Another flash cart by way of RetroHQ is here for us to review. If you remember, we have already reviewed a GameDrive product in the past. That one was for the NeoGeo Pocket Color, you can read about it here. But today we’re covering a flash cart for a handheld that some would argue may be even more obscure to casual players than the NGPC. So let’s dig into this really deep because you might want to actually want to buy it and you should know what you’re getting into.
Description:
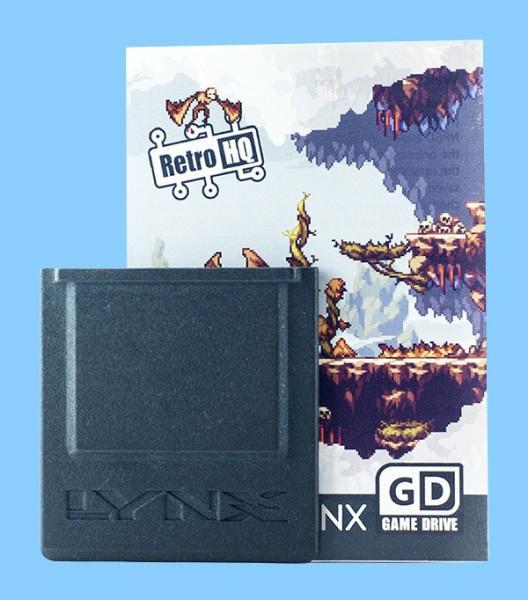
The RetroHQ Lynx GameDrive cartridge allows you to play all your Atari Lynx games and homebrew directly from a memory card. This updated version of the Lynx GameDrive cartridge has support for EEPROM save games as used by some homebrew software as well as improved game load time (no longer than 1 second for the largest games) and an improved game selection menu.
Features:
- All retail games and homebrew supported
- No compatibility issues known
- Atari Lynx Mk1 and Mk2 compatible
- ComLynx Play compatible
- FAT16 or FAT32 memory cards
- EEPROM save game support
- All retail games and homebrew supported
- No compatibility issues known
Unboxing Video:
Pros:
- Build Quality. Let’s just start out with the part that you can see and feel. I feel like some people may not care too much about build quality when it comes to flash carts. Some people buy clones and chuck it into the system, never to touch it again. They may think that that is good enough and they won’t have to worry about it. The problem arises if the console gets tugged and the whole thing goes tumbling and the plastic cracks. Other problems come about when there’s an accidental spill.
.
The team at RetroHQ seems to 3D print every one of the cartridges. This is likely to save them money versus paying for ABS plastic injection molding. Because of the SLS printing, you’ll find the cartridges have a unique feel to them. It almost feels like a smooth rock. I found an explanation online of the feel, “While this is a high-quality 3D printing technique, the cartridge will have a more textured feel compared to injection molded shells.” It’s still tough and I couldn’t get it to bend in my hand even a little.
.
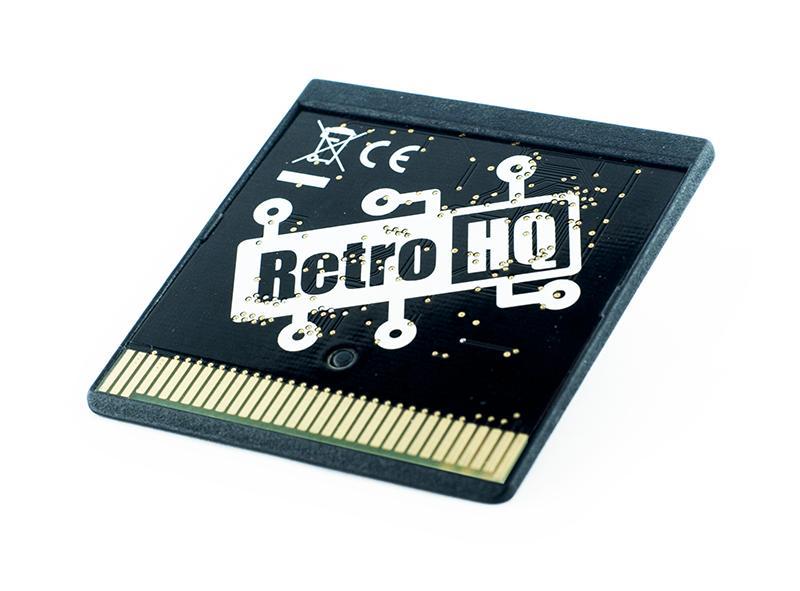
The Atari Lynx GameDrive (referred to as LynxGD from now on) is not something that you can disassemble. It appears to be sealed together as it’s just a single board just inside with no extra add-ons. If you look at the contacts, you’ll easily see that they’re high quality. What they’re made of and plated with usually means that you’ll have great longevity out of them. I think you can rest easy if your mind was headed to eventual corrosion. One last point about the cartridge is that RetroHQ took the time to put the microSD slot on the top. This is fantastic for those who just want to pop the flash cart in and never remove it again. This helps fight against wear and tear on the cartridge contacts as well as the Lynx’s cart slot.
.
Thankfully RetroHQ has made sure that this cart has a simple microSD card slot. There is none of the push it into the slot and pull it out with fingernails. They have installed one that lets you click it into place and click it out to remove it. This is great because not everyone has small fingers with great dexterity, first off. But secondly, and more importantly, it lets the microSD card sit flush with the cartridge. Now we don’t have to worry about it protruding from the top. This is ugly, it can break the microSD off, and/or your microSD could go missing.
.
And for those wondering, of course, I did a physical test. There’s a stigma around 3D-printed commercial products. There is a fear that items that are 3D printed items are structurally weaker. I’m here to tell you that that isn’t true or at least it isn’t true of SLS. There’s no room for gaps and holes, it’s just like a solid piece of plastic sheet. I had my usual (destructive) fun with it. Starting with putting it in my back pocket and sitting on it, it survived.
.
It survived much more than just sitting on it. I also walked barefoot over it, which could accidentally happen in the real world. My house has carpeted stairs leading to my basement; I let it tumble down them. I slid it across the concrete garage floor. And finally, I dropped it from shoulder height. Nothing hurt the LynxGD. But I will say that I exercised caution when sliding it across the garage floor. I didn’t do it with the contact side down, even though I know an accident could happen where the pins may be exposed to abrasive surfaces. So what I’m saying is that it will survive most standard accidents. I’m not going to test it and get crazy with it. It’s obviously not liquid resistant as there is an opening at the top and bottom, be cautious. - Setup. I’m following up with this simply because it’s my favorite part. The simplicity to getting this up and going is unheard of. Setup is incredibly easy and is only a few steps. First, get an appropriate microSD card of your choosing (more on that later). Format it on your computer into FAT16 or FAT32. Once it’s done formatting, simply drag and drop your ROMs to the microSD card. I think having a simple and easy setup is crucial. Having an easy entry point helps even newbies get in on the fun.
.
Now, there is a way to update the firmware. You don’t technically need to do this part. But if you like staying up to date, it may be worth checking once a year for any firmware update. Press the “Option 1” button on your Lynx while powering it on with the Lynx inside. It will give you a QR code and a URL. Use either of them to download the newest firmware, put it on the root of your microSD and then put the microSD card back into the LynxGD. Hold “Option 1” again while booting and let it update. - OS. When you’re in the operating system, there are more features than I thought. I really expected this to be a bare-bones menu. Something that just shows you the games and with simple controls lets you choose one to play. Luckily, it’s a bit more robust than that.
.
Upon loading, it takes you to a screen that is the root of your drive. Depending on how you have this setup, it’s bound to look different than mine. But you’ll see that if you enter a folder, you can press “Option 1” to go back up a folder. Pressing “Option 2” brings up an options screen for the OS. If you press “A” on a game, it will simply load right into the game. (Note, if you come across a game that lets you use “trainers” [cheats], it will give you a button prompt to load it. Pressing up and down on the D-Pad moves through the games and folders. When you press the “B” button it will give you more options on that screen.
.
Pressing the “B” button will now change the features attached to some of the buttons. When pressing “A” on a game will give you details about the game and the file type. Pressing “B” will take you back to the previous options layout. “Option 1” still serves the purpose of taking you back up a folder. “Option 2” still lets you see the options for the OS. Up and down now takes you forward and backward a page through your game/folder lists. If you have any in-game screenshots taken, you can press the “Flip/Reset” button and it will show you screenshots from that game. Additionally, there are packs online that you can download for games and add them on so if you want to see snippets of the game before playing it, you can load them onto the microSD and then load them this way.
.
Finally, going into the OS options lets you tweak a few key things. You can change your color operating system’s color scheme. You can choose between a light mode and a dark mode respectively. It’s not really letting you choose colors, just which look you prefer. The second of five options is the feature to have it automatically capitalize filenames. That’s useful for reading the small text on the small screen, it makes it easier to read, although the letter N is lowercase.
.
The third option in the list lets you choose if you want the long game names to automatically scroll from left to right. This is so that you can read the entire title if need be. Following that option is one that lets you control how fast the text scrolls from left to right. What a novel idea considering some things in the world that scroll do so at blazing fast speeds. You don’t catch the whole headline, title, or sentence when they do that. The last option is one that lets you choose if you want the sounds of the OS on or off (you want it off).

- Compatibility. For this topic, I wanted to cover a few different things. First off, the compatibility with software. We’re told by the marketing of this cartridge that it can run all retail games and homebrew. I think it would be hard for them to stake the claim that all homebrew works since it’s not possible to test every piece of homebrew. However, the ones that I tested worked. I just did a spot check of sorts and couldn’t find any that wouldn’t work. The same holds true with dumps of retail Lynx games and they load fast. I couldn’t tell how long exactly, but generally less than a second. The cartridge itself supports .LNX, .LYX and .O file types. Games can be up to 512KB in size, which as far as I can tell is all of them.
.
You’ll also be happy to know that the cartridge supports save files. This is with a caveat, of course. There are no save states and that may seem jarring. But the way it works is that this cartridge effectively replaces the original game cartridge. So if the retail version of the game that you’re playing features a save function, then so will this. The inverse is also true, if you don’t have save functionality built into a game, then this cannot add it in. It will support the EEPROM save functions in all games programmed to use it. For homebrew games, the same holds true. If you’d like, you can backup your saves to your PC or swap them between your trusty Lynx emulator and the LynxGD (and vise versa).

Cons:
- MicroSD. Now we can talk about some small issues. And it starts with microSD cards. I tried all of my inexpensive microSD cards from the chain Micro Center, but none of them worked, regardless of size. I definitely formatted them in both FAT and FAT32 to no avail. They recognize in the LynxGD, but it just stays on the initial “Reading Directory…” screen. The leaflet manual says that the LynxGD is compatible with all memory cards up to 32GB in size. This simply isn’t true and I ran into the same issue with the NGPC originally, being told that everything should work and my Micro Center cards not working. I’m certainly not complaining about needing to find a different card, there are plenty of brands available. I’m more so complaining that the wording should be changed to reflect the truth. “LynxGD supports most microSD cards 32GB in size and under formatted as FAT or FAT32”.
- Trainers. I never use these for games in general. I didn’t particularly use cheats growing up so I don’t have a nostalgia for them either. But I could see that the necessity could be there for certain games. However, the games that I cherry-picked to test the LynxGD didn’t show the option to use the trainers. I looked online and could only find a finite list of games as it appears that they have to be updated by RetroHQ themselves. That means right now, there are twenty or less games that I’m aware out of three hundred (counting revisions and international releases).
.
I really think that this should be left to the community. This could be done in a few different ways. I would think the most difficult method would be to adopt a method of entering in codes. But maybe the easier way is to code a simple PC program to let us patch the ROMs ourselves and start a forum in which we can share cheats that we can download and patch. I think it’d make the community larger and more connected anyhow. This would also save RetroHQ headaches versus having to find and implement cheats per game. Especially if they hit a wall and just stop adding trainers. Because sifting through ~three hundred games is a daunting task..
Final Thoughts:
Come on guys, the pros definitely outweigh the cons on this one! Better yet, the price is definitely right. If you get it from Atari Age for $114, the price is lower than Stone Age Gamers at $130. But with Stone Age Gamer you get an official clamshell box with a cover, a manual book, and stickers. So you have options between these U.S. sellers. Best of all, the features are great, the ROMs boot fast, and the cart looks like it’s a natural cartridge just hanging out in your Lynx!
.
There is one last point I wanted to mention to you. I only have an Atari Lynx 2 to test this on (unfortunately). RetroHQ stated that this is also working on the first model too, but I couldn’t test that. The instructional leaflet also says that the LynxGD supports linking 2 Lynx devices together and playing games that way using compatible games. It stands to reason that RetroHQ is telling the truth, but if you have your doubts, research a bit more before buying.
.
Purchase Lynx Links:
.
International Sellers:
Retro Gamer Stuff, UK
Retro Towers, UK
DragonBox, Germany
Retro Saga, Canada