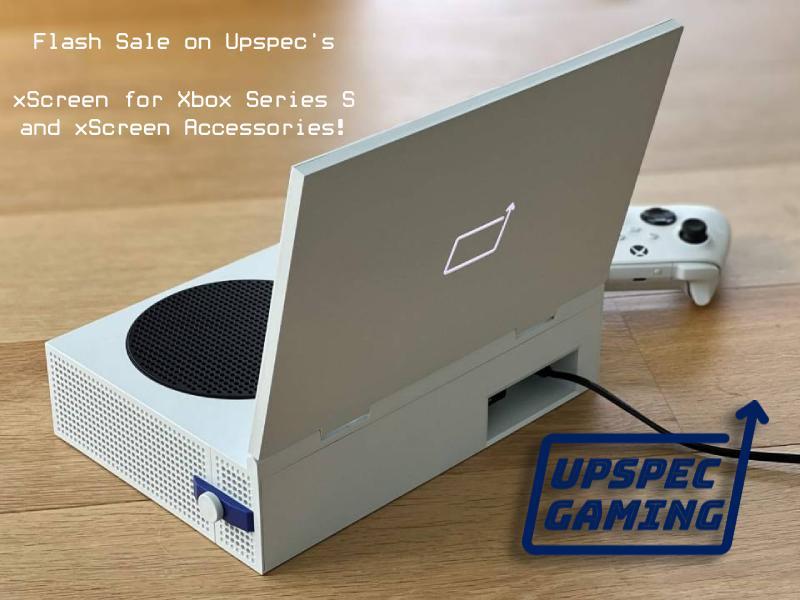
What a time to be alive, man. UpSpec Gaming has introduced a collapsible screen for attaching to your Xbox Series S, making your home console a portable experience! Best of all, there is a sale happening right now (check the links at the bottom to see if it’s still happening). You get $50 off the screen and up to 50% off the accessories. The xScreen is here and I have many thoughts on it. Let’s go!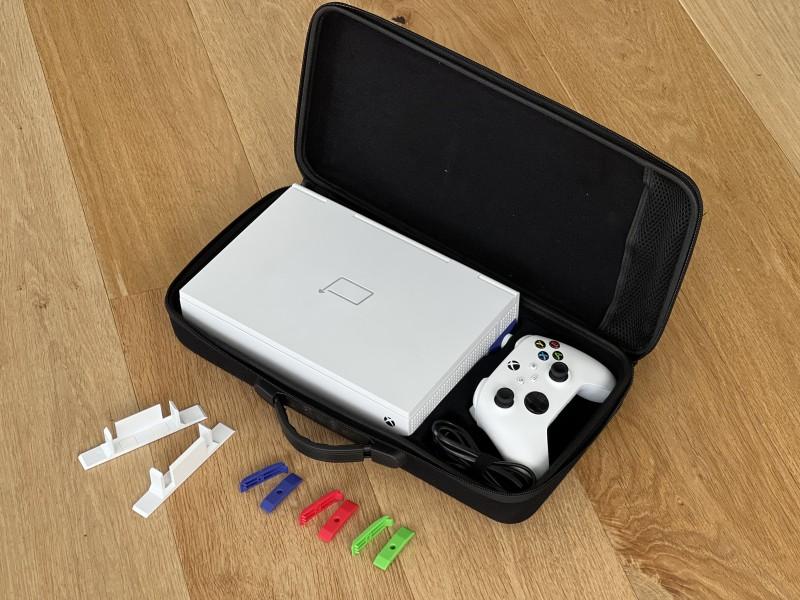
xScreen Description:
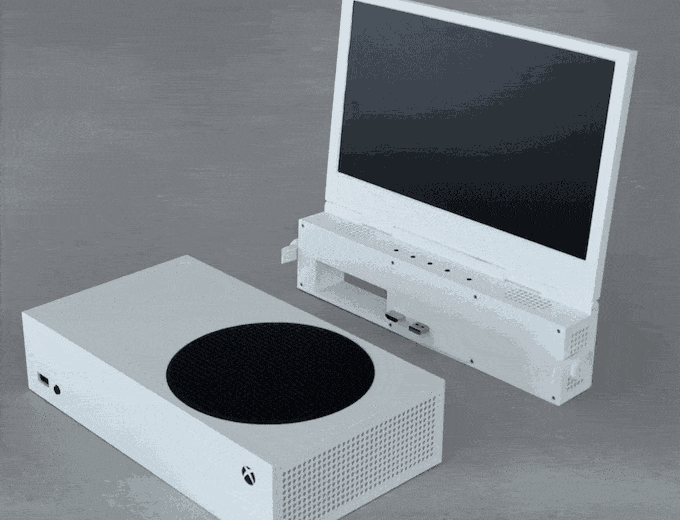
The power and performance of the Xbox Series S can now be taken anywhere. xScreen is a fully integrated folding screen that seamlessly attaches onto the Xbox Series S. This transforms your device into a laptop form factor that can be easily transported and used anywhere there is a power outlet. xScreen perfectly complements the stunning aesthetic of the Xbox Series S to create a single cohesive unit.
xScreen Features:
- 11.6″ IPS screen which is the largest screen size available to fit within the Xbox Series S footprint
- 1080p 60hz resolution, a perfect match for how most games are optimised for the Xbox Series S
- Integrated stereo speakers
- Built-in controls for screen settings and volume
- Cable-free attachment solution – only original Xbox power cable required
- Optional cross-hair overlay for use in FPS games
- HDMI-CEC Xbox power off function on screen close to prevent overheating
- Ability to swap colored latches (optional accessory)
- Optional “stand-mode” orientation using stand feet (optional accessory)
- Custom carry case enables transport of everything you need in the smallest possible form factor (optional accessory)
xScreen & Accessories Unboxing Video:
xScreen/Accessories Pros:
- Build Quality. Usually when I discuss build quality in a product, I mean “here’s what it’s made of and how durable is that”. Today we have a screen to review, so I really, really don’t want to find out how breakable it might be. But we can still discuss what it’s made of and if I feel if it’s flimsy or not.
.
First of all, the screen feels just like a standard monitor with a matte finish. I’m not certain of what they’re comprised of, but presumably a panel of plexiglass. Around the screen itself is a plastic bezel, about an inch wide each direction. Below that you’ll find the hinge to the xScreen. I feel as though this hinge does not get enough love when you’re looking online for information about the xScreen. The hinge is perfectly engineered so that it has the correct amount of resistance for opening and closing. It also is strong enough to stay at the exact angle that you opened it to. The 3DS is significantly smaller and couldn’t have done this, it required hinges with predetermined holding points.
.
Below the screen are the speakers on the left and right. They appear to be stereo and do indeed sound that way. I’ll have more on the sound of the xScreen later on. In between the speakers are five dedicated function buttons to help you improve your xScreen experience. We’ll also go into their purpose soon enough. But I want to discuss quickly how they’re built. Each button is completely flush with the surface of the plastic. They’re about an inch apart, so you don’t accidentally press two at the same time. Since they’re small in diameter and flush, they’re a bit hard to press accurately each time. They’re still functional buttons covering tact switches, but practice makes perfect.
.
Around the backside of the xScreen you’ll find two plugs to connect the console. We’ll be talking about the setup soon, but we can still discuss the HDMI and USB plugs. They’re both exactly the correct amount of protrusion from the xScreen to connect to the Series S. It may feel like a snug fit, but even the distance between the two plugs is incredibly accurate. I was fearful that I was going to scratch the back of my console when trying to get the plugs inserted. The xScreen does block off the ethernet and extra plugs. Here’s to hoping that they create a passthrough on the back for at least the USB ports. Because then people can connect an external USB HDD and it not look ugly coming from the front.
.
The plastic that houses the screen, speakers, and buttons is made to look and feel just like the Xbox Series S white model. The color is almost identical and unless you’re right up on it would never notice otherwise. Its texture is close, but not identical. The same school of thought applies, unless you are feeling really intently and looking for a difference in the texture, you’re not going to find it. - Price. I’d say that this part is going to be up for debate. There are those online that think that the xScreen is priced too high. Others think that the sale price is the perfect sweet spot for the product. Typically if you buy lots of a product at its full value, it can eventually bring the cost down. This is because manufacturing costs will become lesser due to a higher demand. Since the company can then buy their product in bulk instead of as needed, they can get better prices to pass onto the consumer. I recommend that loads of you buy this on sale due to this fact. But nevertheless, I thought I would take the time to compare this to the PSOne’s screen from 2001 and see how it stacks up.
.
I had to search high and low for the cost of the PSOne LCD screen. I found plenty of the LCD and PSOne combo packaging, which seemed to be what Sony was pushing hard. This was because it was still cheaper than the already released PS2. But since it was more affordable and there were hundreds of games already released for the PS1, Sony thought they should have the money of those who thought the PS2 was too expensive or not enough to play. They were pushing a compact system complete with a screen and that was the modern-day equivalent of $230. The PSOne LCD screen on its own is the modern-day equivalent of $198. Which is basically the sale cost of the xScreen, but the xScreen has more features. So for those who take issue with the cost of the xScreen, if you bought the PSOne LCD back in the day, this is no different and you can rest easy. - Design. As previously mentioned, the color essentially matches the Xbox Series S. I would go so far as to say that this is as close to the correct color as a company could get without being an officially licensed product. The same goes with the texture, it’s largely the same and likely as close as their manufacturer could get it. I was really enthralled by the engraved xScreen logo! I love how it’s engraved to the same depth as the Xbox logo on the XSS. That gives it the same amount of shadow cast just inside of the letters. It makes the whole package have a uniform look and feel. It makes you happy without looking like you bought some cheap third-party monitor that doesn’t really match. I’m looking directly at you Intec Screens!
.
I would say that the only improvement that I would love to see is a tiny little thumb indentation. If they could put it on the top center so I can open the lid easier. I’m not complaining about the product, mind you. It simply cannot open as easily as a laptop. Laptops have rounded edges so you can easily grab anywhere on the lid/screen and lift it up. I don’t need it to be rounded across the edge. That would break the look of the square, boxy Xbox. No, if they could just make a small thumb grove on the top center, it could improve the liftability.Finally, they designed the setup to have an opening for you to plug your power cord and Storage Expansion into. This space is fine for most hands, though I question if it would be comfortable or even feasible for gamers with large hands. - Audio. I promised that we would come back to the audio and I meant it. These speakers are loud as hell! I had it at a maximum of four out of 100 and it was already louder than my phone at its maximum volume. The buttons on the xScreen are very sensitive too, so you have to touch it lightly in order to get it to change just one number at a time. If this is an issue, you can always connect a headset to the console via bluetooth or wired to your controller. Then you’ll have a more intimate experience so that you don’t irritate others in public. However, it works really well to have the feet and loud audio together for playing with lots of friends. More on the feet later.
.
An afterthought that I had is other use cases. For instance, you could also treat yourself to this as a “boom box” if you wanted to. Between audio streaming apps and playing music directly from a USB drive, these speakers can definitely put out some big sound. The bass may be lacking at high volumes though. But if you’re looking for a break in between gaming at the party, feel free to use the wifi and stream some tunes for all to hear! The audio is clear enough and doesn’t rattle at high volumes. I even ran the YouTube video that puts speakers to their limits and this could handle it. Again, not heavy in bass or high-frequency squeals (so dubstep is out), but definitely great for music with mids! - Video. So I’m just going to come out and say it. I prefer playing the Xbox Series S via the xScreen to that of my 60″ 4K HDR tv. It’s the perfect size and it is crystal clear at 1080p capping at 60 frames per second. This is how we all want our Switch to look (well if we ever get a Switch Pro). I love how bright the screen can be at even the minimum, which is great because I can play in bed and not disturb my partner. And if you need to, you can definitely crank the brightness up much, much higher. I’m not certain about the sustainability of having it terribly bright for long periods though. For those wondering, there’s no screen tearing, no light bleed, and the viewing angles are fantastic. So if there are a few people huddled around, everyone can see from each direction.
.
My favorite was to put this is the case and just take it around to different rooms in the house. There’s no setting up to the back of a TV all awkwardly and then figuring out inputs and resolution options. A modern console should be easy to set up and this just solves everything for you. Sure you set the initial 1080p setting but everything else is optional so you’re not spending more than 15 seconds setting this screen up to look perfect on your XSS. Once I was plugged in and set up (in any given room in the house), I had my volume and screen settings permanently perfect, this screen immersed me in my games.
.
You know how previously I mentioned that this thing could be a boom box of sorts? This can also be an on the go media player. If you’re connected to wifi, you can stream Netflix, Hulu, Disney+, Discovery+, AppleTV+, etc. or load movies/shows from USB. This could be a kid entertainment box in the backseat of your car if you have a proper power method. I found that my 8BitDo Xbox Media Remote fits perfectly into the carrying cases’s velcro sleeve. So you could definitely take this so many places and do so many more things besides playing games!

- Setup. Now we can talk about just simple it is to combine the XSS and the xScreen. If you haven’t watched my unboxing video already, I recommend doing so if you need visual steps. You’ll see just how easy it is to do so.
.
First off, you need to remove your xScreen from the extremely sturdy packaging. You’ll likely only do this once and leave your Series S connected to the xScreen most of the time. I recommend keeping the original packing just in case you need to store it. After removing it, gently peel away the clear protective cover off of the screen. You’ll notice a warning of not over-tightening the thumbscrews during installation. Because that is the next major step. I recommend completely removing the latches and thumbscrews entirely before proceeding.
.
Place your Xbox Series S in a way that is comfortable for your handedness as you will now be lining up the xScreen’s HDMI and USB plugs to the ports on the back of your console. Apply firm but gentle pressure on the backside of the xScreen to get your HDMI and USB plugs to go in just enough to hold it in place. Now put your left and right hands on the back corners respectively. Push it in with equal pressure at the same time so that you plug it in without putting all of the pressure on the plugs.
.
Once it is fully seated into the XSS, you can now reintroduce the latches that you removed. If you purchased any other color of latches, now would be the time to install them. You’ll reinsert it the same way it originally was before you removed them. The end that sticks into the Xbox has three little nubs that sit nicely into three little holes. I’m sure this whole setup could function without the latches if you find them ugly, but I wouldn’t recommend it. If any part of this shimmies out of place, who knows what trouble you could get yourself in. All in all, this whole setup took me maybe less than two minutes. It’s easy to undo if you only use the screen for sparse family trips or something. I’m leaving mine attached for life. - Dedicated Buttons. Now we can talk more about the buttons on the xScreen. We’ve already touched on how it takes practice to use them without overusing them. Howver, I want to discuss what they all do and how they function.
.
First off, they all appear on screen via an OSD or an on screen display. So if you press any of the buttons, they will show you a representation of what your changing or options that you have to change. Secondly, some of the buttons double as other functions when you’re viewing the OSD. So bear with me as I explain how it all works.
.
When you power on the Xbox Series S, the xScreen will respond if you press the dedicated buttons. We’re going to discuss these buttons from right to left. The far right is the power button, this is useful to have if you’re not setting up the HDMI-CEC functionality in the Xbox. This lets you power on and off the device accordingly. To the right of that is the button for enabling and disabling an on screen crosshair icon (reticle). We’ll discuss more about that later. Not that this button also doubles as the “return” button for searching through OSD menus.
.
Next up is the volume button, press it once to enable the on screen volume display. This button also doubles as the “up” button for changing options. So press it once to enable the volume, press it again to turn the volume up. The next button, second to last, is the brightness button. If you press it just once, it brings up the brightness bar to adjust. This buttons will also double as the “down” button when searching through OSD menus. Press the button once to bring up brightness and you can press it a second time to turn down the brightness. This button can turn down the volume and the volume button can turn up the brightness.
.
Finally, the leftmost button is the menu setup for the whole xScreen. You can adjust all kinds of options in here including the volume and brightness. We’ll work through these from top to bottom now.- Picture Adjust-Here you can adjust contrast, brightness, ECOMode, and Blue Light.
- Color Adjust-This menu lets you adjust your display mode, color temperature, as well as red, green, and blue.
- Setup Menu-Here you can adjust the location of the OSD, how long until the OSD times out, as well as how transparent the background of the OSD is. Here you’re also able to turn on and off the power LED of the xScreen.
- Memory Recall-This is just a function to reset all of the xScreen settings back to factory default. I feel as though they should change the name of it. It’s more universal to call it a reset button.
- Miscellaneous-Here is where you can also adjust the volume, but you can also simply choose to mute it here as well.
- Information-This breaks down the information about your specific xScreen. My guess is that a lot of xScreens will have the same information. It talks about the current resolution running, the H frequency, the V frequency, the pixel clock (in terms of Mhz), the model number of your xScreen, and the input source.
- Ease of Use. Now that you have it all set up, we need to discuss how easy it is to use this thing when you follow UpSpec Gaming’s recommended settings. If you put it into power saving mode and set up the HDMI-CEC functionality to let the screen control the device, you’re better off than using the default settings. This way the xScreen can put the Xbox to sleep whenever you close it (remember that fantastic hinge that I mentioned before?). It doesn’t power the system on automatically though, I feel like Microsoft needs to let HDMI-CEC functionality include turning on your Xbox as well.
.
Anyway, should you choose to forego the automatic lid, you can still have an easy time with the xScreen. You can still easily power off your device the way you always would and then power off the screen with the dedicated power button. I recommend that if this is what you choose to do, leave the power LED of your xScreen enabled. It likely isn’t using extra power anyway. You’ll open up your xScreen and press your Xbox button and you’re off to the races. When you’re done, press the Xbox button, choose to power off and give the xScreen power button a single press. - Feet. Hey, we can finally get onto talking about the accessories! First up, we’re going to talk about the feet for the Xbox Series S. I think that these should not only be advertised in use with the xScreen, but also a regular Xbox Series S connected to a TV. They can hold it up off the surface of your entertainment system and let the console breathe even more. But enough about that, if you watched my video, you likely noticed how excited I was about these feet. I was at first confused about how they attached and their purpose. But soon, I saw the picture (featured below) that shows exactly how they attach and their purpose.
.
The idea behind the feet is to raise the display for either taller people to play more comfortably or have more people sit around the xScreen and play split screen. This is a crafty idea all things considered. The feet themselves are manufactured with the same color and feel as the xScreen. They’re quite strong too. I put them in my back pocket and sat on them (as if I was transporting them haphazardly) and nothing happened to them. I think they’re plenty sturdy for their use case. All in all, I’m an average height person, but I did play a TV show for my friends and me to watch while we were outside hanging out and it was perfect.
.
There’s not much more that can be said about these. I think they’re a great addition to a setup that travels a lot because it can help in the previously mentioned scenarios. If you’re just playing at home by yourself and you’re average height or shorter, these aren’t necessarily needed. And for those wondering, yes, the screen stands up and stays up (remember that amazing hinge?!). - Latches. The latches come in an array of colors. They come in white, which comes with the console. They also are available in red, green, and blue. Now if you watched my video up top, you’ll notice that the camera doesn’t show them as blue. I also said out loud that to my eyes they do not appear as blue either. It’s closer to an indigo or the classic Gamecube color. This isn’t necessarily bad, but for those who like blue, it may not cut the mustard. Blue could be that of the sky, very light. It could also be down the middle or even a dark navy blue. However, this color looks like it has some red in it, giving off a purplish hue. If they sold it as purple, people would still buy it. I don’t mind too much as blue is not my favorite color.
.
Finally, I want to bring up that I would love to see the feet they sold have color options as well. Just having an accent of color to keep the xScreen in place looks great. But if I’m being honest, it isn’t enough extra color for me. I really love the color red and I would love to get my hands on some red feet too (without having to paint them). I would think that this is the next natural step for them, make feet that match the other colors of latches. Only time will tell. Anyway, the latches work great and do the job the way they’re supposed to. - Case. I saved the best accessory for last, the carrying case. When I first took it out, I thought it was a way to transport the screen and accessories to someone else’s house to use on their Xbox Series S or something. But it turns out I was wrong in the best possible way. The case allows you to transport your XSS with the xScreen fully installed complete with accessories. There is a velcro pocket, as previously mentioned. In here they recommend that you put the feet but I also included my extra latches and they all fit. Next to the Xbox is a secondary portion. This portion comes with two velcro cable ties.
.
The cable ties, according to the official images, are for the power cord and an extra USB cable. The controller also has a dedicated formed part of this partition for keeping it from moving. So, I recommend that you place the controller in first, then the power cord, and then the USB cable. It helps everything fit correctly, looks neat, and nothing moves at all in the case! It takes all of two minutes to wrangle your setup.
.
Intelligently, UpSpec Gaming took great care with the outside of the case. I’m not talking about the cute UpSpec Gaming logo on the top. I’m actually talking about the strength and resistance the outside case has. On the very top of the case is the handle for easy carrying. This is a rubber handle that is very thick and sturdy. It’s connected very well on both ends so that it won’t come free while in movement. I’m not afraid to carry this around with the full weight of the contents!
.
The other thoughtfulness comes by way of the zipper. The entire case can be unzipped and opens like a book, which is grand. And better yet, when you zip it up the zipper seals tightly. It has a liquid-resistant flap when you close the zipper. It almost appears like the zipper is inside out or something, but looks don’t matter, only functionality.
.
The only downside that I found about this is how snug the spot for the Xbox to set is. The case has rounded corners, but the Xbox itself has very sharp corners. The fit is snug, because it has to be to keep the device safe. The takeaway here is that you must put your Xbox in very exactly straight down and in. There is no real wiggle room (literal or metaphorical) to adjust after it’s in. So if you get caught on a corner upon trying to put it in, the easiest thing to do is lift the Xbox back up and try again. You don’t want to hurt the corners of the slot with the Xbox. Damaging the corners could reduce the structural integrity, thus allowing the Xbox to slide around more than designed.
.
When it’s all said and done, I love this case. There is only one addition that I wish that UpSpec Gaming would give it. Put a strong loop on the top two corners and give us a strap. I would love to be able to carry my setup like a messenger bag or a sling bag. The contents aren’t terribly heavy, but if you take this to a convention or an expo and keep it handy, you’re going to have to switch hands a lot holding it while standing.

Final Thoughts:
The xScreen and accessories are nothing short of brilliance. There may be some minor oddities to them, but as a whole, the set only makes sense. Especially in a day and age where people are starting to go back out and see each other again. Why not bring your Xbox Series S in your UpSpec Gaming case, complete with the screen and custom-colored latches, and set up some gameplay with your friends? If you do that a lot and have a lot of friends I could even see the feet being a necessary purchase for you.
As I said previously, I’m leaving this screen connected to my Xbox Series S for life. I intend on having my Xbox Series X connected to my 4K TV since it deserves a giant cinematic experience. But I digress! If you’re interested in this, I recommend that you get one now while they’re still on sale! If you happen to miss the sale, it’s still worth every penny!