If you read the title, don’t worry, you weren’t being clickbaited here! There is finally a more conventional way of getting a 3DS/2DS modded with a custom firmware now instead of a flashcart. Yes, that method still and will always work. But this method doesn’t require that you buy a $20 cart from a foreign country and then wait a month to get it. However, if you have a bricked system or one that can’t go online or you don’t have wifi in your home, you’ll still need to use the old tried and true flashcart method. I repeat if you can’t go online with your device or it’s bricked, this article isn’t for you. Instead, read our flashcart tutorial or watch my video, either will help you out. A small warning though is that this is cheap at $2, but will take a couple hours of work from you and even more from your PC. I know it can appear daunting, but it only has a lot of steps because I noobed the heck out of it!

PART 1-Files to Download:
- Python. Install it after downloading. If you already have it, skip this.
- Seedminer program for PC. Get the newest release available at the time of you doing this tutorial. Extract its contents to a folder on the desktop.
- Seedminer files. Extract them to the desktop.
- Starter Pack for 3DS. Extract this to the desktop.
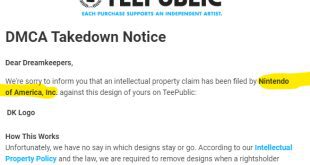
PART 2-Before Starting, Stop Nintendo Ban:
- Before doing anything, we need to keep you from potentially getting banned. Go to the Settings App.
- Tap Internet Settings, then Spot Pass, open Automatic Software Download, choose No. Press OK. Then press Sending of System Information and also choose No.
- Go back to the 3DS home screen and open the Friend List app.
- Press the Settings option, then Friend Notification Settings, turn off Show Friends What You’re Playing.
- Before leaving, get your own Friend Code written down. This will be needed later for the modding.

PART 3A-Beginning Instructions (Self Brute Forcing Method [only choose this if you have a decent GPU]):
- On your 3DS, go to the eShop and buy any compatible DSiWare game from this list.
- Once it’s downloaded, go to the Settings app, then choose Data Management.
- Now, tap on the DSiware option. Now, you should see the game you just bought first.
- Tap that game and choose the Copy option and it will copy the game to the SD card. Tell it OK to move on.
- Power off the device and remove the SD card. Put said SD card into your PC.
- Navigate to your device’s SD card. Inside the Nintendo 3DS folder is a folder with a long alpha-numerical name (it’s your ID0 code). Copy that folder name. See picture 1 above.
- Now, make a text file with your ID0 code in it. It should just be the 32 digits with no dashes, spaces, or special characters of any sort.
- On the next line of the text file, add your Friend code from earlier. It should also not have any dashes or anything in it.
- Save the text file where you can keep it handy for when we need those numbers.
- Now, on your 3DS SD card, go into your ID0 Code folder, then the next folder with a long name, and then the DSiware folder. Inside of that will be a folder with your game in it. It will be the most recent folder.
- Inside will be a .bin file, cut and paste it to the desktop.
- Now, open this link in a new tab.
- Enter your Friend Code into the Friend Code field and then the ID0 Code into the ID0 field. Now press Go.
- You will be given a Friend Code to add to your Friends List on your 3DS. So now, turn on your 3DS and add the Friend Code to that Friend List app. You can leave the SD card in the PC.
- Back on the computer, go back to that site where you got the Friend Code.
- Download the movable_part1.sed and save it to the Seedminer folder in the Seedminer program that you extracted to the desktop earlier.
- Now, hold Shift and Right Click in the Seedminer folder and choose Open Command Window Here.
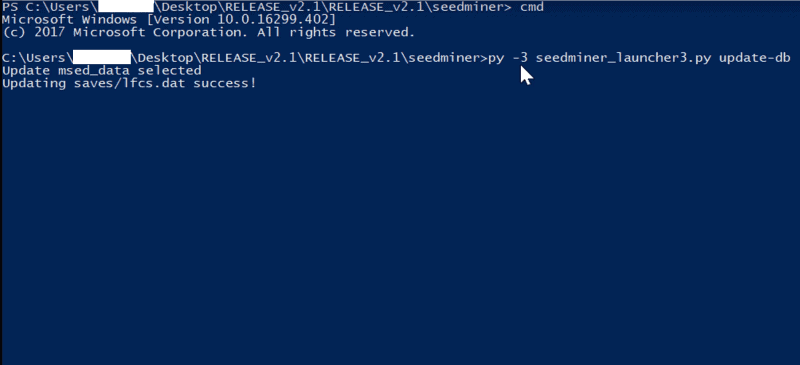
- Type in this command without quotes “py -3 seedminder_launcher3.py update-db”. Let it run when it’s done it will say Successful.
- After that, type this command “py -3 seedminder_launcher3.py id0” followed up with your ID0 code. Look at picture 2 below if necessary.
- You should get a statement stating that there are No Hashes added. This is normal, so now add this one last command “py -3 seedminder_launcher3.py id0 gpu”.
- This is the command to brute force the .sed file with the ID0 code. It shouldn’t take you too long, but if it does, don’t worry. Just let it run until it says Press Any Key to Continue.
- Exit the Command Prompt. You can now move the .sed file from the Seedminer folder to the desktop. Now continue to Part 4.

PART 3B-Beginning Instructions (Someone Else Brute Forcing Method[choose this if your GPU is not decent]):
- On your 3DS, go to the eShop and buy any compatible DSiWare game from this list.
- Once it’s downloaded, go to the Settings app, then choose Data Management.
- Now, tap on the DSiware option. Now, you should see the game you just bought first.
- Tap that game and choose the Copy option and it will copy the game to the SD card. Tell it OK to move on.
- Power off the device and remove the SD card. Put said SD card into your PC.
- Navigate to your device’s SD card. Inside the Nintendo 3DS folder is a folder with a long alpha-numerical name (it’s your ID0 code). Copy that folder name. See picture 1 further up.
- Now, make a text file with your ID0 code in it. It should just be the 32 digits with no dashes, spaces, or special characters of any sort.
- On the next line of the text file, add your Friend code from earlier. It should also not have any dashes or anything in it.
- Save the text file where you can keep it handy for when we need those numbers.
- Now, on your 3DS SD card, go into your ID0 Code folder, then the next folder with a long name, and then the DSiware folder. Inside of that will be a folder with your game in it. It will be the most recent folder.
- Inside will be a .bin file, cut and paste it to the desktop.
- Now, open this link in a new tab.
- Enter your Friend Code into the Friend Code field and then the ID0 Code into the ID0 field. Now press Go.
- You will be given a Friend Code to add to your Friends List on your 3DS. So now, turn on your 3DS and add the Friend Code to that Friend List app. You can leave the SD card in the PC.
- Back on the computer, go back to that site where you got the Friend Code.
- Click Continue to have another person do the brute forcing for you. Now just wait, you can leave the tab open and do other stuff, it’s not happening on your PC, so anything you do will not affect the brute force. They mention that it can take up to an hour, but is 30 minutes on average.
- When it’s complete you will have a Download movable.sed option, choose it and save it to your desktop.
PART 4-Middle Instructions:
- Go to the Seedminer folder for 3DS. Copy the .bin file in it to the desktop. Then, go into the folder for your region and copy the 2 files inside that folder onto the desktop as well.
- Open this in a new tab. On the right side of the screen, it is asking you for all 5 files that you should have on your desktop. The .bin from the game, the .sed we brute forced, and the 3 files you just took out of the Seedminer folder.
- Browse for all of them 1 by 1 and after they’re all chosen, press Start.
- Now it will prompt you to save a new .bin file that has been patched. Save it to the desktop.
- You now need to rename the newly downloaded file to not have the word Patched in it.
- Now, on your 3DS SD card, go into your ID0 Code folder, then the next folder with a long name, and then the DSiware folder. Inside of that will be a folder with your game in it. It will be the most recent folder.
- It should be empty if you followed my instructions, if not, overwrite the old .bin file with the new one you just renamed.
- Open the Starter Pack folder you have on your desktop. Copy the contents of the “Copy to SD Card” to the 3DS SD card’s root.
- Now in the Firmwares folder, choose either one that matches your system. The only part that you need to worry about, no matter your firmware, is if it says OLD or NEW. If your system has the world New in the title (New Nintendo 3DS), choose the new one. If it doesn’t have anything in the title, choose OLD. Copy this file to the Boot9Strap folder that is now on your 3DS SD card.
- Insert the SD Card and go into the Settings app, choose Data Management, then DSiware. On the bottom screen, tap on the SD card option. If done right, you will see your game.
- Tap on the game, then choose to copy it to the device. Tell it that it’s okay to overwrite the previous game.
- Go start the game from the Home Screen. If everything was done right on the PC, your game at some point will load the exploit. Just start playing the game until it crashes into the exploit. Every game is technically different and will depend on which one you’ve chosen. But if you see no results after 5 minutes, you probably failed somewhere along the way and need to start again. This should be easy since you still have all 5 files from earlier already on your PC.
- If it works, you’re now on the Boot9Strap screen. So go down and choose to Dump F0F1. Once it’s complete, it will say that it’s done.
- Now, go up a few options to Install Boot9Strap. It will give you a warning, just press the button combo of Start and Select to continue on.
- It will do it’s thing and will tell you once it’s done. ONLY once it says it’s done should you turn off the console. To do that, hold the power button down to forcibly power it off.
- Power the device back on and you should be greeted with the Luma configuration screen. If you’re not, don’t freak out, you may have still gotten the CFW installed. Skip onto step 18 to find out how to know.
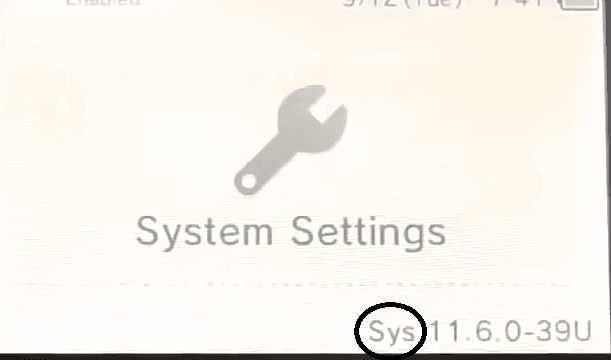
- If you’re on the Luma config screen, choose the Show NAND or User String in System Settings option. Now press Start to reboot the 3DS, if it prompts you to press Power Off, do so.
- Now on your device, go to the Settings app and look at the top screen in it. If you see “Sys” in front of your firmware, you’ve done it! You’re on a CFW, if not, go back to Step 12 and retry.
PART 5-Final Instructions:
- If you’ve come this far, just know that you’re almost done, we just need to get the Homebrew Launcher going for some things. So, on the home screen, choose the Download Play app.
- Once it’s loaded, press this combination: Down on the D-Pad, Left Trigger, and Start. You will now be on the Rosalina menu.
- The 5th option down is Miscellaneous options, press it. Then press Switch the .hb title to the current app. After that, press the B button to back out. Keep pressing it until the Rosalina menu goes away.
- Now, close the app completely. Then, after it’s closed, open it again.
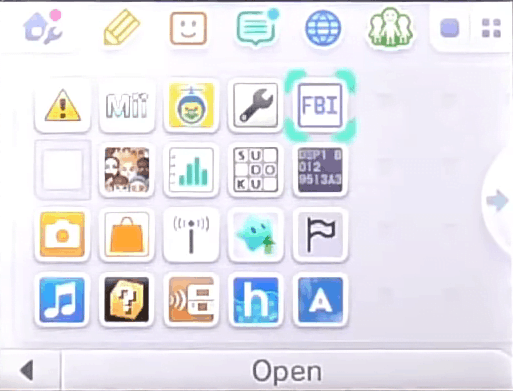
- You will now be on the Homebrew Launcher. Go down to FBI and load it.
- Once FBI is open, go to the SD option, first in the list, now press A.
- Go into the CIAs folder now and once you see the list of apps to install, simply press A, then choose Install and Delete all CIAS.
- Once it’s done, exit out to the 3DS home screen.
- Unwrap all of your newly installed apps. Run the DSP1 app. It will automatically do its thing.
- When it’s done, it will have an option for you to press B to delete the app and exit to the main menu. Do this as we no longer need the DSP1 app.
- At this time, open up the Luma Updater app to check to see if there is a Luma update available. If there is, install it. If not, press Start to exit to the home screen.
- Power off the device. Once the device is off, press this button combination: Start and Power.
- You should now be on DevMode9 and not the 3DS home screen, if you’re on the home screen, go back to number 12.
- Press the Home button and choose the Scripts option. Now choose the second to last option called setup_ctrnand_luma3ds. Then press A on the following screens.
- You will get to a button combination screen, do what it asks of you.
- When it’s done press A to confirm and then press A to relock permissions.
- Press the Home button and choose the Scripts option again. Now choose Backup Sysnand. Press A to confirm and let it do its thing.
- Press the Home button and choose the Scripts option one last time. Choose cleanup_sd_card and press A to confirm.
- Now press start to reboot the system.
- CONGRATS! That’s all you have to do and if you ever want to update your system, you can, you will never lose your custom firmware!
Stay tuned here on Hackinformer.com for more reviews and follow us on Twitter @Hackinformer
If you like the author’s work, follow him on Twitter @V1RACY and remember to enter the weekly giveaways!