
READ EVERYTHING 3 TIMES BEFORE YOU PROCEED TO USE ANY OF THE INFORMATION!
The Wii U is starting to catch up with the progress of the 3DS scene with a few exceptions in mind. Before we begin, its important to understand the safety procedures and limitations.
This tutorial is designed to take a stock Wii U and make it into a CFW enabled Wii U with region-free enabled by default. You can choose to use the redNAND CFW or sysNAND CFW setup.
- redNAND CFW will give you more protection if you install bad titles or mess up system files.
- sysNAND CFW will not give you that benefit but does not require a big SD Card like redNAND CFW.
With Nintendo releasing FW 11.3 for the 3DS there is a strong possibility an update for the Wii U is coming. I recommend using the redNAND CFW option

REQUIREMENTS:
- Wii U system on version 5.5.1
- sysNAND CFW setup, SD Card (8GB for Black Wii U/8GB for White Wii U)
- redNAND CFW setup, SD Card (64GB for Black Wii U/16GB for White Wii U)
- 1 USB Device for Wii U storage (2 USB devices are recommended)
- Internet Access
- Nintendo Network Account
- Funds to purchase DSiware Game
- Patience

Homebrew Launcher Preparation
- Place the SD Card into the computer, backup any existing files, freshly format the SD Card and restore your existing files on it.
- Download the Homebrew Launcher and unzip it.
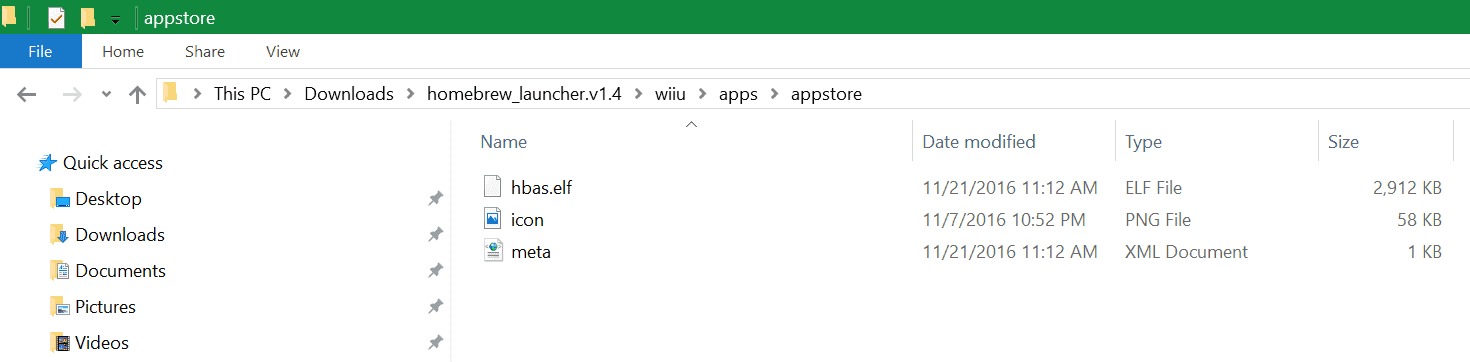
- Download the Homebrew App Store and unzip it. You want the folder that contains hba.elf, meta and icon files and place it in the Homebrew Launcher’s “apps” folder.

- Place the contents of the Homebrew Launcher folder into the root of the SD Card. A “wiiu” folder should only be present in the root of the SD Card.
- Place the SD Card back into the Wii U system.
- Connect your USB device to the Wii U system. If your using a portable HDD, you may need to purchase a Y cable to provide data and power supply.
- Turn on the Wii U and format the USB device when prompted to-do so.
- Navigate to the System Settings and setup an internet connection, then update to version 5.5.1 if you haven’t already.
- Navigate to the Power Settings of System Settings and disable all the settings here.
- Navigate to the Internet Browser and go to this URL, www.loadiine.ovh
- Make sure Select your program is set to “Homebrew Launcher 1.4 (5.50-5.5.1)” and click submit.
- It will boot your Wii U into the Homebrew Launcher, if it fails keep trying. Delete all browsing data if problems continue to persist.
- Once it loads, press the home button again and exit to the home menu.
- Turn off the Wii U and place the SD Card into the computer, then proceed to the next section.
![]()
CFW Preparation
Mocha CFW is a custom firmware that is derived from iosuhax. It offers all the features of iosuhax and some additional features without the requirement of a fw.img on the SD card. Furthermore it combines all the current features of a custom firmware such as sysNAND or redNAND with signature patches into one application with a configuration setting
Features:
- fw.img less custom firmware
- sysNAND or redNAND patching in one application, selected/saved in a setting
- SEEPROM redirection to/from SD card
- OTP redirection from SD card
- custom launch image on load of the custom firmware if exist on sd card (sd:/wiiu/apps/mocha/launch_image.tga)
Planned Features:
- MCP FAT32 mount on USB
Choose either the sysNAND CFW Setup or redNAND Setup and then continue to the next section!
sysNAND CFW
- Download Mocha CFW and unzip it.
- Add the “Mocha” folder to the “apps” folder in the “wiiu” folder located in the root of your SD Card.
- Place the SD Card back into your Wii U.
- Turn on the Wii U and Navigate to the Internet Browser and go to this URL, www.loadiine.ovh.
- Make sure Select your program is set to “Homebrew Launcher 1.4 (5.50-5.5.1)” and click submit.
- It will boot your Wii U into the Homebrew Launcher, if it fails keep trying. Delete all browsing data if problems continue to persist.
- Load the Mocha CFW app and Do NOT SELECT “YES” on redNAND option or it will format the SD Card and Begin the redNAND CFW process.
- Select “NO” on redNAND option and press “A” then you will boot sysNAND with Patched Sigs.
- Once you have booted sysNAND CFW once time, turn off the Wii U and eject the SD Card.
- Place the SD Card back into the PC and continue to the next section.
redNAND CFW
- Download Mocha CFW and unzip it.
- Add the “Mocha” folder to the “apps” folder in the “wiiu” folder located in the root of your SD Card.
- Make a backup of your SD Card on the computer.
- Place the SD Card back into your Wii U.
- Turn on the Wii U and Navigate to the Internet Browser and go to this URL, www.loadiine.ovh
- Make sure Select your program is set to “Homebrew Launcher 1.4 (5.50-5.5.1)” and click submit.
- It will boot your Wii U into the Homebrew Launcher, if it fails keep trying. Delete all browsing data if problems continue to persist.
- Load Mocha CFW app from the Homebrew Launcher.
- Select “YES” the redNAND option will format the SD Card and create a new redNAND partition on your SD Card.
- This process will take a long time so be patient and keep the Wii U Gamepad on a charging cable during the whole process.
- Once its done turn off the Wii U, place the SD Card back into the computer and restore the backup you made from step 3.
- Place the SD Card back into the Wii U.
- Turn on the Wii U and Navigate to the Internet Browser and go to this URL, www.loadiine.ovh
- Make sure Select your program is set to “Homebrew Launcher 1.4 (5.50-5.5.1)” and click submit.
- It will boot your Wii U into the Homebrew Launcher, if it fails keep trying. Delete all browsing data if problems continue to persist.
- Load Mocha CFW app from the Homebrew Launcher.
- Select “YES” on redNAND in the Mocha CFW Config Menu and press “A” to boot into redNAND.
- You should now make a red folder and call it redNAND to not confuse being in either NAND.
- Navigate to the Power Settings of System Settings and disable all the settings here.
- Enjoy redNAND!!!!!
- Place your SD Card into your computer and continue to the next section.

NAND BACKUP Preparation (redNAND CFW only)
- Place the SD Card into the PC.
- Download and unzip sdio nand extractor and injector.
- Run the program as Administrator
- Edit the location where you would like to dump your NAND and select your SD path the SD Card.
- Be sure to make and save all 5 NAND dumps mlc.full, slc.full, slcmpt.full, otp.bin and seeprom.bin. You will have to name them accordingly and place them in safe location.
- Place the otp.bin and seeprom.bin files on to the root of of your SD Card.
- Place the SD Card back into the Wii U system.
- Turn on the Wii U and Navigate to the Internet Browser and go to this URL, www.loadiine.ovh
- Make sure Select your program is set to “Homebrew Launcher 1.4 (5.50-5.5.1)” and click submit.
- It will boot your Wii U into the Homebrew Launcher, if it fails keep trying. Delete all browsing data if problems continue to persist.
- Load Mocha CFW app from the Homebrew Launcher.
- Be sure to enable Expert mode in “Config view mode” in the Mocha CFW Config Menu.
- Enable SEEPROM and OTP Redirection in the Mocha CFW Config Menu.
- You can enable “Skip this menu on launch” if you wish to boot Mocha CFW faster. You can always press B when launching Mocha CFW to open the Mocha CFW Config Menu.
- If you ever decide to buy or use another SD Card you can inject all 5 NAND dumps and they will work as long as you have a backup of the existing files of the old SD Card.
- Turn off the Wii U and place the SD Card into the computer.

Haxchi Preparation (Optional)
This section is not required but is essential to have. This will give you option to booting the “homebrew launcher” without needing the internet browser or an active internet connection. I highly recommend this setup before Nintendo removes or patches this terrific exploit.
- Download Custom Mocha CFW Haxchi images and unzip it only move the haxchi folder to the root of the SD Card. This will give you a cool themed Mocha CFW haxchi channel. It autoboots Mocha CFW by default and launches the Homebrew Launcher when Holding “B”
- Place the SD Card back into your Wii U system.
- Purchase a compatible DSiWare Game available from the eshop.
- Make sure the compatible DSiWare Game is on your NAND, if not move it from your USB device to your NAND from the options in System Settings.
- Optional: Navigate to the System Settings and make a copy of your DSiware game on another USB device. Keep it in a safe location for future use.
- Navigate to the Internet Browser and go to this URL, www.loadiine.ovh
- Make sure Select your program is set to “Homebrew Launcher 1.4 (5.50-5.5.1)” and click submit.
- It will boot your Wii U into the Homebrew Launcher, if it fails keep trying. Delete all browsing data if problems continue to persist.
- Select the Homebrew appstore app and load it.
- Search for “Haxchi” and download it, then return to the homebrew launcher by pressing the ‘home’ button on the gamepad.
- Select the Haxchi app and load it.
- Highlight your DSiWare game and follow the instructions on the Wii U gamepad.
- Reboot the Wii U and launch your haxchi enabled DSiWare game and Hold “B” to launch the Homebrew Launcher. It will have the Mocha CFW logo.
- Turn off the Wii U, then proceed to the next section.

Coldboot Mocha CFW redNAND (Optional)
This setup requires Haxchi if you wish to use this. This configuration will allow you to coldboot Mocha CFW redNAND and should not be used with the sysNAND Mocha CFW. It will causes issues!
This setup can be dangerous and you should never move your exploit game from your NAND. IF YOU DO MOVE IT, YOU WILL HAVE A PAPERWEIGHT!!!
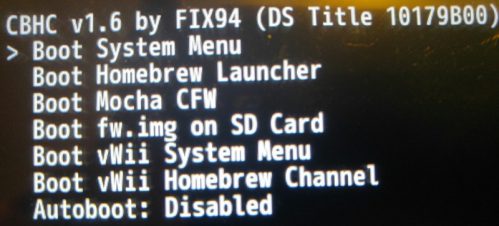
I use this setup to autoboot into the CBHC menu and you can always re-enable the CBHC menu when you press the Home button on the Wii U gamepad when you see CBHC booting.
- Turn on your Wii U with the SD Card inserted.
- Launch your haxchi enabled DSiWare game and Hold “B” to launch the Homebrew Launcher. It will have the Mocha CFW logo.
- Launch the Homebrew App Store and download CBHC.
- Exit to the Homebrew Launcher and select the CHBC app and run it.
- It will find your exploit game automatically and press A to install.
- You now have Coldboot Mocha CFW redNAND.
- Once its done, turn off the Wii U and place the SD Card into the computer.

Installing Content Preparation
This will allow you to install custom channels and rid the option to need the browser to launch Homebrew without needing internet access.
- Place the SD Card into the computer.
- Download and unzip the WUP Installer GX2 Channel.
- Download and unzip the Homebrew Launcher Channel.
- Create a folder and call it “install” and place it in the root of the SD Card.
- Make 2 folders and call them “WUP” and “Homebrew“, then place the contents of the unzipped folders into their corresponding folders.
- Place the “WUP” and “Homebrew” folders into the “install” folder in the root of the SD Card.
- Place the SD Card back into the Wii U.
- Turn on the Wii U. If you have Haxchi or Haxchi + CBHC (redNAND only) and boot into Mocha CFW. Then skip steps 9. – 12.
- Navigate to the Internet Browser and go to this URL, www.loadiine.ovh
- Make sure Select your program is set to “Homebrew Launcher 1.4 (5.50-5.5.1)” and click submit.
- It will boot your Wii U into the Homebrew Launcher, if it fails keep trying. Delete all browsing data if problems continue to persist.
- Load the Mocha CFW app and run it.
- redNAND CFW only: Make sure you see the redNAND folder you made earlier. If not, do not proceed and try to boot into redNAND CFW again by following step 8.
- Navigate to the Internet Browser and go to this URL, www.loadiine.ovh
- Make sure Select your program is set to “Homebrew Launcher 1.4 (5.50-5.5.1)” and click submit.
- It will boot your Wii U into the Homebrew Launcher, if it fails keep trying. Delete all browsing data if problems continue to persist.
- Load the Homebrew AppStore app from the Homebrew Launcher.
- Download WUP Installer GX2 app from the Homebrew App Store, exit back to the homebrew launcher by pressing the home button on the Wii U Gamepad.
- Load the WUP Installer GX2 app and run it
- Install “WUP” and “Homebrew” folders to the USB and exit.
- You will now have both WUP Installer GX2 and Homebrew Launcher channels installed on your redNAND.
- Future content must its own corresponding folders in the “install” to take advantage of the multi folder install feature.
- redNAND CFW only: If you have Haxchi + CBHC, select homemenu shortcut from the CBHC Menu. This will boot sysNAND.
- redNAND CFW only: Delete the internet connections from sysNAND’s System Settings. They will remain in redNAND CFW and prevent System Updates in sysNAND.
- Congrats your done and enjoy your tasty cfw on your Wii U
FAQ
Can I update redNAND CFW? If you redirected seeprom and otp, you will be ready for future updates.
Can I install out of region content? Yes the current build of redNAND/sysNAND CFW is region-free.
Will Content show up from my redNAND CFW on sysNAND? Both NANDs will share the USB device content if they are both linked.
How do I access vWii content? Run the vWii Channel from sysNAND. If you installed CBHC, use the vWii shortcut via CBHC menu.
How do I stop using redNAND CFW? Your redNAND CFW is tied to your SD Card and formatting it or using a different one.
How do I update redNAND CFW to the latest build? Update Mocha CFW from the homebrew appstore
Can I access the eshop on redNAND CFW? Yes and online features stay intact.
How do I remove Haxchi and CBHC? Load the homebrew launcher and run the corresponding homebrew apps. They offer options to uninstall.
How do I update Haxchi and CBHC? Update the homebrew apps from the homebrew appstore within the homebrew launcher. Then run the installers over existing installs.
I hope you enjoyed this tutorial and appreciate all the devs responsible for the progress we have available to use.
Team Hackinformer signing out
Sources: Github, WiiuBru, Reddit, GBATemp and various forums


i keep getting an error about armips. I’ve started over many times. what’s the folder setup look like where armips is placed.
added photo
Thank you. stay awesome.
armips download link just comes up with a blank page
Fixed
Thanks 🙂
do yo need to download ds game from eshop or you could just install usb like method with ironhax…. i cant ger to homebrew launcher with this described
ty
You need to purchase a legit dsiware game from the compatibility list specified in the Haxchi section. Go for the cheapest one avilable.
ioshax
I have updated the Homebrew Launcher section with more detailed instructions and photo with file structure.
what happen to the redNand fw.img instructions?
so I am assuming Mocha does all the redNand building without using the PC?
The process is now easier than ever and making a build environment is no longer required. The Wii U pulls all the files and now works without needing a fw.img. I’ll update this thread as new developments are available.
ok, thanks.
sys configuration keeps giving me an install error. verify.tik and WUP files are correct & compete. Homebrew channel installed without an issue on redNand.
I have the same issue with sys config.
Is the uploaded package on mega ok ?
Thx
I’m sorry for my past post. First : thank you 8BitBang ! Your tutorial is very clear and usefull. I google some more info and find https://gbatemp.net/threads/how-to-setup-custom-firmware-w-sigpatches.446818/
You can use sctout from https://mega.nz/#!qpFhWZ7Q!uBNZQwRMvyOQfKZ-yJKxFEhY9AS3a5D3GW23tUxVNxA in place of system config link in this tutorial. It’s working for me
Many thanks
cant launch haxchi enabled DSiWare game?
well i have done this it works….before i formated sd card for rednand and then i formated sd card on my pc and now i cant format sd card on my wiiu again for rednand. im confused.
nvm 😀
Thank you for this guide! The link to the sys config file is a valid link , however, the file is bad and will not install. Here is a valid link to a sys config tool authored and provided by iAqua http://pastebin.com/u/iAqua
The tool is available there as well as here…
https://mega.nz/#!qpFhWZ7Q!uBNZQwRMvyOQfKZ-yJKxFEhY9AS3a5D3GW23tUxVNxA
Thanks again!
I have a question in regards to Updating the Wii Games, I’ve loaded multip .cfw titles for Title Key site, and am able to Install the games themselves with the WUP Installer, but when I try adding the updates via the WUP Installer the games at launch with say that Update Content Is corrupted and then I have to delete it from the Storage Device. Any thoughts or proper way to apply these.
I am on the first step and whenever i try to load into homebrew it says getmountsource failed
Try changing the program from “Homebrew Launcher 1.4 (5.5.0 – 5.5.1)” to “Homebrew Launcher Illuminaty (5.50 – 5.5.1)” from the loadiine.ovh site. This is assuming you a good sd card, files are placed in the right dir/ and running fw 5.5.1 Report back if that fixed your issue
following your instructions but on the extractor i only have the option to dump mcl, slc, slccmpt. do you have to enable otp and seeprom on mocha then dump on pc?
I updated the link to show version 1.3, sorry about that. Redownload it and you will have the options to dump otp and seeprom
k cool thanks
does a new sd card have to be partitioned to inject or will inject auto partition?
The nand inject application will do all the work for you
Hey, first off, thanks for the guide! I’ve been following it to the T and so far things have been going well.
However, I’m at the final stretch of the cfw and have hit a roadblock. I’m at the point where I was able to install the cold booter with no problems. However, I’m unable to successfully boot into Mocha CFW without the system freezing at the Mocha logo. If I understand the guide right, loading into Mocha loads into my redNAND, and without access to it, I’m not able to finish the steps to completing CFW installation.
Any way to either fix this or am I just being dumb? Lol, thanks in advance.
Were you able to boot into mocha before installing Haxchi and CBHC?
I’m pretty sure I was able to in a prior step, unless loading up the homebrew launcher through the mocha icon earlier wasn’t done through mocha.
Is there something that would interfere with loading up mocha?
Looking back, yes I was able to boot Mocha from the homebrew launcher earlier in the process, that was the last time I was able to access my redNAND. I remember because I made the red folder as instructed so I could tell if I was booted into it, and have not been back to it since the freezing after installing haxchi and CBHC.
Try injecting your otp.bin and seeprom into your sd card with the pc application from the nand section. Then try relaunching it and if it still doesn’t load you might need to make sure you have the proper mocha settings in the mocha menu selected. Report back on Twitter on dm if possible
Great tutorial but I have a question, when I succefully installed content on mocha CFW (rednand) and usb drive (example hombrew launcher) it also appear in my original nand, I cant load this content on nand or will brick my wii u or just won’t work or even better it will work?
It won’t work on sysNAND
Hey, great tut excellent work 🙂 | one question tough I worked my way all the way to the WUP installer to point 13. Here I am stuck or afraid to go on as I am not sure where I should create the “redNAND” folder?! Is it just a normal folder on my SD card or is it folder on the WII Menu. Could you explain that in a little bit more detail? 😉 Where should I see this folder?! Thx buddy
mocha says I have a 32gb card when I have a 64gb card and says cannot write
When I launch Mocha CFW and hold B it sends me to Mocha options not Homebrew Launcher. Is it suppose to do that?
Also pressing home just goes to a black screen instead of going to homebrew channel
Assuming your using mocha CFW redNAND w/ coldboot. You should only press the home button when you see CBHC initializing. If you used the custom haxchi icon pack, pressing B will also access the CBHC menu.
If your not using coldboot it will launch the homebrew launcher when holding B. If you are using coldboot it will use CBHC menu.
I am on the haxachi preparation step 14 and having the same problem holding B brings up the mocha menu not the HBL. Can I proceed like this, or am I doing something wrong?
Checking the config file in haxi folder, A button sends you to Homebrew channel, not B 🙂
Hi, I’m new to the homebrew scene, I had recently tried to install mocha, after I attempted it, whenever I put my SD card back into my computer it wasn’t being read, and needed to be formatted. I don’t really know how to make a backup of my sd card, and what constitutes as a backup. The main problem was i couldn’t access my sd card as it needed formatted. Any help for a noob?
Hi guys, thanks for the nice stuff!
I have installe Mocha CFW with rednand and when i try to go on the eshop (error 105-4206) or play online (error 102-2471) while being on the CFW i have an error.
When i am on the Sysnand everything is fine but as soon as i go on the rednand i am screwed.
Can someone help somehow? I have tried googling it but could not find anything.
Many thanks