Welcome back! Today’s review is effectively a part 2 to the one I had previously written about the Retro-Bit Retro Prism HD Adapter. If you missed that, it’s here. But to catch everyone up, Retro-Bit has released 2 HD devices to get your Gamecube looking good. There is an HDMI adapter and today’s product, the component cable. Let’s jump right in, I’ll try to keep it as brief and detailed as possible. Note, I have an NTSC-U console, the information in this referring to resolution will only be about NTSC signals.
Description:
‘Our Retro Prism products let you experience the classics on their original consoles in glorious high definition. Whether you prefer component cables or our HD adapters, you can harness the full potential of your GameCube® by tapping into the Digital AV Out port on most models. With our Retro Prism Component Cable, you will have both video and audio available in one cable that is plug-and-play with no fuss. ‘
Features:
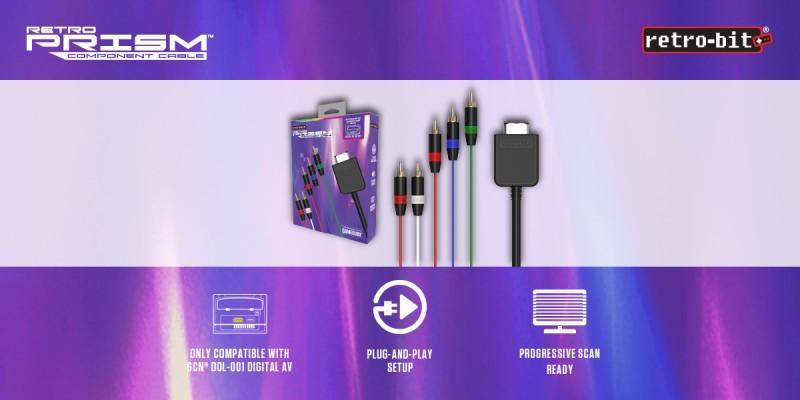
‘Only Compatible with GCN DOL-001 Digital AV
Plug-and-Play Setup
Progressive Scan Ready‘
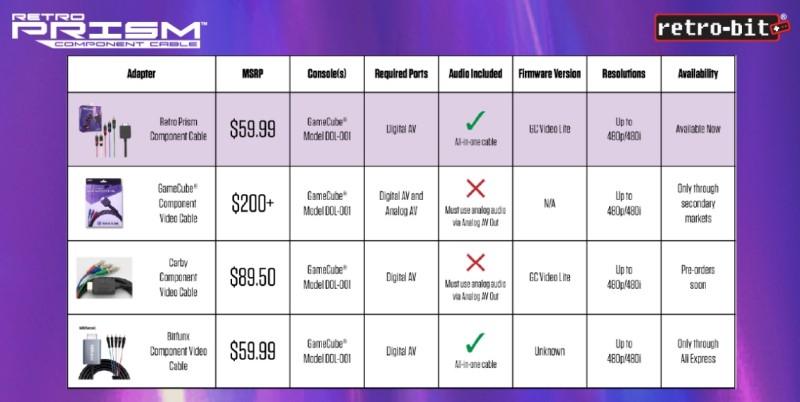
‘Prism Component Cable’ Cable Comparison:
Unboxing Video:
Pros:
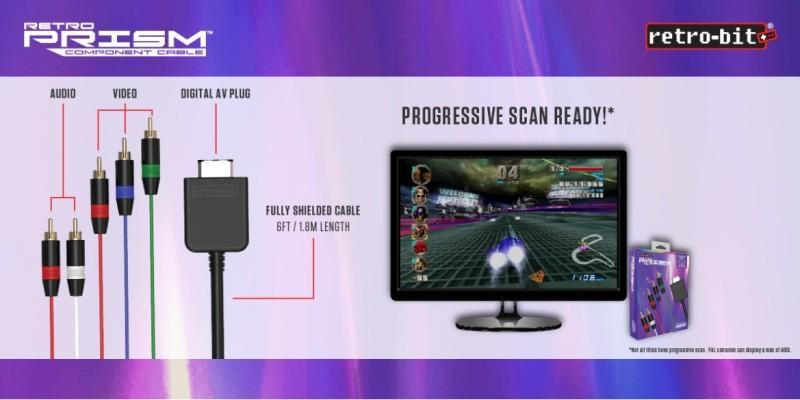
- Plug and Play-The component cable is not something that should be unfamiliar to anyone who has every used cords for connecting up consoles and DVD players in the last decade. You should already know how it works. It works the same as the composite/RCA/red, yellow, and white cables.
.
If your TV has 5 plugs that have colors that match the cords show in the picture, then you have component support! Congratulations, you can just plug this into the TV and the other end into the Gamecube. Then you’re ready to power on your TV and start playing!
.
There is no resistance plugging it in either since it has a metal housing on the plug. That’s it. It’s so plug and play that you technically don’t have to do anything special. This is definitely true for those who just want to run their Gamecube on their modern TV. If you’re missing the component port on your TV, you can either buy an HDMI adapter instead of component cables or get a video scaler to go from component to HDMI... - Length- The component cable comes in at about six feet in total. In my setup, I feel that this is a good length. Each one of the individual five cords breakout into nine-inch lengths. This helps cable management even further. It sucks when component options only have three to six inches of length. Nine inches is far more sensible and is likely a more universal solution for all televisions. If that still isn’t enough length, you can always opt for a component cable extension cord. HD Retrovision has them available on Amazon, click here if you’re interested.
- On-Screen-Your component cable comes out of the box with GCVideo Lite baked in. So be aware that the image that you get on your TV is the image that you will always get. There, as of now, is no official method for upgrading the GCVideo functionality on these component cables. Having said that, you get support for several resolutions. The Retro-Bit Component Cables play nice with anything that I’ve thrown at them.
.
By that, I mean that this will run the 480p oftion if you hold B while starting any given Gamecube game. However, if you’re running Swiss on your Gamecube (it’s easy and cheap if you aren’t), you can force additional resolutions to output to the TV. This includes 240p as I tested one of the games that I own in my collection that does so. This can also support the Gamecube Interface and the resolution options that it can output at.
.
You’ll also be happy to know that the cable is fully shielded. I don’t rightly have a way to test it personally. What I did do, however, was plug in my PS2 that had crappy unshielded cables to look and see what I noticed. Then I looked at the Gamecube again to see if I noticed any of the same symptoms. I couldn’t find a single issue with these cables in terms of interference!
.You’ll all be happy to know that these can be used in conjunction with a scaler to work with HDMI only TV’s. This can also be just to increase the fidelity. Having a scaler as the input device is one attribute over the HDMI-only adapter. The OSSC and the RetroTinks of the world take component and composite and clean it up and/or improve resolution. I was blown away because it looked better than playing my Wii.
.
The best part of this in terms of on screen, is when streaming the screen. I feel that this may actually be the better way to do it. To me, it seems easier to capture footage through this cable onto older capture cards. Those capture cards are easier to find and cheaper. Combine the Prism component cable and an older capture card then you can start streaming for cheaper than HDMI with an HDMI capture card..
- Price-There is a price breakdown later on in the article. It’s an image so you can cross-reference the Retro-Bit component cables with some other options, including Nintendo’s own. You’ll find on the image that the price for the component cables is $59.99. If you look closer, the only other one that is the same price point is the BitFunx cables. I don’t really recommend anything from BitFunx. But they’re the same price and don’t come with the same features as this one. So if you really want to buy BitFunx cables instead, let us know your outcome. For everyone else, $60 is far less than Nintendo’s official component cables.

- Build Quality-I’ve already gone pretty far in depth of the build quality that Retro-Bit puts into their products. Their quality seems to be second to none and if you do find something wrong, they’ll make it right. If you want to read more about their due diligence, I have plenty of articles about their products! But I do want to take the time to touch on the key points about these component cables.
- Add the fact that there is a clip that keeps the audio cables (red and white) independent. This is because there is a second red cable on component (I don’t know why they could’ve used black or something).
- The plugs stay in place nicely and are easy to take out. I’m aware that my Wii’s component cables hold on too tightly and pulled one of the component ports off of one of my previous TVs.
- Stylistically, they look they HD Retrovision cables. Not identically, per se. But they really do have that nice sleek, yet chunky look about them. Chunk is power!
.
- Dual Output-This can be used at the same time as the standard AV output on the back of your Gamecube. This is primarily interesting because that means you could have two TVs set up side by side. As long as your secondary TV has a composite (red, yellow, and white) input. This would be especially good if you wanted to have multiplayer of a game but not huddle around the same TV. The same could be said about a tournament being run from one Gamecube.
.
Having breakout cables such as component does allow you to also divert your audio easier too. This could be for recording purposes or tuner or surround sound. HDMI only usually requires extra steps and/or cables. Which would mean more money for the same results. Furthermore, you’ll find that Dolby Pro Logic II (the best audio that some GC games output), sounds great!
.
You can also use that secondary composite output simply for audio and have 2 different audio sources instead of two different video sources. This could be useful if you want to record the audio while playing the game and hear audio for yourself. I’m sure there are other use cases that people can make out of that.
Cons:
- Upgrading-No upgradable GCVideo? I’m uncertain if it’s even possible. It could be that it is not and I understand and I just want readers to know that it doesn’t have it. It could be that it is possible, but the competition for component cables don’t have upgradable GCVideo, so why should this one. Either way, it doesn’t have it. The fact of the matter is, using the table below, the exact same offering from BitFunx for the same price doesn’t have it!
- Size-I brought this up in the other article. The size of the part coming out of the back of the Gamecube is massive and as such makes it ugly and heavy. But with cords hanging out, you risk even more issues. I recommend making sure that you have at least 6 inches of slack. Don’t put stress on the back of your precious DOL-001’s digital out port.
Final Thoughts:
Honestly, while this doesn’t have as many features as the HDMI adapter, it does have fewer issues that I quabbled with. I think the other product is great, but Retro-Bit still has some flaws to fix. This one, I feel like you could buy it today and be happy. The idea with this one is great 480p output that is plug and play. No frills, but at the same time, no extra settings to refine. If you don’t care about scanlines and changing aspect ratios, but want 480p, this is the way to go.
While I don’t have the BitFunx cables to test them against, these clearly are the better option. The build quality is great, it has GCVideo Lite pre-installed, and it’s the exact same cost. The Retro-Bit Retro Prism Component Cables are affordable and available on U.S. seller sites (links below). BitFunx is only available through AliExpress and is bound to take longer to arrive.


 0
0