We’ve covered Gameboy stuff out the yin-yang, you know it and I know it. What should we talk about now? How about that awful Game Gear screen that has a bad backlight and draws far too much power? Sound good? Because we have a new set of products from RetroKAI.store that sets out to fix a lot of the issues that both plagued the Game Gear at launch and have only gotten worse since. So put on your sunglasses, because the Game Gear is about to get much, much brighter.![]()
Description:
Want to change your original faded screen with limited viewing angles? Install a Magic Screen! Aligning brackets, 3 components to remove, 6 wires to solder, installation in less than 1H.
Features:
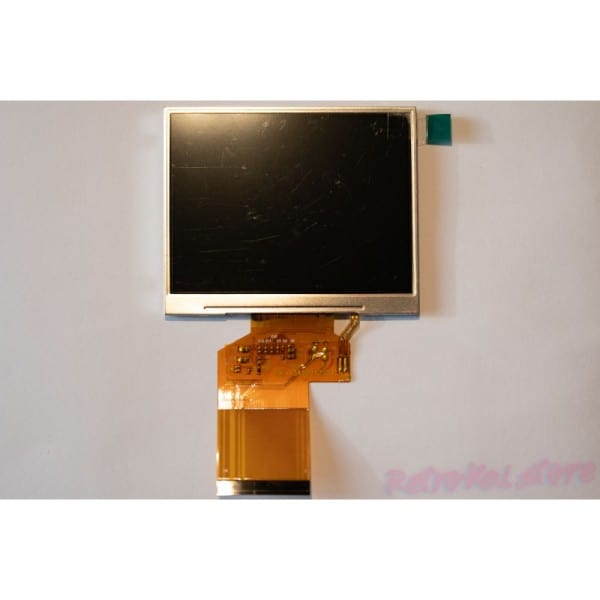
- The Magic Screen is a TFT screen that is easy to center thanks to its plastic brackets that screw in the same way as the original screen.
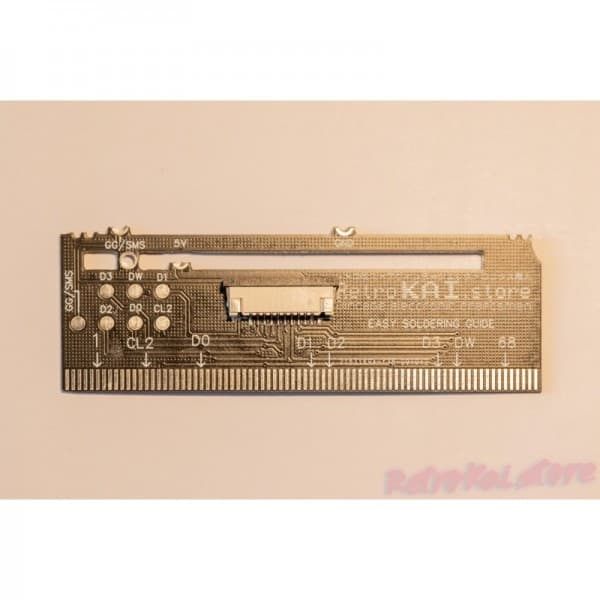
- To avoid having to solder a lot of wires, we developed the Easy Soldering Guide, a piece of printed circuit board that solders directly to the connector on the original Game Gear display. This connector connects to the main printed circuit board via a ribbon cable. The printed circuit board that comes with the display therefore only needs 2 wires to work, it will take 6 to enjoy all its features.
- The installation of the Magic Screen requires (in addition to the original screen and its backlight system of course) the removal of only 3 components.
- If you choose to do the complete installation (6 wires to solder so), you can choose between the 7 display modes proposed in order to have the choice according to the game you are playing and control the intensity of the backlighting using the original contrast wheel. And yes, of course, the vertical scanlines are part of the game.
- Validated by the Marketing guy who sucks at soldering, myself, since I’m the one writing these lines.
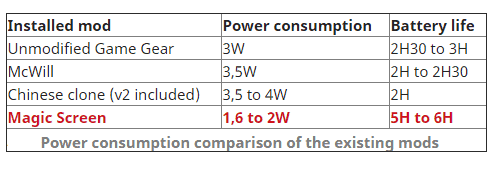
- When designing the Magic Screen, we paid particular attention to energy consumption and component reliability. Thus the Magic Screen consumes between 1.6W and 2W depending on the backlight setting chosen and we have chosen to equip the kit with a switch-mode power supply for maximum reliability. We did not want to risk the linear power supply which sometimes causes a short circuit in the kit or in the console. No risk of burning anything if the console voltage is not perfect thanks to the protections integrated in the circuit. The inductors are also oversized to ensure maximum lifespan.
Unboxing video of the Magic Screen kit (and more):
Pros:
- Shipping. Right out of the gate, I want to commend retroKAIstore for the packaging and shipping on this. The shipping was fast, considering it look less time to get this from France than my package that I’m still waiting on from New Jersey. But more than that, they had delicate items that they knew were going a far distance and packaged them properly. This may not seem like anything that is a big deal and I should get to the product itself (don’t be impatient, I’m getting there), but it is a massive deal. They know they have sensitive material and they know that it is going to any given place, they need to do it right. The company’s credibility always matters as much as their products. retroKAIstore knows what they’re doing with regards to shipping.
- PCB. The mainboard that acts as a bridge (oversimplification) between the screen and the Game Gear is gorgeous. But it’s more than that, it’s also quality. I’m unaware at this time if it is something that they manufacture in house or if they have another company fabricate the board itself. All that I know is that I only see this good of quality in Black Dog Tech and mainstream products. The PCB isn’t so thin that it has the potential of bowing, and it isn’t so jagged on the edges that it presents a hazard. Furthermore, I know nothing about the world of engineering, but I do know that this thing works out of the box. Case and point…I used it and it worked.
- Install. This install is not terribly difficult if you are experienced, in fact, it’s probably why it’s called the Magic Screen. There are some minor parts that I struggled with, I’m sure that it’s just because I’m still intermediate with a soldering iron. I was so impressed overall since the Game Gear is a rather intimidating looking device on the inside. There were only a few wires to solder if you want the full feature set. If you’re just wanting a screen to replace the old one and you don’t care about the video modes, it’s even easier. Then there’s only one wire you need to worry about. There is an Easy Solder Guide that you literally lay in place and put solder on. It does most of the heavy lifting for you. I will be posting the video of me installing it soon and an article with exact steps shortly that. But here’s the main question about this install, could they have made it easier? We’ll talk about that more at the bottom of the article!
- Screen. The screen is exactly what the Game Gear needed. It may just be a standard TFT screen, but it is brilliant. And I don’t mean brilliant compared to the old screen. A dog turd is more attractive than the old Game Gear screen. You may take issue with a TFT screen, but I assure you that in this day and age, it’s still appropriate. It looks great at the same size and with this resolution, it’s less expensive than premium screens, it’s going to extend the life of your Game Gear, and it’s easy to swap out should it break or a better option come available.
Besides the type of screen and resolution, it’s incredibly customizable with regards to its modes and brightness. There are seven different available modes that come with it (I just stuck with the default). When the whole thing is assembled, you change through the modes simply by holding Start and cycling with the 2 button. But different games might look better to you with different modes. At this time all that I really have are Sonic and Columns, and they looked fine with no change. Additionally, you can control the brightness level now with the OG contrast wheel. These are quality of life improvements that everyone should be excited about. The only thing you can’t change are the scanlines that you see, those are a product of the Game Gear itself. Sorry scanline haters! - Plays Nice with Others. This screen is designed to fit into your existing OG Sega Game Gear shell just dandy. And it does so quite nicely. But how does it play with a third-party shell like the one I just reviewed for RetroSix? Well, I’m happy to report that I found out that luckily it all fits as it should! RetroSix sometimes makes quality of life improvements in their shells and a removal of a post or something like that could’ve made them incompatible. The Magic Kit does indeed fit as it should in this shell.
How does it fair if you also have the CleanPower GG from RetroSix? Well I’m happy to report that it does indeed not cause any issues. I’m sure that they designed the Magic Kit with the original Sega power regulator in mind. But since this kit uses literally less power than the original screen than the CleanPower GG can power, it’s a no brainer that these two work out. In fact, I’m wondering if that affects overall battery life. I’m about to talk about battery life in much greater detail! - Battery. Battery consumption is the last topic that I wanted to discuss and for good reason. For the sake of fairness, I should mention that I did not test the battery life of the screen with the original DC power regulator. If you pay attention to me on Twitter and YT, you’ll know I switched out the regulator before ever installing the screen. So down below this section is the official readout from retroKAIstore themselves. It reflects the power consumption with the OG regulator and how this screen ranks against the original screen and other screen upgrade mods. If you already have a CleanPower GG or intend on getting one, keep reading. If you intend on not buying a CleanPower GG, then don’t bother with the next three paragraphs. You can skip to the power table.
What I did look into was if having the CleanPower GG in with this Magic Screen netted me more battery life. If you already looked down at the grid, you’ll see that the Game Gear in its vanilla state is 2.5 to 3 hours. This is already debatable because it’s something that depends on what kind of batteries you’re using. The weakest batteries net you 1 hour and 3 hours for the best, maximum. So for the sake of our experiment, let’s say it’s 1-3 hours. They have their screen getting you 5-6 hours. We have to trust that they have done extensive testing on their own product across different settings and with different battery strengths. Lastly, the CleanPower GG says it can make your system stay on for 24 hours if you use a battery (bank) of 20,000 mAh. We can now do some math.
The weakest batteries (1000 mAh) are 1/20 of the battery bank in question. This means that if you divide 24 hours into 20, you get 1.2 hours out of that 1000 mAh instead of just 1 hour. Now we can extrapolate that across the new power consumption of only 1.6w (I’m guessing that’s the lowest brightness). My math shows we should get a maximum of 5.15 hours conservatively on the weakest batteries! Wikipedia shows that you can have AA batteries up to 2850 mAh, how do those work out in this equation? It says 16 hours!
Let’s tie this off. I truly doubt that any of you are going to buy 6 of the LR06/AM-3 batteries just for your Game Gear. Maybe you will after the CleanJuice GG comes out that can charge batteries. But even if you do, I doubt that you’ll be running it at the lowest screen brightness the whole time. If you run it at a setting that requires 2W of power, then you’ll probably net closer to the 10hour mark on those expensive rechargables. For the rest of the world, you’re probably not near a power source on a trip and want to get some play in on the car ride. With 2W of power, you can expect 4.5 hours of play at best. I used this source to calculate watts to amps using the datasheet of the Game Gear. I used this source to then calculate the battery life.

Cons:
- Install. As previously mentioned, this install is not difficult if you are experienced. This install is terrifying if you have zero idea what to do. Let it be known that if you are uncomfortable opening your device, desoldering items, soldering new items, this isn’t for you. You can still buy it and pay someone to install it, for sure. You’re just going to end up paying more in the long run, both for the kit and for an experienced person to install it. This is not the fault of the kit, but I do hope that iterations come out to make it easier and easier, as the Gameboy Advance did. One day soldering may not need to happen, only desoldering. One can hope.
- Compatibility: You might be bummed out to find that this doesn’t work on every single Game Gear on the planet. As of now it is only compatible with two existing Game Gears. If you have a VA0 model or a VA1 model, then you are in business, this isn’t for you. If you, however, have a V4, or a V5, you’re out of luck. The other models are easy enough to come by and Game Gears are not region locked. Your game of choice might have a different language, but it can still play on your Game Gear. So even if you’re in a country that has zero Game Gears, you can always import a VA0 or VA1 model. I have another shorter article coming out later today that tells you how to find out if your current Game Gear is a compatible model.

Overall Thoughts:
This is the part where I bring some stuff to your attention. If you read over all of this, you’ll see that there are a few complaints. I’m not experienced, but I could tell that there were definitely some places for improvement. Having said that, there is already a newer version of this that is 2 revisions newer. I would really love for you to forget about my complaints, because I’m going to share the list of 8 massive improvements on their new board, and it squashes my complaints and adds new points to the “Pro” list above. This list, in fact, should solidify why you should buy one of these right now! The purchase links are below the list of improvements.
‘Differences with the first (v1.0) version:
- Aligning brackets has been reinforced because they sometimes tended to break too easily.
- Aligning brackets has been recalibrate to be even more centered.
- Addition of a quartz that removes the need to solder the 32 MHz wire.
- Complete instructions are now printed on the board to avoid potential mistakes during the installation.
- The board have now true holes and not just half holes like before, should ease the screwing.
- The test pads on MS and ESG are now in the same order as on the Game Gear display connector.
Should ease alternative wiring and testing. - The CN2 connector has been moved to have more loose on the ribbon cable.
- Easy Soldering Guide has been redesigned to ease the soldering using notches instead of trying to solder something you can’t see.‘
Purchase Links:
Click here to purchase a Magic Screen kit.
Like what you saw here?
Give me a follower on Twitter @V1RACY for not just reviews on tech and games, but also giveaways!