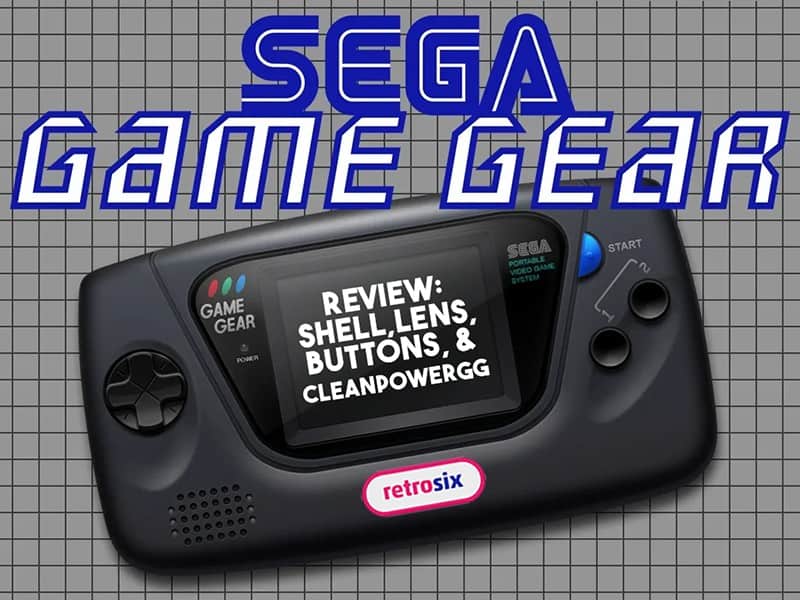
As we previously mentioned, we’re moving past Gameboy upgrades for the time being. We’re going to cover parts and replacement pieces for the faithful Sega Game Gear. Today we’re specifically covering the shell, buttons, lenses, and Clean Power GG from Retro Six. It’s a lot to cover, so buckle up, because we’re going to cover a lot of ground. Starting off with an unboxing video (and a bonus parts swapping vid)!
Unboxing video of the Game Gear parts:
Swapping in the RetroSix GG Parts:
Shell Description:
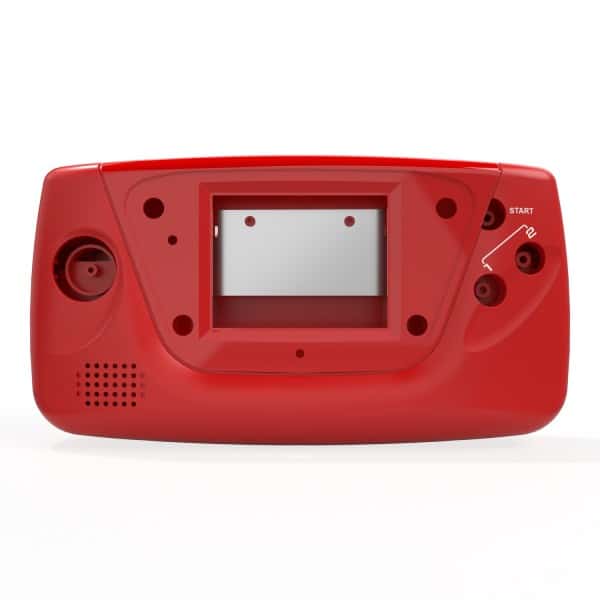
After great success with previous shells, for 2020 we focused hard on the Game Gear. We took our time, made multiple molds, refined and perfected the kit to finally reveal our RetroSix Prestige ABS Shell Kit for the Game Gear.
Shell Features:
Shell Pros:
- Sexy. Not just the red, but all of the colors are absolutely out of this world. If you’re thinking all that they have are the red that I’m using and the standard black, you’re wrong my friend. If you head over to their site right now, you’ll find more colors. You’ll see that they also sell more and as of now, these are what they have. Black, red, light blue, yellow, cream white, orange, purple, grey, mocha brown, clear, clear black, dark blue, light green and dark green. I can only imagine more colors or finishes will come. But I don’t work there, so I can only hope. I would love to see if they do a soft touch, rubberized “Pearl” finish like that of their Gameboy Advance shells I reviewed previously.
- Accurate. The overall shape of this product is exactly the same in the way it plays once it’s installed. In fact, it’s so accurate I’m sort of bummed out. This was a chance to add improvements to the original design. So even though they left out any quality of life improvements, I give them credit for being 1 to 1 on the feel. I would love to see an option to had some “grippiness” to the backside of the shell. Maybe battery doors that have little tiny bumps for grip. You can just swap them in and they enable you to hold the behemoth even longer.
- Simple. Everything here is a drop-in kind of situation. Take it out of the OEM Sega shell and drop it into this new one. You don’t have to undo any of the previous battery leads either. The cords for the batteries stay in. The shell has built in shielding too, so no need to worry about transferring that. It’s so simple…I don’t even have anything more I can say about it. You don’t have to be experienced to remove screws and swap parts.
- Compatible. This new shell is mostly compatible with original Sega Game Gear accessories. If you have an accessory that attaches to the top like the TV tuner, you’re in luck, it still has the bracket holes for that. If you have a battery pack that attaches to the back, you’re also in luck. The bracket slots on the back are still represented accurately. I don’t have any accessories, so I can’t test them. However, the slots are all there, so it’s obvious that those accessories should work. Mostly.

The shell that I chose.
Shell Cons:
- Alignment. Just one post was ever so slightly misaligned. This made driving the screw more difficult. If you watched my above video, I had to really mess with it. I had to start the screw at an angle. Then as I drove the screw deeper and it got closer to the hole of the PCB, it evened out. I hope I just received an add one and that others don’t have to experience that. Or at least not experience it any worse than I did.
My guess is that the molding process isn’t a completely certain thing and there is always a chance for a small mistake. I also understand that they can’t sit there and test every little thing. If you have a big enough irregularity with yours, mention it to them. But in all honesty, this was my first product from RetroSix that had anything wrong with it. I’d go so far as to say that it is probably an anomaly. - Compatible. Remember how before I said that this shell was “mostly” compatible? Well, I meant mostly because there is one difference. If you watched my shell swapping video, you’ll have heard me mention that the shell was missing one component. On the back center of your Game Gear, there is a gold hole. The hole is metal, prethreaded, and ready for a screw of some kind. The hole itself has been used for accessories in the past that have knobs to tighten the accessory into the Game Gear.
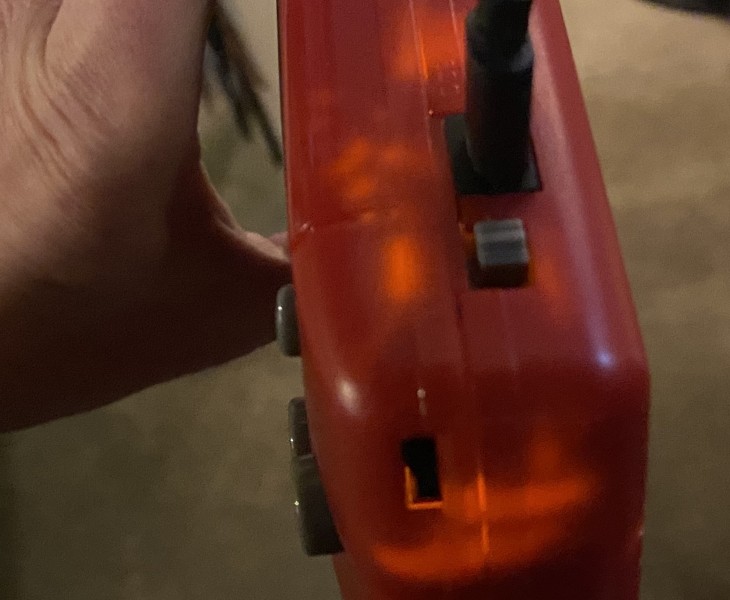
This hole is present on the back of the RetroSix shell, but it does not have any metal inside of it and it does not have any threading. I do not have any accessories for the Game Gear, let alone ones with a tightening knob. So I’m uncertain if you could use one to tap the threading into that hole. For those that are savvy, I’m also uncertain if you could unseat the original gold metal part and place it into the new shell. These questions are unanswered on their site, so either accept that you can’t use the accessory or take the risk and find out if you can tap the thread with the accessory itself. - Transparent? I discovered a “flaw” of sorts in the shell. Let me start by saying that it’s supposed to be a feature of the CleanPowerGG. I will be talking more about it further down in this article. I wanted to bring it up here as well because it’s relevant. So, when you have the CleanPowerGG plugged in, there is an LED on the CleanPowerGG. The LED is supposed to yield different colors for different statuses. My complaint is not the implementation of an LED that informs you of battery status. The complaint is that the LED light seems to bleed profusely through the shell in low-light settings. Conversely, no amount of light is noticeable when you’re playing in a well-lit room or outdoors. But if you’re like me, you play before bed in the dark or you play in a gamer space only illuminated by dim lights. I hope that they find a way to thicken the plastic around that area or line it with something to prevent light bleed. A simple lightpipe to divert the LED straight to a hole that is located on the top of their custom shells. They could make it to the left of the USB port (when looking at it from the front).
To be fair, I’m entirely uncertain if this happens this badly only with the red shell I have. It could happen to this extent with every shell they make. But what is truly the point of having the color-specific LED if you can barely see it in any logical place in regular lighting? This is presumably going to be used on someone’s official Game Gear shell at some point and not be visible at all. Those people couldn’t even utilize a light pipe solution without shell modification. I think a better suggestion would be a transparent power switch so the light can be seen. This works with OEM and RetroSix shells. They could then thicken the inside area of the shell where the light bleeds through (maybe only necessary on the red). There are some pictures below of my complaint, click to enlarge them to see the orange spots more clearly.

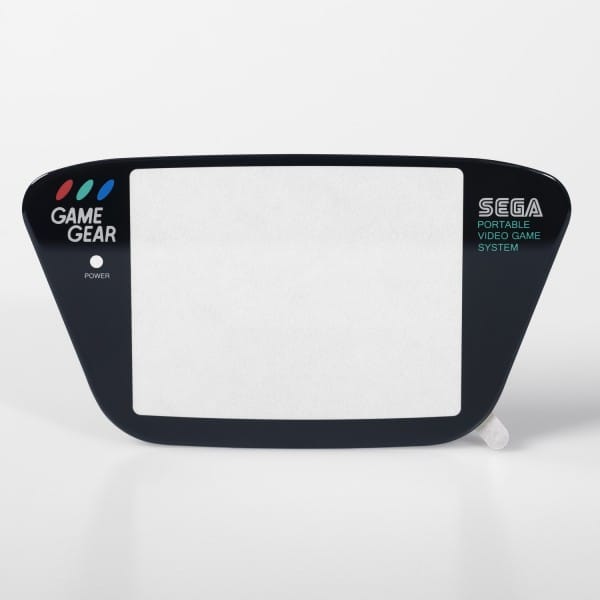
Lens Description:
Lens Features:
Made of tempered glass, scratch resistant, tough and ultra clear. Comes with adhesive backing so simply peel off and stick on.
Lens Pros:
- Magnificent. Even if you’re keeping your original Game Gear screen inside, this lens just POPS. I’ve never used that word for anything. Not even when describing the glass lens they have for Gameboys. But the reason this looks so damn good is for the simple fact that it’s just so large and reflective. It also makes the underlying screen look much better. The OEM screen has less scratchy muddiness to it. Removing the muffed up plastic lens and installing a glass lens should happen even if you do zero other changes to your Game Gear shell. You’ll thank yourself later.
- Sticky AF. RetroSix only seems to use quality products and it’s obvious that the adhesive is no exception. I’m no expert in the world of adhesives and other structural materials. But when you see that beautiful, bold 3M logo on the wax paper lining the back of something, you know you’re being treated well. I wasn’t wrong either, it is very intensely sticky. More on that a little later, but just know that once you’ve set it in place…that’s where it is staying!
- Sturdy. Yes, I’ve tested it. I was basically wondering if such a broad piece of glass was more susceptible to breaking in the middle with enough pressure. While I didn’t jump on the thing or anything crazy like that, I did test normal scenarios. I had it in the back pocket of my old baggy pants that I need to throw away and it survived. If we’re being honest, I put the glass side down so that it was less pressure than my cheeks directly sitting against the glass. I didn’t want to hurt myself if it broke. The other test I did was drop it face down on my carpeted stairs. It tumbled down only like 3 of the steps, I couldn’t get it to fall down the entire staircase. But nevertheless, it survived. In both of these scenarios it didn’t end up with scratches.
- Scratching? I was too terrified to test scratches directly on this new glass lens. But I am happy to report that the other lenses I have from RetroSix are still scratch free and have been used under normal conditions. I think that there is a fear that it has a larger surface area so there is more chance of scratches. It would be great if their shells just had a smaller space to put a lens and they just make a custom lens that wasn’t as large. I don’t mean instead of these shells, I just mean for people who want the option for less glass on the front of their Game Gear.
- Options. What, you thought that the shell was the only component that you could choose the color for? Get out of here! As of right now, there are quite a few options. They have, classic black (with the original logo colors printed on it), blue, white (with original colored logo), red, yellow, Majesco black, purple, orange, green, (completely)clear, and dark grey (with original colored logo). But those are just the colored lenses. There are also themed lenses like the Sonic theme, Jet Set Radio theme, a custom “UV Splash” theme, and an option to have your own custom theme printed. It’s just insane all over.
Lens Cons:
- Historical Accuracy. There was something special about the fact that the original Sega Game Gear lense was a bit convex. This glass one is superb, as I’ve already stated. The part that I wish was the most present in this shell is the bit of thickness that the top of the original lens had. Just be aware, they’re going for function over nostalgia with the glass lens.
- Adhesive. You have to be careful when removing the 3M backing off of this lens. Do it very slowly and pull it evenly. Because while it is incredibly sticky on the side that will attach to the shell, the underside that sicks to the glass wants to lift away with the backing. If you do it slowly, it will not stretch, it will stay in place. Once you have the lens in place and pressed down a bit, you should be fine. Then both sides are being pressed and neither is being pulled. That’s when the adhesive shines. But if you’re fast with the backing being pulled off, you can, as I did, pull some adhesive up. I caught it early and had to tap it back in place.
Buttons Description:
Membranes Description:
Buttons/Membranes Pros:
- Quality. As is mentioned in the description for the buttons, they are crafted from ABS plastic. And it’s not only the buttons that are made from ABS. They also use it for the bracket holding the speaker in place. Funnily enough, ABS plastic is also used on the battery contact cover. If you watched my video or know anything about the inside of the Game Gear, there is originally a thin piece of plastic glued onto one side of the battery contacts. It’s probably there to keep dust/battery acid out. But you have to remove it when swapping shells (unless you buy the CleanPowerGG) and need a new one in the new shell. So yeah, RetroSix supplies that replacement and it uses nice, thick ABS plastic on the battery contact cover. Definitely overkill, but still a welcome addition.
- Feels. But how do these buttons feel? Well, when combined with RetroSix’s membranes, they work as well as expected. While the inside of the buttons that touch the membranes are made differently, they seem to feel just fine on the outside. So when you’re playing your game of Columns that you love so much, you won’t feel any sort of disparity between the buttons from RetroSix and Sega’s original feel. I also rather enjoy not having the fear of a 3rd party button not falling flush or below the plastic shell. Remember those 3rd party controllers from way back when? The buttons would be squishy and you could (and had to) press them so far down to register, that they just were no fun to use. Yeah, this is nothing like that.
- Colors. There are color choices also abound when it comes to the buttons. On their site, at the time of writing this they have the following selections. Black, red, light blue, yellow, cream white, orange, purple, grey, mocha brown, clear, clear black, dark blue, light green, and dark green. You can mix and match any of those buttons as well as choose which shell and lens colors you think would be best for the mashup of your choice!
Buttons/Membranes Cons:
- D-Pad. It’s worth noting if you haven’t watched my swapping video, that the D-Pad in the kit does not play nicely with the existing Sega membrane. There is a ball that makes the OEM D-Pad pivot nicely. The RetroSix D-Pad comes with a built-in pivoting system. This is not a bad thing per se, but the website doesn’t tell you that their D-Pad membrane is required when you’re buying buttons. Or that you will have to make a modification to your old membrane. (I just removed the ball pivot and cut out the center where the ball was and made it match the one from RetroSix, but not everyone wants to do this.)


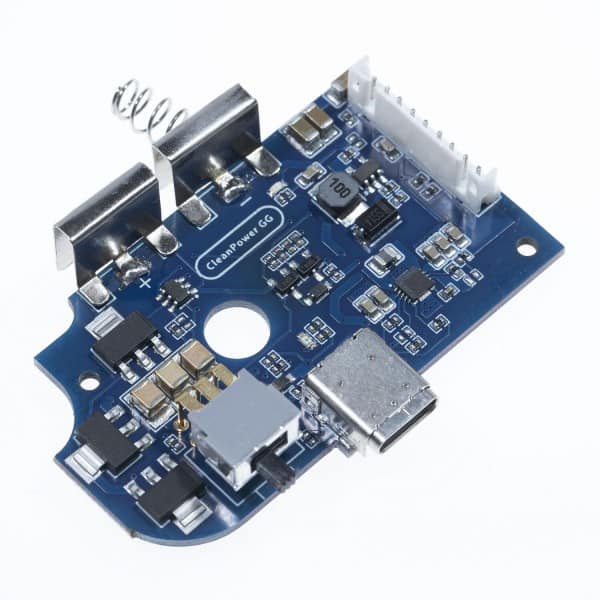
CleanPower GG Description:
CleanPower GG Features:
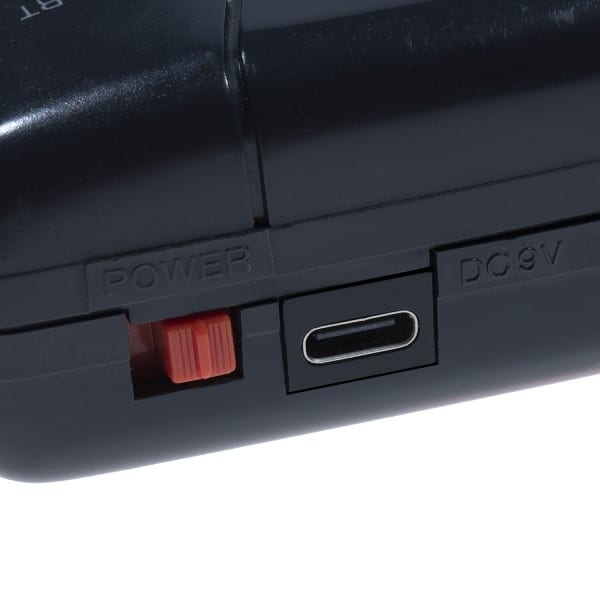
The CleanPower GG comes with USB-C power and can run from the original batteries of the console also. With support for hot-swapping between USB-C and batteries, when the batteries start running low you can plug in a USB-C cable and continue gaming without interruption or power down.
CleanPower GG Pros:
- Simple. Easy to install. If you watch my swapping video, it’s as easy and literally putting it into position. You do have to figure out which way is up with the little plastic toggle switch cover for the power. But other than that 5 second issue, you’ll find that this is far less intimidating than it looks in a picture. Pull off battery contact plastic, unplug old power regulator, take out its screws. Drop in CleanPower GG, screw it down, plug it in, put on battery contact cover. You now have new features and you don’t have to worry about scouring eBay for an OEM battery regulator from hopefully a trusted seller.
- Advanced. New features you say? Yes, I do say. Once you have the CleanGG installed, you’ll find that the best feature is that it incorporates a USB-C port. In fact, this may be the sole reason that you should buy this. Especially if you already play plugged into the wall with your dated, power hungry AC adapter. Let’s talk about efficiency for a second. I originally had three different “pros” here, but I decided to combine them into one lengthier section. You deserve detailed explanations, after all.
The CleanPower GG can run off of quite low power and off of most standard USB ports. You are able to use the phone chargers and fast chargers around your house with zero issue. They should work as low as 1.5 amps but if you’re running into issues with it, just use a port with 3 amps. I even plugged it into my USB 2.0 port on my PC and it turns on without batteries. Overall, having a choice of USB port is great because whether you’re using the iPad power brick or a low power phone charger or even a port in your car, you’re likely to be able to play this wherever you go. And while I don’t own one, RetroSix makes the claim that your Game Gear can run for 24 hours on a 20,000 mAh battery bank. - Zero Batteries. That’s right, I did say that, didn’t I? There’s no need for batteries. In the very same way that the original power supply can run the Game Gear without batteries in it. I’d almost recommend that. What’s really the point of burning through 6AA batteries all of the time when you can just be plugged up? USB cords can be long as hell and cost practically nothing. The bigger takeaway here is that you can have a lighter handheld. The weight of 6AA’s on top of the full-on weight of the Game Gear is something that will make you want to play it less.
- LED. Works with the Game Gear’s built-in LED system to let you know if batteries are getting low. The low power LED that flashes on the Game Gear when the batteries are low will not flash. This is only true when you’re running on USB specifically as it has a consistent source of power. The same goes for when you run your Game Gear off of the default barrel jack power supply. This is great as it will not distract you with a flickering light the whole time.
CleanPower GG Cons:
- Recharge. The CleanPower GG does not charge batteries. If you’re wanting that functionality, you’ll have to wait longer. The CleanJuice GG will have that functionality. It’s projected by RetroSix to release in early 2021. I wouldn’t say to hold off buying the CleanPower GG until the CleanJuice GG comes out. We just don’t know the price point. It could be plenty more money for the additional features. I would say buy one of these and when the CleanJuice GG comes out and you can afford it, sell the CleanPower GG to a buddy.
- USB Support. The USB port itself is fine, don’t misunderstand what I mean. The issue is actually the 3D printed support that surrounds the USB port. It looks to be fitted in the image down below. I’ve even watched a couple of other reviewers and theirs is fine. But mine is ever so slightly crooked and it juts out. This yields an uneven, not flush edge. Is it a big enough issue to complain about? Not particularly. The bigger issue here is will you end up with one that is even more beefed than mine? That’s the uncertain part and that’s why I had to bring it to your attention.
- LED. As mentioned before, there is an LED light inside on the CleanPowerGG board. It is orange if you’re on USB power. It is green if you power it on (from battery or USB) and you’re battery has plenty of charge. There are a few things wrong with this, the first being what I mentioned up in the shell section. If you’re plugged into USB in a low light setting, the color bleeds through. This even happens when the USB is plugged in and the power is not switched on. Rather annoying if you play before bed because you essentially have to unplug it or hide the Game Gear from view so you can sleep. When the device is powered on, it’s kind of pointless as you cannot really tell if it is green or not. It just seems to barely be noticeable through the cracks/openings. It is, however, very noticeable with the light bleeding the plastic when powered on via USB. This is goofy because you get the bleed of a random color, but the color of the LED is not obvious. They implement this very well on the GBA CleanPower solution. I think my clear plastic power switch idea is the best option assuming the size and shape of the Game Gear. They can even still make the color be matched like that of a transparent Game Boy or N64. The light would clearly shine through in different tones.
Overall Thoughts:
All of the choices I made in terms of color comes down to one thing. It’s simple really, I love the color red. Unfortunately, not every console, handheld, and controller comes in red. I would love to buy an official Rayearth Sega Game Gear. But you know as well as I do that that is far too pricey. I think making the item your own and customizing it is the next best thing. At that point, you at least have the memories and pride from doing it yourself. Especially when there are so many color options that Retro Six has between their shells, buttons, and lenses.
How do I feel that they panned out, though? Would I recommend them to you, knowing that it’s going to take your hard-earned money and time to construct? I think that you can tell by now that the answer is a resounding “yes!”. There was no part of this whole swap that was cumbersome, scary, or even remotely difficult. On the contrary, it was actually cathartic. To be able to fix some of the issues with the system and extend its life is why we do this right? We love our retro systems so much that we set out to breathe new life into them, relive our youth. and create new memories. It’s great because it’s not just a shell swap, it’s adding in modern-day advantages like USB-C and better power management. Look, you should probably stop reading now and get your happy ass over to Retro Six. The links are below, enjoy!
Purchase Links:
Click here to go to the shell kit page.
Click here to go to the lens page.
Click here to go to the buttons page.
Click here to go the membranes page.
Click here to buy the CleanPower GG.
Like what you saw here?
Give me a follower on Twitter @V1RACY for not just reviews on tech and games, but also giveaways!