One of the coolest items in the box of retro goodness I got from RetroSix was a restored GBA. You may think, “Oh…so it’s just a refurbished GBA.” But you’d be the furthest from the truth. We’re going to look at this Game Boy Advance from the inside out. There’s a lot to cover this time around, so buckle up. We’re going back in time!
Description:
‘Hand-restored to its original condition, with a new shell, buttons, screen, [and] boxed making the perfect gift for a die-hard gamer. We take an original Game Boy Advance and start by taking it apart fully. We clean the PCB, replace any broken or worn components such as the Link connection, volume and power switches, and do a full hardware test to confirm good working order is restored.
Next, we replace the old, used, and worn shell with a brand new cast ABS precision shell and buttons from RetroSix, along with the rubber contacts and buttons to restore that brand new button press feel. Next the big upgrades. We change the LCD screen for a new IPS backlit screen and upgrade the audio amplifier to a powerful class D amp as well as installing a new 1W speaker to give the audio a 400% volume boost!
No more AA batteries, all Prestige consoles now come with a CleanJuice USB-C battery pack. The console is powered by a 6.2W lipo battery and charged using any USB-C cable. Finally, we replace the plastic screen protector with a modern tougher glass screen protector so your old new console stays newer for longer. The finishing touch is a boxed and sealed product perfect as a gift for any retro gamer… or maybe even treat yourself?’
Unboxing Video:
Pros:
- Glass Lens-Let’s start from the outside and work our way inward. First off, one of the things you’ll notice about one of these hand restored GBA’s is the glass lens. They replace the plastic lens with a tempered glass lens. It’s much stronger than the original OEM lens. Not only will it withstand more and live longer, but it will also look better. I don’t just mean the way it appears on the GBA. What I actually mean is that there is a far reduced chance of scratches. This means you won’t have that “fog” of scratches on the lens you’re trying to look through to see the gameplay. That’s all I really wanted to speak on on the matter. I have a whole article covering not just the GBA lenses but also Game Boy (DMG) and Game Boy Color, you can read about them here. It goes far more in-depth, for those interested.
- Shell-The meat and potatoes of the outside is the brand new shell. But it’s not just any ol’ shell from a Chinese factory. They ditch the old beat-up shell and pop on a brand new one that’s made of ABS plastic. The default grey shell I’ve gone into detail on before. You can read all about it specifically in this article. I’ll be discussing the Pearl shells that came on my review GBA more in deeper detail in my next article. A few more things to note, if you decide to get any other Retrosix shell in the future you’ll already be set to swap. The shells are already built in such a way that the CleanJuice and IPS screen (that we’re about to talk about) you have here, fit perfectly. That means you won’t be doing any shell modifications, just swapping parts.
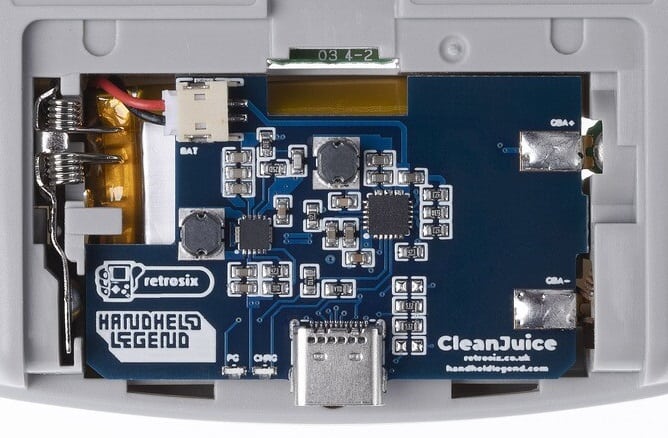
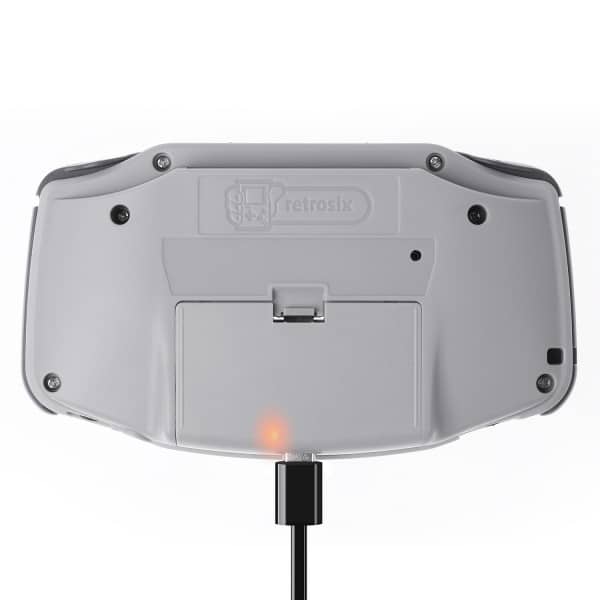
- Rechargeable-The battery door looks like a standard battery door but on the bottom, there’s a little bit of a difference. You now have a USB-C port greeting you. Gone are the days of having to open up the battery door and swap out batteries. Even the inconvenient changing of rechargeable AA batteries. All of these GBA’s that have been hand restored come featured with a CleanJuice USB-C battery pack. When you plug your USB-C cord in, it has a satisfying snap to it. The cord does not easily come out so if you drop it or it falls to the floor while charging, you shouldn’t have to worry. When you’re charging, there’s an LED indicator light to help you know the status of the charge.
The battery itself is a 6.2-watt lithium polymer with a 1700 mAh capacity. In my testing of the brightness being on its default setting (brightest I believe) and the sound up all of the way, you get about 13ish hours of gameplay. Obviously, this will last a little longer if you turn down the volume or you’re able to turn the brightness down. You can charge and play at the same time. What’s even crazier is if you have a smartphone that supports charging other devices, you can use your phone as a battery bank for the GBA. If you need a closeup of the CleanJuice board, there is one down below. - Hardware-Next up, we get to talk about the general hardware of the device. We can’t get into it too deep without first discussing the buttons. From the D-Pad to the face buttons, what Retrosix has crafted is nothing short of black magic. The buttons feel perfect in your hands and there’s no strange rubbing against the plastic shell like you get sometimes with Chinese knockoffs.
The same goes for the triggers on the top, which all too often are the bane of my existence when buying 3rd party button replacements. There’s always a fear of “do they click properly or do they rub wrong” or “maybe they’re sticking for this or that reason”. I’m happy to report that the triggers work as they’re supposed to. I’m uncertain if Retrosix replaced the switches connected to the board in my review unit, but they at least checked them to make certain that they worked.
They have also included a new set of Select and Start buttons installed which truly feel great. Who knew that Start and Select would be something so groundbreaking to me. I seriously sat there and kept pressing them like some kind of fidget toy. They feel so great both in terms of touch and also responsiveness. That’s primarily because Retrosix has also made another improvement in this build. Underneath the front buttons are new contact membranes. Newer membranes help connectivity and button responsiveness. It’s good to get new ones as you’ll find buttons feel like they work less as time goes on. I’m uncertain as to the length of time that these will last not being OEM, but I’m guessing about as long as Nintendo’s version.
As far as the rest of the hardware goes, I wanted to bring up the fact that all new screws are used in the shells. You also need to know that changing parts out is easy since the screws are all Phillips screws. That means if you get a different shell from Retrosix or want to change out the buttons or something, you can use a standard Phillips screwdriver. No more of that triwing malarky. Last of all, the power switch and volume wheel that are included match the buttons. They’re matching not only in look but also pristine, brand new function.
- Screen-Down on the inside of the restored GBA we see some truly remarkable improvements. Let’s start off with how the screen has been updated. If you turn on the GBA, you’ll obviously see that the screen is backlit. If you open it up, you’ll find that they have installed a new IPS backlit screen. The screen matters a lot since it’s the core of the gaming experience. But it’s not enough that the screen is backlit. When you’re playing the restored GBA from Retrosix, you’ll also get clarity. There is zero pixelation and no screen tearing either. I played hours upon hours upon hours of my GBA searching for screen anomalies. If they exist, the average user isn’t going to see them. However, if I’m being honest, I’d bet my house that there is nothing but pure, clean image. Additionally, the lens supplied is made to show the ever so slightly larger IPS screen. So the screen plus the lens is a complete package!
- Speaker-While I’m not too keen on the inner workings of audio hardware, it’s obvious that the restored GBA is better in terms of audio. Retrosix has taken the time to update the amplifier within the GBA. Gone is the OEM amplifier and here to stay is a competent and might D-class amplifier. But that’s not all, to handle the power that the amplifier puts off, they’ve installed a 1 watt speaker. As you read in the description of the device above, that nets you a 400% audio increase. I have to have mine up halfway at the maximum when I’m at home. When I go on my walk in the park, I turn it up 75% of the way and it works well. I haven’t found a purpose to have it up all of the way, maybe a construction site?? Even if you’re someone who loves to have it up full blast, it’s there for you and doesn’t take much off of the top of the battery life!
- Repair-It’s great that there are new parts on top of Nintendo’s classic GBA motherboard as a start. But that’s not all that they do when restoring these GBA’s. If you open a restored GBA and inspect the board, you’ll find that they take the time to clean it from head to toe. I don’t see any replaced parts on my review unit, but they do indeed update broken parts before they send them out. It would be a waste if the board worked just fine and they tossed it out due to a broken volume wheel. No, they instead check and replace all of the ports, switches, wheels on the GBA’s they’re restoring. And who knows, maybe mine did have broken parts originally, maybe Retrosix takes great care and effort in their soldering skills. It could be that they’re just as good as Nintendo’s machinery was at attaching parts.
- Assembly-Now, it’s not enough just having the parts put together. Putting them together properly so that things don’t move about inside is key. Or sometimes people jam too much stuff and too long of wires in their devices and it won’t close properly. Not a concern here! Retrosix clearly has a full understanding of composition and what needs to go where. If you buy a pre-modded GBA on eBay you may find lots of things wrong. Hot glue gobs, poor soldering, wires far too long or short, rattling parts, loose or tight buttons, etc. From the inside out this kit is the real deal. I honestly wouldn’t be surprised if they had machines cleaning, cutting wire to length, soldering, etc, on a conveyor belt. I’m so proud of this kit that I’m forever storing it in a hardshell case when I travel with it to keep it as original as possible.

A look at the USB-C charging with LED light.
Cons:
- Lens- I’m not sure how to address this. I’ll just say it. When I press down on the very center of the glass screen and then let go, it makes a little pop sound. It’s similar to how when you press in on a Snapple lid and it makes that little snap sound. The obvious cause of this is the fact that I’m pressing it down completely flat. However, the adhesive is giving up and it’s coming free a bit.
Now let’s break this down. I’m not certain, but personally believe, this is due to the extreme heat of the Midwest that it got delivered to from the UK. I’m saying this because the other glass lenses I’ve applied from RetroSix have not done this. They weren’t already applied and thus didn’t experience a large temperature change. Is it a big deal? No, not really, especially if you don’t press down in the middle of the lens for any reason, one would never notice it. The lens is definitely not going anywhere (I can’t get it to come off).
I just needed to bring this up because it could happen to someone else and I don’t want them to freak out thinking the product is bad. One way that might be the best to solve this is assembling the whole product sans the lens but still include it in the box. Then the buyer can peel the 3M backing off and apply the lens. But for the money, this is far easier than doing it yourself and barely anything to complain about.
Overall Thoughts:
If you’re not wanting to take apart your own original GBA and swap out all of the parts, then this is the way to go. The cost may seem daunting at first, but if you’re dedicated to playing your GBA and it’s your go-to handheld, this is nothing. After you consider the cost of the items and how much uncertainty you may have upgrading the screen and such. That’s not to say that you can’t buy these pieces yourself and upgrade them…
But Retrosix has the experience and the products already on hand. You just press purchase and you get what Nintendo would ship us if they had created the GBA nowadays. This product is so prestige it’s better than what Nintendo’s official refurbishment used to be. This product has almost zero downsides to it. Bottom line, I almost never talk to my friends about what I’m covering for Hackinformer. However, this product is so incredible, I had to talk about and show off this product to all of my friends. Needless to say, it’s a jaw-dropper.