I have been wanting to cover something like this for a long time. 3D printed parts from a small, individually owned company. Not just any 3D printed parts, mind you, but quality ones. Ones created and printed for the sole use in retro consoles and handhelds. Today, that is finally happening and I’m excited to share them with you. Now, there are a lot. So I will give a list of pros and cons for each. I’ll have my unboxing video before it all. At the bottom of the article, I’ll have my video covering the installation side of everything. Enjoy!
Unboxing Video:
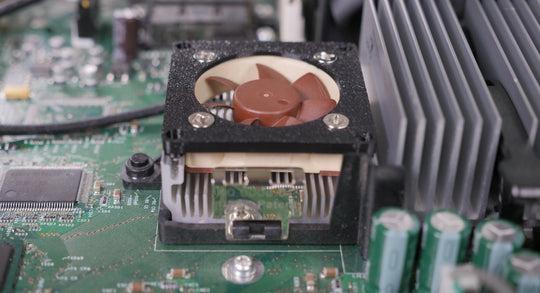
XBOX 40mm Fan Mount Pros/Cons:
- Thin, small form factor. The mount itself has to stay within the confines of the original fan in the 1.0 XBOX. Which reminds me, it’s worth mentioning that this is only for XBOX 1.0 revision. To quote Retro Frog, “This will only work on the 1.0 version of the original XBOX. If your Xbox is a later model and has the larger GPU heatsink without fan, you can’t use this (nor do you need it).”
- It’s brilliant that this exists since using an updated fan makes much more sense. Not just less power, but also smoother and quieter. And at this point, it’s likely a good idea in general to replace your fans. The quietness of it all, especially if you replace the large fan too (more on that later) is the real winning attribute.
- I do, however, wish that it came with screws. And I don’t just mean to attach the fan. Screws that could also replace the original screws that connect to the heat sink. What if those were stripped from years ago and couldn’t replace the originals when we finally got them out? Mine only had 2 screws in it (due to the previous owner) for instance. So if you fall into one of these situations, then you’re forced to try to find and buy new ones. Have fun with that predicament.
- If you have the screws though, it’s incredibly easy to install. You’ll see it in the video of mine at the end of the article, but I’ll run you through it here. There are 4 screws holding in the current small fan on the smaller of the two heatsinks. You’ll unscrew those and then the old fan will come away. Simply follow the wire to where it’s connected to the board and disconnect it. Take your new Retro Frog 3D printed mount and place it on top of the fan. I realized shortly after recording the video that I put connected the fan to the mount upside down. I’ve already fixed it but be aware that the fan is supposed to blow downward and bring cool air to the heat sink.
- Has two color options, both of which match the whole XBOX aesthetic. The “Classic Black” option will likely be the favorite of most since it matches the inside and outside of the XBOX. If you have a love for the “Bright Green” color, there is that as an option as well! Neither is more expensive than the other and they both are textured on the top which helps when holding them together to screw them.

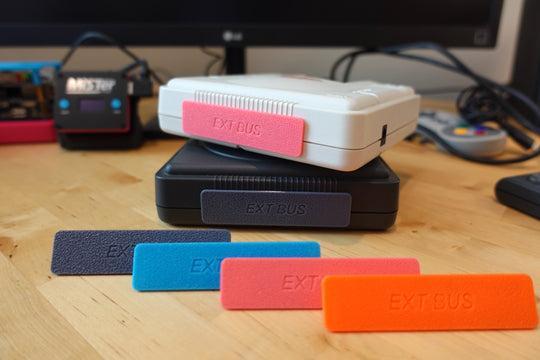
PC Engine BUS Cover Pros/Cons:
- The BUS cover fits much better than I thought that it would upon first glance. It was easy as pie to put in, as you’ll see in the video below. That was the first time that I put it in and there was no fuss.
- I have a want, nay, a wish that there was a small knob in the middle of it to it out. Something similar to a dresser drawer pull knob. I don’t want to have to use my fingernails to pull it up along the edges until I can get the edge of a finger in.
- The cover is compatible with more than one NEC console. On Retrofrog’s page, you’ll find other console options. The cover is compatible with CoreGrafx and SuperGrafx.
- I would love to see colors that are more complimentary. Sure it goes on the backside, but I think that sensible colors make sense too. Keep the fun ones, for the people who like to mix and match. Have white for the classic PC Engine, as I have.
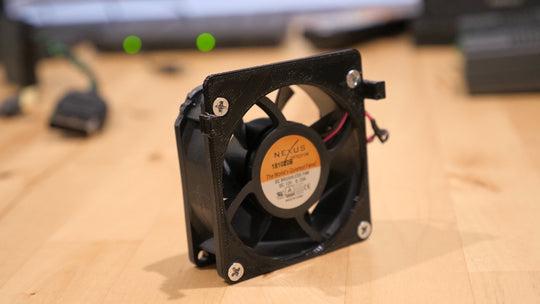
GC 40mm Fan Mount Pros/Cons:
- Comes with a 3pin to 2pin fan adapter, likely for Noctuas. I found a different brand of brushless fan at that size that came with a 2 pin cord already.
- Be aware that the mount doesn’t come with screws to attach the mount to the front of the fan. The downside of the one that I bought was the lack of screws. I found ones in my house that worked great. You can reuse the GC’s screws to attach the mount to the GC, but not the fan to the mount. If you don’t already have screws, get a fan with screws.
- Which is a good transition to the fit of the mount. I found that it fits flawlessly. Not a single millimeter out of alignment. It made putting the whole kit and Gamecube together a breeze. It’s just as easy as swapping it out with a stock OEM fan.
- I’m glad that the mount is black, to match the rest of my black-on-black Gamecube. It works out because the GC doesn’t have one of the little fan vent guard things on the side with the fan. This means you can see the fan very easily. If there was a neon color an inch into the Gamecube, you’d be able to see that color. It might be a bit too ugly for me to be cool with it.
- I would love to see an option where fans are supplied with the adapters. Maybe the fan mount is already attached to the fan and the adapter in place. That would make it even easier for the end-user, just plug and play. However, I understand that that’s a different business model altogether.
- It’s already a no-brainer to update your fan to a quieter one. Why not one that you can easily clean. You can take it off the mount and get to both sides of the fan easier than before. If you don’t upgrade your fan, then your options are to struggle cleaning it thoroughly or let it be dirty.
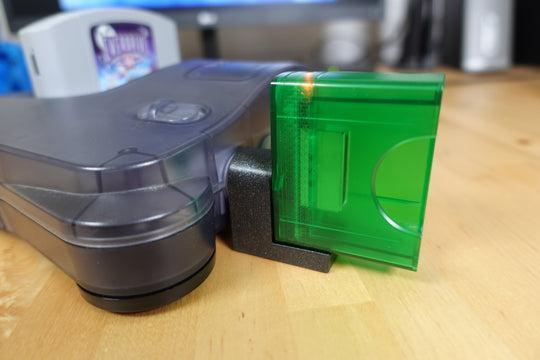
Tribute64 Wireless Dongle Support Pros/Cons:
- This is an incredibly easy install, even easier than the PC Engine cover. It simply sits between the dongle and the N64.
- I love the T64 emblazoned on the front of it. Imagine packing it away for a move and then finally unboxing it months later and forgetting what it’s for. It looks like a piece to a larger item, so it’s great that the reminder is there.
- These also come in other flavors. If you have a Brawler64, you’ll find you can buy one from Retro Frog. The same goes for the Hyperkin Admiral BT dongle. The Brawler64 says B64 on it and the Admiral says ADM.
- I wish we could choose colors. Don’t get me wrong, I love the black with silver glitter in it. But I think it’d be great to choose our model of dongle and then choose the color. I would rather it match the dongle than be an obtuse color. That’s assuming that those colors exist in the world of filament.
- The support doesn’t expand the width of the dongle. This is great because that means you can have multiple controllers plugged in. There will not be any blocking of ports.
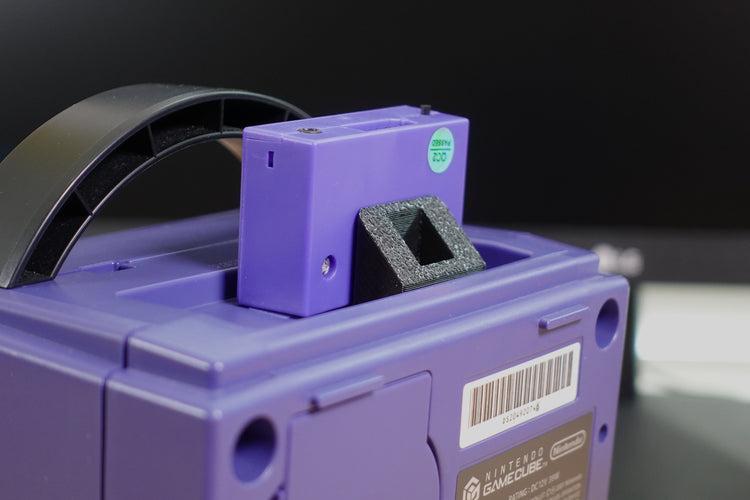
GCHD MKII Support Bracket Pros/Cons:
- This support bracket is incredibly simple to install. Not as simple as the Tribute64 support or the BUS cover, but it’s still really freaking easy. It hooks into the vents on the back. I centered mine, in the middle of them since I’m using it on the GCHD MKII. Once it is centered, you can place snap in the GCHD MKII and you’re done. For life.
- Retro Frog also makes ones that are compatible with the Carby from Insurrection Industries and Retro-Bit Prism. If the great results I got from this bracket are any indication, the support for the slenderer ones should be just as good for those with Carbys or Prisms.
- What is great for the GCHD MKII version, is that since it’s wider, it has a hole in the center to let air flow through. Kudos to whoever the designer was of these, whether it was Retrofrog or if these are widely available models, I don’t know. But the point here is that they thought about the blockage on the vent and opened it up for breathability.
- The only downside I found is that if there isn’t pressure on it from above from the adapter, it wants to come up and away as you’re trying to put the adapter in. It’s hard to set the Gamecube flat on its feet compared to standing it on its face. But if you do that, it’s not hanging from the slots, so here’s my recommendation. Put it on the face first and then put in the support. Then gently turn the GC onto its feet again. Now snap in your HDMI adapter.
- To be clear, it doesn’t snap in. I think there could also be a more “permanent” version available. Maybe a support that goes a one direction and snaps heartily in place. Snapping into the vents would be stronger too and for those of us who want permanency, would be great. We could unsnap it by opening the cube up and using our hand to manually remove it.
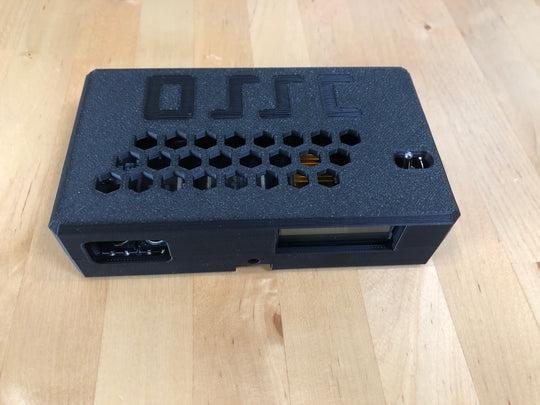
OSSC Case Pros/Cons:
- This was my least favorite product out of all of them. It has some upsides too, don’t get me wrong. First off though, I was displeased by the manual aspect of reaching inside the shell to press the large buttons in the front. If you have this box tucked away it’s going to be impossible to reach these. I had mine tucked away in my setup because in the previous case it had external button extensions that could be reached from afar. This enabled you to hide it out of sight and out of mind since it’s a little box that gets in the way. Now, with this case, you simply cannot without redoing your existing setup. You’d be better off having your OSSC be naked to both be able to hide it and still press the buttons easier.
- To that same point. I was also displeased by the small hole for the audio changing switch. This one is even harder to reach. Like much harder to reach. I’m not sure if I’m missing something or if I’m just an idiot, but it’s damn near impossible to get to. The space is open and you can see inside for sure. But the hole is incredibly small for a switch that required you move it toward and away from you. The hole is just barely large enough to fit a pen inside to move the switch, but have fun with that. Since the hole is small, you can’t see inside since the pen blocks the light, and any opening for your sight is blocked now. Also, the switch moves forward and backward, so you can only move the switch away from you. Have fun moving it toward you without having a way to pull it back. My previous OSSC shell has an extension for the switch from the outside that enables you to push and pull the switch. Again, you’d be better off having your OSSC be naked to both be able to hide it and move the switch back and forth.
- I do have some upsides. If you’re never going to press those large buttons or move the audio switch, you’ll appreciate its body. This OSSC shell is small, compact, black, blends right in and is understated. You can definitely set it and forget it if you’re working with a small setup and know the settings are tuned just right.
- The honeycomb ventilation holes is great for releasing heat and increasing airflow. They also look really nice and have a great way of matching the “OSSC” print above them. It’s all very “zen”! The only downside of that is that it allows for dust to accumulate inside. I feel like if anyone can make an improvement to this, it’s Retro Frog. I’d prefer to see a vent system on the bottom half of the shell. Or at least reduce the number of holes on the top of the shell. Maybe Retro Frog could find a way to implement a 20mm fan inside of the shell that we screw in, but then we’d have to find a way to power the fan.
- This shell comes complete with rubber feet. This will help it from sliding if you have to push the buttons or fiddle with the audio switch. Having said that, since there are rubber feet to hold it up, that lends itself to better ventilation. Vents on the bottom would be more logical since you’re lifting it up off of the surface on which it stands.
- The SCART port is not flush with the case. Why? What is the actual purpose of this? What could be benefitted from having the plug be protruding a bit from the shell? My previous shell has it aligned with the edge of the SCART connector and it works like a treat. This, for those who don’t know, is because the SCART connector allos the plug edge to slide within it. So yeah, this shell could be extended out to be a more seamless look.
- Would appreciate the hole for the metal switch on top to be wider and deeper. Large fingers will have an issue with flipping it correctly. Not much more that can be said on that, other than I know it’s possible and I’m unsure why it’s not. Are they trying to avoid dust from getting in? Too late for that since there are so many of the large honeycomb holes on the top.
- Here’s an upside that I’ll give them credit for. I think that it’s pretty great that it specifies still the 5V power cord required. It’s printed into the side of the shell for those of us who lose things easily. Imagine the very real threat of rearranging or moving houses and you misplace your OSSC power supply. You go and look all over the board but it isn’t printed on the PCB anywhere. Barrel plugs also aren’t based on their capacity, so you could end up torching your OSSC if you get the wrong replacement. Kudos to the creator of this shell for that smart inclusion.
- Lastly, the shell doesn’t allow for easy access to the JTAG port. Now with this complaint, I’m fully aware that most users aren’t touching the JTAG. So it’s less of a complaint and more of a nitpick. But if you are someone who uses the JTAG port…you’d be better off having your OSSC be naked to both access the port and use the rest of the OSSC as intended.
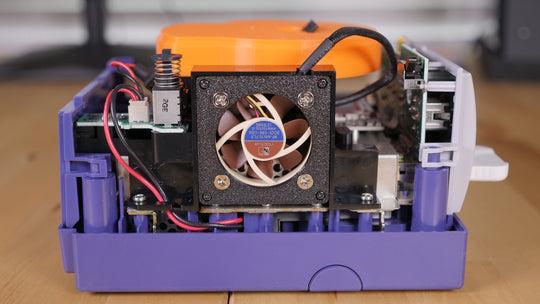
XBOX 70mm Fan Mount Pros/Cons:
- No instructions on how to assemble this, but if you’re like me, you’re an imbecile who couldn’t figure it out without looking at the picture. It is nothing that I’m embarrassed about. I wish there was something like even a 3 step guide on the bottom of every purchase page. This can remove the guesswork for people who just want to make their childhood XBOX quiet. Between the picture below and the video I’ve included, hopefully, it’s clearer to you.
- Very strong structure and it snaps in very nicely. I was afraid that the metallic nature of the XBOX shell that it snaps into could have been too strong for the 3D printed arms of this mount. Luckily it’s thick enough to push past the metal and grasp accordingly. I wouldn’t recommend doing this over and again or switching it to another XBOX. It’s possible that the 3D printed arms might snap or fracture. But for the one and done installation, this is a treat!
- This also comes in a 60mm flavor on the site. So you can install a slightly smaller fan if that’s what you have available or prefer or is a little cheaper. Either way, the mount appears to be the same in style with the main difference is that it’s two halves that attach above and cradles the bottom. I can’t speak about the pros/cons of that one, but I’d assume you’re in good hands there.
- The hardest part of this is the swapping out of the previous fan. When it pulled out the old one I wasn’t prepared for it to crack and break a little bit. But it does make sense in hindsight about the fragility of old, brittle plastic. So to avoid cutting yourself on old plastic, I’d recommend you glove up. Then as you put this new one in, make sure any bits of plastic are out of the way. I had a piece at the bottom that stopped my fan from sitting flush until I discovered it.
Installation Videos:
Final Thoughts:
Whether or not I gave some of these a lower grade shouldn’t matter. The great thing about 3D printing is the fact that the model can be iterated on again and again. One day an overall flawless product will emerge. Not to mention that you may actually find the prints to be perfect the way that they are. Furthermore, no matter what, even with the OSSC case that I didn’t care for, all prints came out factory quality. The prints were immaculate overall and deserve praise. Having texture on some sides and not others add personality and functionality as well. There are a lot of brilliant subtleties even in the products I didn’t like too well
The bottom line here is that these products actually work as advertised. What’s even better is the hole in the retro scene that they’re helping patch. There are too many retro parts that are breaking and companies won’t supply replacements. Now they’re being remedied by Retro Frog, similar companies, and the community. It’s time to give them your money so that they can keep saving us from scalpers. Otherwise the scalpers with their over priced OEM parts (that will also inevitably break/rot) win. Heck, you don’t even have to buy anything and you can still support the cause. Or, if you have a 3D printer, you don’t even need to support the cause, you can still print off the models that Retro Frog has made. Retro Frog is a massive benefit to the community.
Purchase Links:
-
XBOX 40mm Fan Mount
-
XBOX 70mm Fan Mount
-
GC 40mm Fan Mount
-
PC Engine BUS Cover
-
OSSC Shell
-
Tribute64 Dongle Support Bracket
-
GCHD MKII Support Bracket
-
AND MUCH MORE!