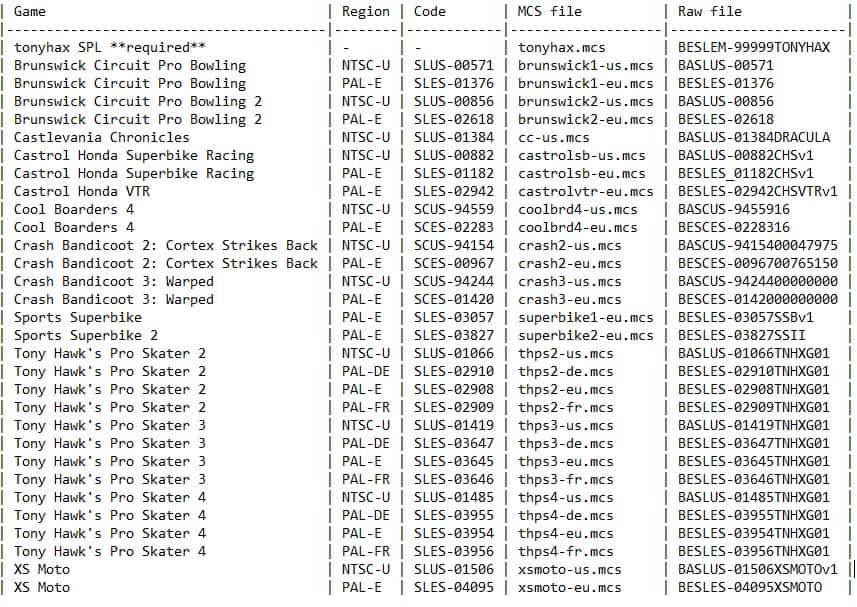
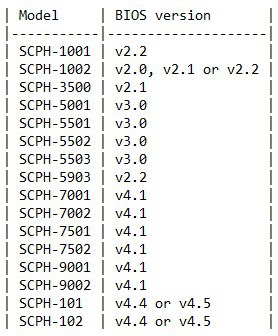
It’s been a long time coming for this. It’s primarily because we knew there would be more updates and improvements. We wanted to wait for the “it’s as good as it’s going to be”, but the creator of Tonyhax just kept working. And then, out of left field, came FreePSXBoot. So then Tonyhax got updated to support that! It’s crazy stuff and it means there are simply too many variables to consider. So we’ve done our best to make sense of them from both the site hosting Tonyhax and also FreePSXBoot. When in doubt, feel free to visit the original websites or my video at the bottom of the page. The video only roughly shows what it should look like once the files are in place, but ideally, the text instructions should cut the mustard. Let’s do it!
Tonyhax Instructions (using PS1 disc to load it)
Step 0. Have a modded PS2.
Step 1. Own just one PS1 memory card. It can be for both Tonyhax and other game save files.
Step 2. Download Tonyhax from here.
Step 3. Format a 1GB or larger USB thumb drive as Fat32.
Step 4. Open Tonyhax download, go to the loader folder and copy BESLEM-99999TONYHAX to the USB thumb drive.
Step 5. Go back into Tonyhax download, go to the entrypoints folder and find the save file for the game you want to use (must be compatible with your PS1, use table below)
Step 6. Copy that file to the USB thumb drive.
Step 7. Put the PS1 memory card goes in your PS2’s second slot.
Step 8. Put the USB drive in your PS2 as well.
Step 9. Boot into your PS2 mod and go into the uLaunchElf program.
Step 10. When in there, navigate to your USB and copy the file that you got from the entrypoints folder and BESLEM-99999TONYHAX.
Step 11. Now, navigate to your PS1 memory card in slot two (mc1) and paste the files. May take 30 seconds to a minute.
Step 12. When it’s done, power off the PS2. That memory card is now ready for its big debut!
Step 13. Go to your PS1, place that memory card in slot one so it automates the process a bit.
Step 14. Put in whichever game disc is your entry point.
Step 15. Wait for the game to autoload the save and then activate the exploit (Click here to see how your exploit is triggered).
Step 16. Tonyhax will then appear and will tell you when you can put a burned disc in to play!

Tonyhax Instructions(using FreePSXBoot to load it)
Step 0. Mod your PS2 if you haven’t already.
Step 1. Own two PS1 memory cards. One will be for Tonyhax and one will be for save files
Step 2. Download MC Annihilator v2 from here.
Step 3. Download Tonyhax from here.
Step 4. Format a 1GB or larger USB thumb drive as Fat32.
Step 5. Open Tonyhax download, go to the FreePSXBoot folder and find the version compatible with your PS1 (table below).
Step 6. Put the .elf file from your MC Annihilator download and the .mcd file for Tonyhax/FreePSXBoot on to the USB.
Step 7. One of the two PS1 memory cards goes in your PS2’s second slot.
Step 8. Put the USB drive in your PS2 as well.
Step 9. Boot into your PS2 mod and go into the uLaunchElf program.
Step 10. When in there, navigate to your USB and load the MC Annihilator .elf file.
Step 11. Once it’s loaded, choose the “Restore MC image” option.
Step 12. Press L2 to have it show you all file types. Once you see the .mcd file on your USB show up, choose it.
Step 13. It’ll ask you to choose and confirm your memory card of choice, choose the one in slot 2.
Step 14. Let it do its thing. When it’s done, power off the PS2. That PS1 memory card is only used to launch Tonyhax from now on.
Step 15. Go to your PS1, place the formatted memory card in slot one, put your other memory card for game saves in slot 2.
Step 16. Boot PS1 with disc lid open, wait for Tonyhax to load. It will tell you when you can put a burned disc in to play!
Marco’s Acknowledgements (these people deserve some fanfare)
- ChampionLeake for documenting the Brunswick exploits at PlayStation dev wiki.
- Gerardo Rodriguez for suggesting Cool Boarders 4 on a YouTube comment.
- @FMecha for suggesting Castrol Honda VTR on Twitter.
- Jose Silva for adding support for Sports Superbike II and XS Moto.
- Martin Korth for his super awesome technical documentation page that was vital for the development of this project, as well as for developing the no$psx emulator that was also essential for debugging.
- Patrick Vogt for testing on multiple development PS1 consoles.

