First, this PS3Xploit was supposed to be released Q1 2018 but it was released as a very early Christmas present for every PS3 owners. The NOR Dumper can dump every PS3’s Flash with NOR Flash. This means old Phat PS3’s with NAND Flash and Super Slim PS4’s with eMMC can’t be dumped with it.
Now, this is not too interesting for the general user who wants to hack or as many would say Jailbreak their PS3. Now, this is where the 4.82 NAND/NOR Flasher comes into play. This is a really neat piece of software that doesn’t actually flashback a NAND/NOR Dump but writes some CoreOs Data to flash regions ros0 and ros1 to enable compatible PS3’s to directly install CFW on latest Firmware and have all those cool things you always hear about but never have.
But first of all a Disclaimer. This has been made as safe as possible by the Devs but there is always going to be the possibility of something that could go wrong. In case of an actual brick, you can still recover your PS3 with a Hardware flasher or with the recovery menu if its still accessible but there are few simple tricks minimize the risks. This Flasher only supports Phat PS3’s and Slim PS3’s up to 25xx that have a minver of 3.56 and lower. You can check your minver version by extracting this file and copying the PS3UPDAT.PUP on a fat32 formatted USB Drive creating a folder called PS3, inside of that creating a folder called UPDATE, and copying the file into the UPDATE Folder. Then just use “Instal Update from Flash Drive” and install the file. It will stop at some point and display the minver your PS3 supports.
minverchk.pup: http://www.mirrorcreator.com/files/1OJQOQYM/
So if you got a compatible PS3 let’s put a CFW on it 😀
First of all, you need 2 things
FAT32 USB Stick
flash_482.hex (DO NOT UNDER ANY CIRCUMSTANCES RENAME THE FILE!!!)
Now let’s install a CFW on your PS3.
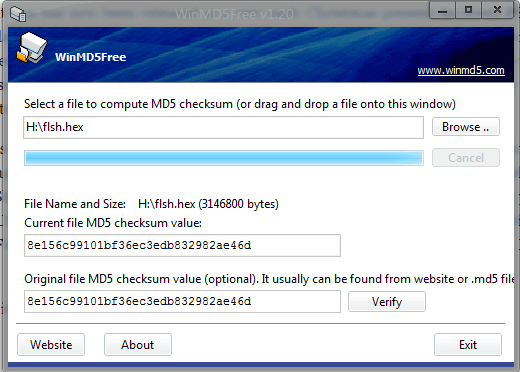
1. Copy the flsh.hex file to the root of your USB Stick. CHECK THE MD5 WITH WINMD5FREE OR ANY OTHER TOOL. AS LONG AS THE MD5 MATCHES YOU CAN’T BRICK. ALSO, MAKE SURE IT’S THE FILE FROM YOUR USB YOU CHECK.
MD5: 8e156c99101bf36ec3edb832982ae46d
2. Put the USB farthest to the right USB Port on your PS3.
3. Power up your PS3 and open the Browser. Press Triangle and go to “Tools”. Then go to “Home Page”. There Select “Use Blank Page” and press OK. This will make launching the exploit easier. Now close the browser and open it up again.
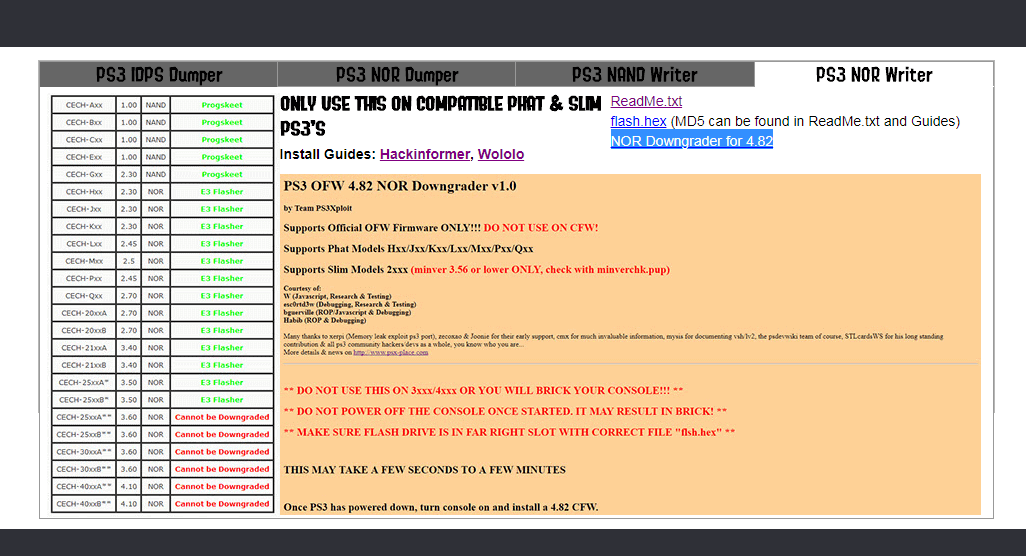
4. Press “start” to open the Search bar and go to http://darthsternie.bplaced.net/team-ps3xploit-browser-exploits.html or here https://ps3xploit.com/writer/index_nand.html. There select PS3 NAND Writer, if want to hack an old Phat Console with NAND Flash (Model Axx/Bxx/Cxx/Exx/Gxx) DO NOT USE ON PS3 Models 3xxx/4xxx (aka SuperSlims / Late Slim models) you will brick those consoles.
If you own any other compatible PS3 just go to PS3 NOR Writer. https://ps3xploit.com/writer/index_nor.html Now just go on “NAND”/”NOR Downgrader for Firmware 4.82”
You will be greeted by a Pop-up that mentions that your PS3 is compatible so just press OK. When the page loaded just Press on “Write to NAND/NOR Flash Memory” If all goes fine the exploit will trigger and you will see a green success message.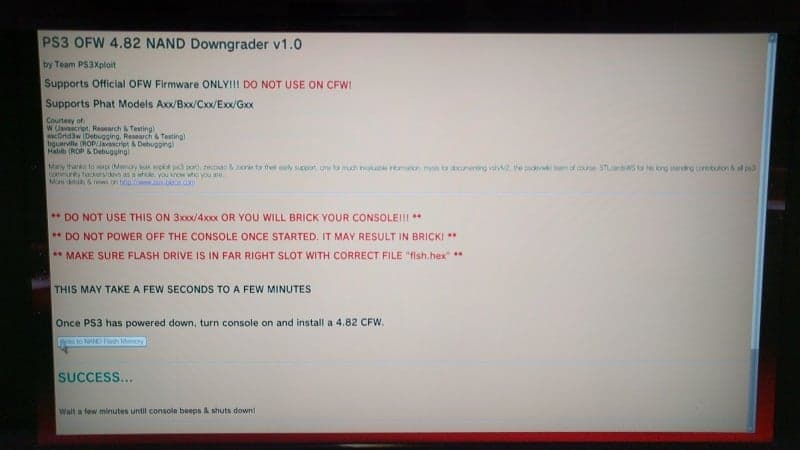 Just wait until your PS3 shuts down. If it takes more than 5 minutes to shut down the PS3 it most likely froze. If this happens you can safely shut down the PS3 by disconnecting power and trying the exploit again. This is a known problem and is currently being investigated by Team PS3Xploit. You can try resetting your PS3 to factory settings. This has worked for me and the exploit worked first try in a few seconds after doing this.
5. If your PS3 has successfully shut down just boot it up again and set it to go through “it’s you did not turn off the system right” crap. Then you can now choose what you want to install next. You can either install a 4.82 CFW (Currently the only available CFW is Ferrox) or install 4.81 Rebug REX with this modified PUP by Thibobo directly over the 4.82 OFW.
Whatever you choose just download & copy the CFW you want to install to your USB Stick into /PS3->UPDATE and rename the PUP to PS3UPDAT.PUP.
Now just install the CFW by going to System Update and choosing Update from Flash Drive.
6. That’s it. Now have fun with your completely software hacked PS3 and don’t forget to thank the great Devs behind this Exploit.
If you installed 4.82 CFW and want to downgrade your CFW you first need to QA-Flag it. Since it’s not that easy to find the correct information I’ll briefly explain how to do that here.
1. Download Habib QA-Flag Standalone.pkg and put it on the root of a FAT32 Flash drive.
2. Power up your PS3 and go to “Install Package Files”
3. Install and run Habibs QA-Flag Standalone Installer
4. When your PS3 returns to the XMB go to Settings->Network Settings and press L1+L2+R1+R2+L3(Press Left Thumbstick)+DPAD_DOWN
You should now have Debug Settings and two other things unlocked. Open Debug Settings and search for something called “System Update Debug” and turn it on.
You’re done. Just put your favorite PS3 CFW on the USB now and install it directly.
Thank you so much to the Devs W (Javascript, Research & Testing), esc0rtd3w (Debugging, Research & Testing), habib (ROP & Debugging) and bguerville (ROP/Javascript & Debugging).