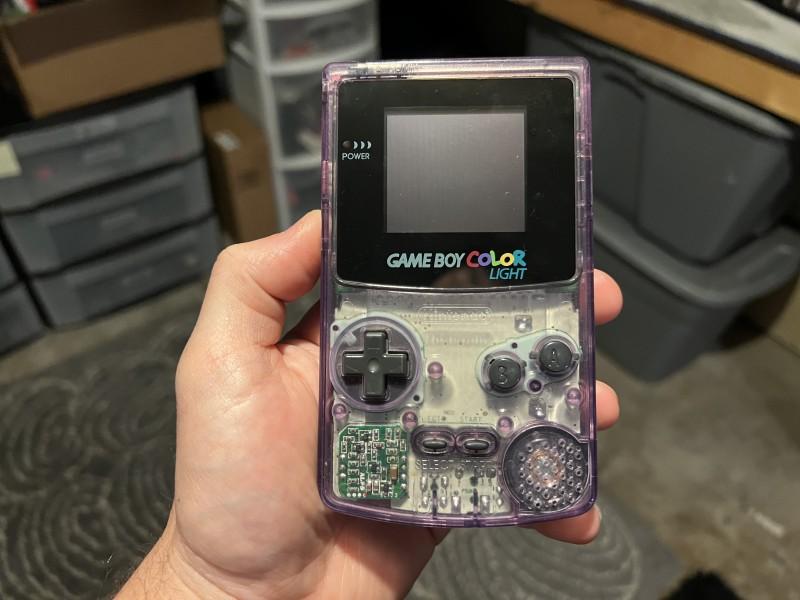
Vetro Gaming has a motto: Modernizing the Game Boy, Enhancing Your Nostalgia. A bold claim for a small company, but not out of the realm of possibility. Today I’m going to be diving into what that means by dissecting the drop-in LCD backlight kit that they sell for the Game Boy Color. Does this device modernize my Game Boy Color? Does it enhance my nostalgia? Let’s dive in!
Description:
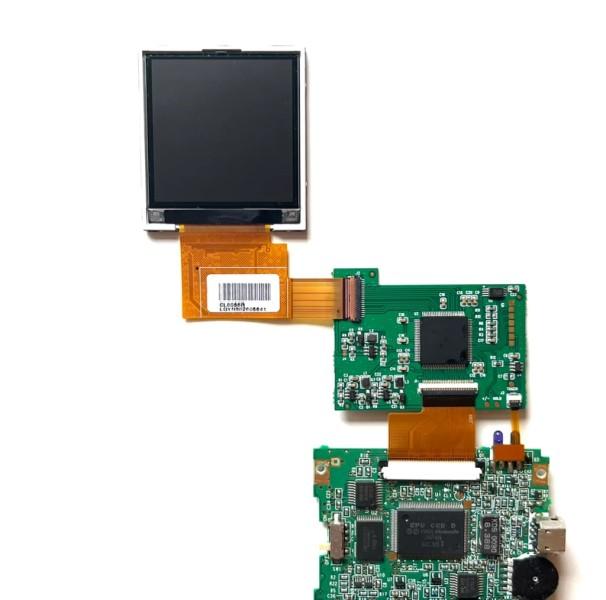
“This is a fully drop-in TFT backlight modification kit that comes with everything you need for an easy installation.”
Features:
- “Tri-wing and cross-wing screwdrivers
- TFT display
- PCB board
- Insulating films
- Acrylic centering spacers
- Custom-fit glass screen lens”
Unboxing Video:
Pros:
- Customer Service. I will get to the product pros in just a moment. But I want to start by giving kudos to Vetro Gaming as a company first. I experienced a small issue while testing the product. Without diving too much into the issue I came across, I just want to say that they’re great. It would seem that if you come across any problem or issue, Vetro Gaming will be there for you. Their communication as a company is a breath of fresh air in this day where you normally wait in a support ticket queue.
- Cost. My second favorite point to give them kudos for is the affordability. This whole entire kit, with everything it comes with, clocks in at just $55. This means that if you have a childhood Game Boy Color and you keep not playing it even though your nostalgia for it keeps you up at night, you can get this. In fact, if you have $60 (on average) you can buy this and have it sent to you. Now you can get onto playing!
- Screen Size. This is going to be a point of contention for a lot of people. The size of this screen is not the XL size that you see a lot of people opting for nowadays. This screen seems to be the same as the OEM screen. But it does seem to have a lot of points going for it. It’s obviously going to be better on battery. But not just that, you don’t have to chop up your shell to get it to fit and buy the correct lens. Or you won’t have to buy a precut shell.
- Simplicity. The instruction video that I made for this kit will be out next week. I’ll update this article to feature it, but I want to talk how incredibly easy this install truly is.
.
You have to firstly open the shell of the Game Boy Color by removing the external screws. The screwdrivers needed to do everything for this are included with the kit. Once you’re inside, just unscrew the few screws to remove the motherboard from the shell’s front half. Once you’ve done that, carefully remove the screen and unplug the flex cable from the PCB. Now remove the OEM plastic lens, and peel the 3M wax paper off the included lens.
.
Lay the new screen in and pop in the placement shims. Peel the included clear insulting film and put them on the back of the screen and PCB. Now connect the screen to the PCB and the PCB to the motherboard where the old screen was plugged in. Now the kit folds and tucks inside nicely. From this point, take the little flex ribbon at the top right and tuck it into the IR sensor. You can now screw the motherboard back in place and then screw the back shell back on. There is a picture down below of what you should expect to see and how easy it is.
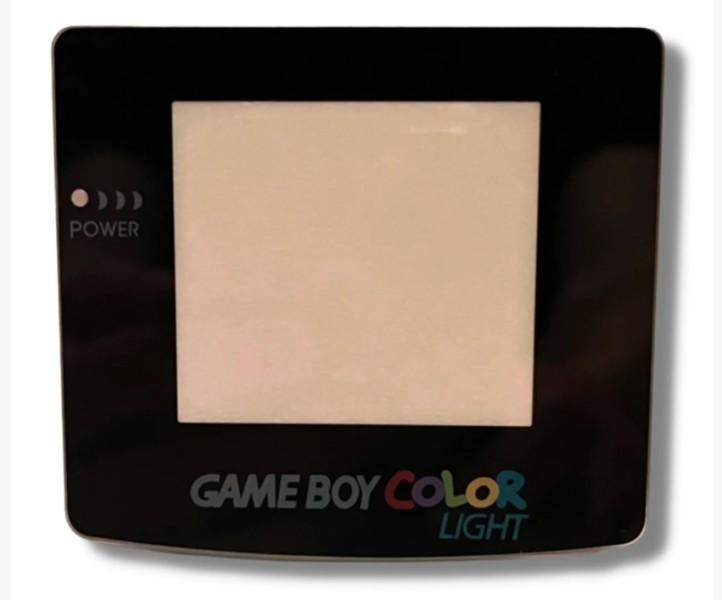
- Brightness. One of the major selling points besides this being a drop-in, no-cut kit is also the lack of soldering. That’s right. There is absolutely no soldering required to achieve brightness control. If you’re reading this article, that means you’re looking for a good easy option. That means you are also likely aware of the downside of other kits requiring soldering the brightness controls to the motherboard because they connect it to button combinations. Here you simply place the light sensor into the IR sensor and it will then let you tap on it with your finger and change the brightness accordingly. Each tap reduces the screen brightness by 20% (5 total options) all of the way down to the OEM GBC brightness.
- Lens. We touched on this a little bit when discussing the simple install. If you watched my unboxing video, you saw that this kit comes with several items. The kit isn’t just the screen, flex cables, and PCB; but also the lens. This is great because lots of other kits require you source your own. This one also has an accurate logo at the bottom, usually logos are some comic-sans style font and are a bit too obvious that they aren’t legit. Additionally, the included lens is made of glass. Glass, scratch resistant lenses are usually what most people updating their handhelds seek.
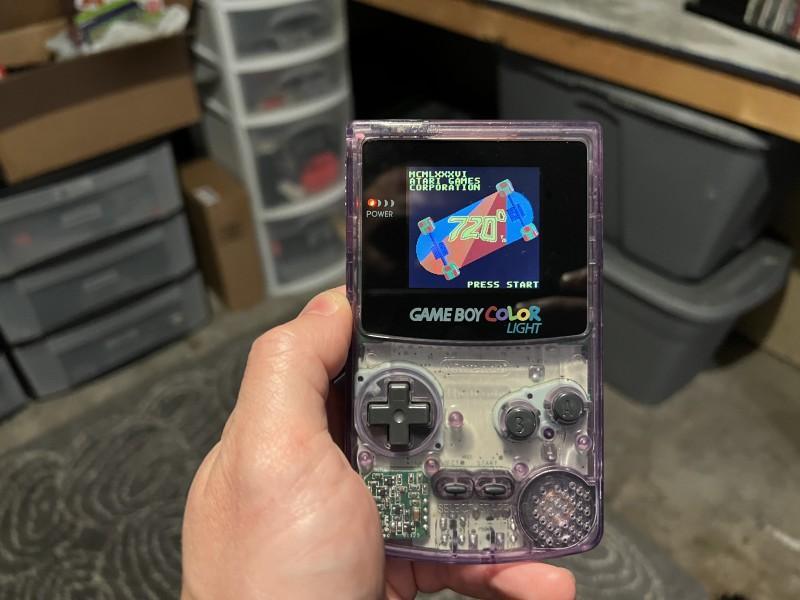
- Look. The clarity of the screen is truly second to none. It matches the clarity of the OEM screen that you grew up loving. I looked deeply at this, trying to find how accurately it is rendered. Well, I’m happy to report that there is not any stretching (for lack of a better word) of pixels and there for sure is no ghosting. The only downside I could find is that on the brightest setting, the black backgrounds of certain games appeared more blue, maybe a bit washed out. But I never played at full brightness after my testing and was entirely happy with the results.
.
The viewing angles of the LCD are fine. I even laid down in my bed, rested the GBC on my stomach, and leaned it back so I could see. Even at that strange, tilted angle I found that the screen looked good. The only point there was a strange angle was when it was leaned a little toward me. It’s an unnatural angle anyhow, so it’s likely nothing you’ll ever come across.When my installation video comes out, I’ll have more footage of the clarity I’m talking about. I love it!
-
Battery life. This one is hard to answer. I really thought I could do testing and come out giving a concrete answer. I found that even one time use batteries differ, some are lower power and others are made to have longer lives. My rechargeables also have different mAh. Not to mention that the different brightness options make the tested trivial. And for a reason I’ll be bringing up in the “Cons” section, I also couldn’t get an average.
.
But what I can do is tell you what I did to maximize and get the most longevity out of it. So here is my official list of how to get it to last. You can deviate from any of these if you would like to, but you will get less desirable results. These tips also work well even without a backlit screen mod.
,
1. Turn it to the second to last brightness option. This works well indoors and that’s where you’re likely to play it.
2. Don’t use an Everdrive. Yes, that’s right. If you want the most amount of battery, whip out your favorite official Nintendo cartridge instead and play it.
3. Use the highest capacity rechargeable batteries that you can find. For me, the 2450 mAh ones from Ikea were the highest in my area.
4. Turn the volume all of the way down as low as you can. Maybe don’t mute it, but certainly reducing the amount of power to the driver will help keep your batteries lasting longer. You can also opt for corded headphones.
Cons:
- Everdrive. The only thing I could find that bothered me is something small. And who knows, it may have a resolution but I won’t likely bother fixing it. When you have this installed and have any brightness setting on, putting in an Everdrive will cause an issue.
.
The issue at hand is that you can hear a hum from the speaker. This issue doesn’t exist on the default OEM screen and doesn’t exist if you turn off the brightness. This hum also only exists in the menu screens of the Everdrive, mind you. You won’t have it while you play a game that you choose. I’m unsure if this issue exists on other GBC flash carts, but it does on mine.
Installation Video:
Final Thoughts:
A bright screen that you can increase and decrease the brightness on. A glass lens that resists scratches. No shell cutting required. Drop-in kit that is also power efficient. Yeah, I would say that we have injected modern sensibilities into our nostalgia. No more leaning underneath a lamp light or turning the screen just the right way in the light. Vetro Gaming is a company with a bold mantra that they’ve shown they not only reach but also surpass. They even have other services and products, for those interested. Check out the links below.
Additional Services:
Complete Various Game Boy Models
Purchase Link: