First off I want to say that I am proud that I got to work with SK customs on this. I haven’t had too much control over products I review on here (beggers can’t be choosers). All too often we cover big-name companies and their products. And as consumers know, that doesn’t always necessarily mean good results. Sit back, read, admire the pictures, and watch the video!
This review is going to go a bit differently. I want to cover it from beginning to end as a customer might experience it. But this is a good thing, I assure you.
Beginning-The Setup:
I feel like from its inception to its delivery working with an individual was much faster than a company when it comes to making something from the ground up. SK Customers was able to message me and keep a conversation going about what I was looking for and the entire time they kept an open mind. Sure they have standard options like replacing Joycon sticks, upgrading buckles, and swapping shells. Going deeper down the rabbit hole you’ll find that they are capable of so much more. Any artist that you commission to make something for you is something that will cost you and that means you have to really want to do it. You have to really want to stand out. You have to really want that conversation starter that makes you proud of the product.
That’s exactly what I’ve been looking for. I’ve been on a constant search to find somebody who can customize these controllers and deserve to benefit from the attention that one of our articles might bring them. Big companies know this, big companies, and send out extra review kits. That’s because at the end of the day they know that word of mouth from sites is cheaper and more effective than paying for any kind of online marketing.


So let’s start with what I originally wanted and talk through the process. When I reached out, I simply asked for a demonstration of his services. I suggested sending over my imported red Japanese Joycons so that they could have improvements made. The left thumbstick was already drifting a bit since these are my go-to daily drivers. So of course I asked him to replace the thumbstick on the left Joycon. He suggested I replace both thumbsticks. If not, I would risk the right one being older and starts to drift, and then I’d be in the same scenario. This was incredibly insightful on his part.
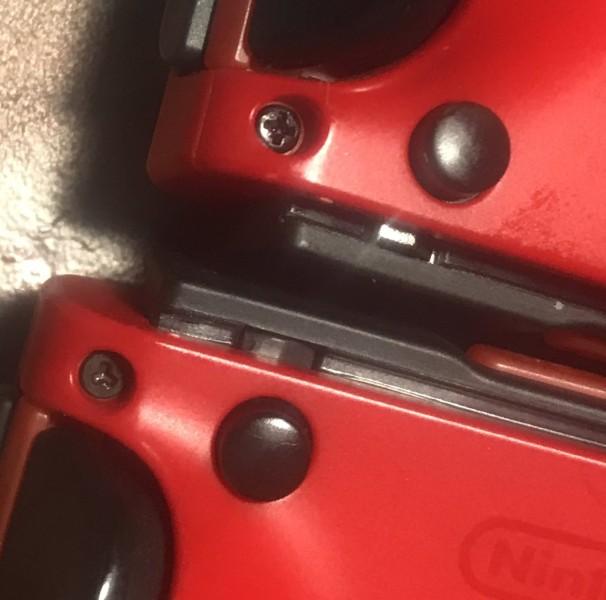
The next thing I recommended on my red Joycons was replacing the buckles. If you don’t know what the buckle is, let me fill you in. The buckle is the assembly that moves when you push on the button to release the Joycon. The reason you’d want to replace it is that as time goes on, you’ll start to notice that your Joycons wiggle. Not much, maybe a millimeter up and down. Sadly, the plastic that Nintendo used seems to be a bit soft in terms of holding it in place. Metal buckles on the other hand do not shift or move because the metal is far more resilient.
Last of all, SK Customs suggested changing out the screws while he was in there. Replacing the triwing outer screws is another smart idea for people who use Joycons a lot. This solves the problem with always having to use triwing screwdrivers to get in and then swap to your Phillips screwdriver. It also means no potential stripped triwing screws (they’re a bitch to remove). So a lot of insightful ideas on his part, for sure!

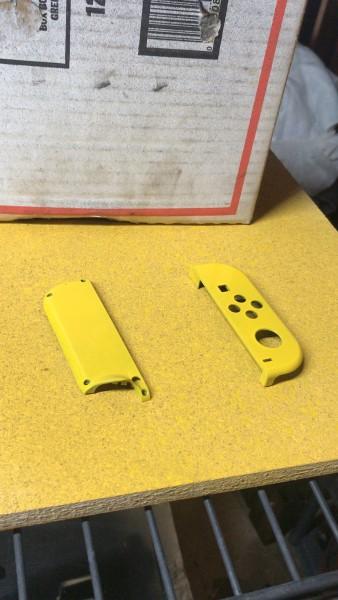
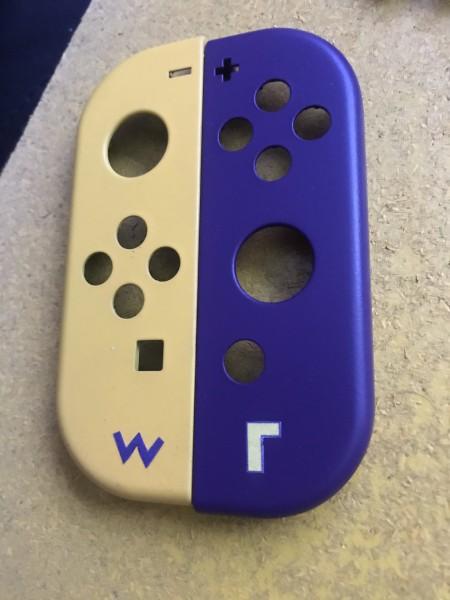
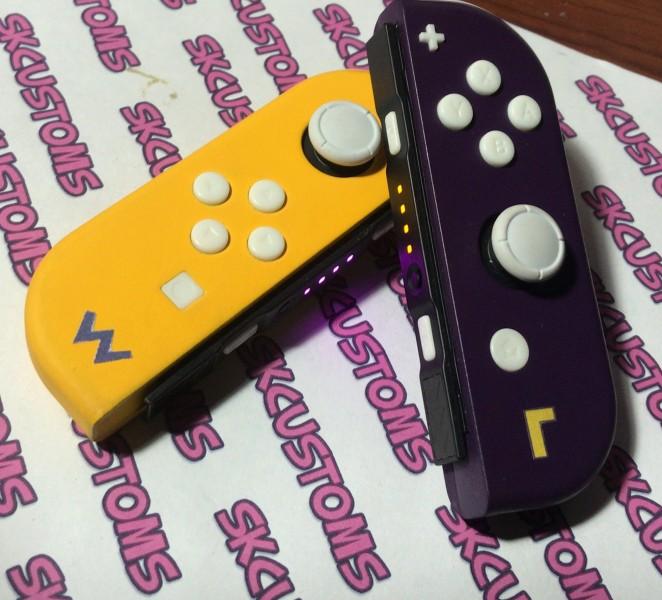
Now let’s talk about the full customization of my gray Joycons. They came with my day one Nintendo switch. Not that I hate the gray, but they are just so lackluster. So when talking with him about it I knew that I wanted to make controllers that not very many other people had. My red ones were definitive and vibrant. I wanted something like that to replace the gray so I decided to ask them to be modeled after my favorite Nintendo character, Wario.
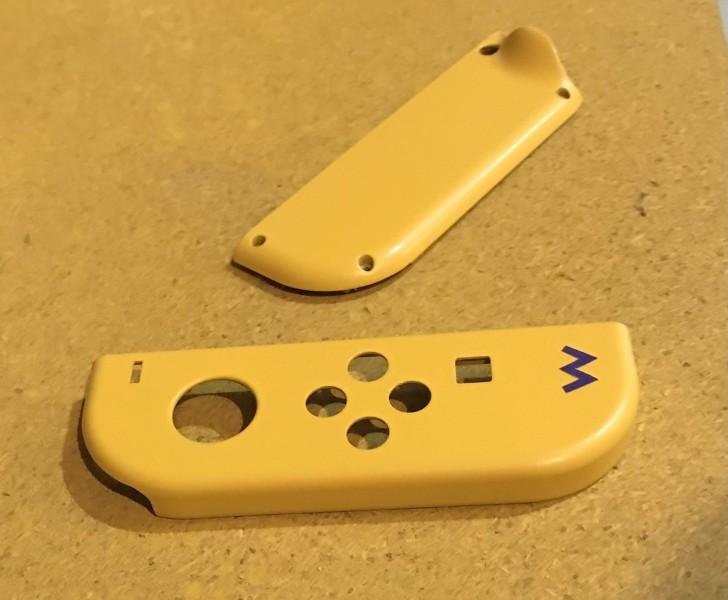
My first recommendation was that maybe he could make them both yellow and make the buttons purple and have that classic Wario color scheme. But then they replied with an even better recommendation. Why not have both Wario and Waluigi Joycons?! One would be yellow with the purple W on the lower corner and the other would be purple with the upside-down L, in yellow. What a brilliant idea! Then SK Customs recommended that we take it even further. How about we enhance it with white buttons and thumbsticks? I absolutely agreed! The last recommendation were custom LEDs. These would replace the standard color that Nintendo installed on the rail. A welcome idea for sure! He installed purple LEDs on my yellow one and yellow LEDs on my purple one. The last point of business was, of course, the metal buckles and replace the triwing screws.
Middle-The Semantics
I’m not normally picky, but this time I was. I was being asked what I wanted, why not be honest? So, I truly detest glossy controllers and thus requested matte paint. SK customs definitely was not intimidated by this request, mind you. However, it was definitely a new request that took them some trial and error. If you’re asking for a very specific product/service you need to understand something. When it’s a specialty request, it’s going to take time and you must not complain about it (within reason). The time it takes is the time that it takes. Artistry cannot be rushed if you want it done right. Custom jobs are art, if you don’t agree, you should not be doing this anyhow.
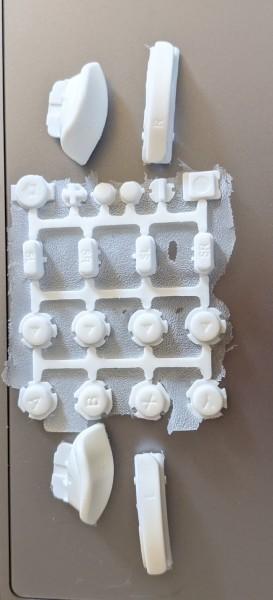
SK customs worked with another individual to cast the white buttons so that they would be accurate. This took time because everybody in a supply chain has different schedules. Remember that and do not hold one part of the chain accountable for that. With the L and W icons, stickers were ultimately used. I’m unsure if that caused any issues for SK customs. It may have been their preferred method. It wasn’t my idea, so I can only guess it was something that they preferred.
If you want to avoid supply chain delays, here’s my tip. Ask SK Customs which button options they already have in stock. Same with special requests that you’re afraid it might take too long. See what they already have in stock or ask which methods they’re experienced with and can get done in a timely manner. If you have time and have the money, foot the bill for your own ideas!


End-The Fit & Finish:
So I finally received them back, how are they? As you can already figure the thumbsticks, metal buckles, and Phillips screws are the same in both serviced Joycons. So we can touch on them both simultaneously. When I sat down and tested the thumbsticks everything looked, felt, and played great. I also used the thumbstick configuration on my Switch and they’re tight and snappy! The main point about the thumbsticks it’s just how dirty the left white thumbstick already was. I’m guessing this is from testing and just naturally to touching things in the studio in which they were assembled. Luckily it cleans right off, but that’s not my ultimate concern. It’s more about the continual dirtiness that they’ll show.
The screws on the back look good and are colored black. Otherwise not too much to comment on. The metal buckles though… you must do this now! Like if the only thing you ever do is metal buckles on your Joycons, you’ll be very happy! In fact, the sooner you do it the better. I recommend that you have someone who is experienced in the matter like SK customs do it for you since there are lots of small intricate pieces in a Joycon.
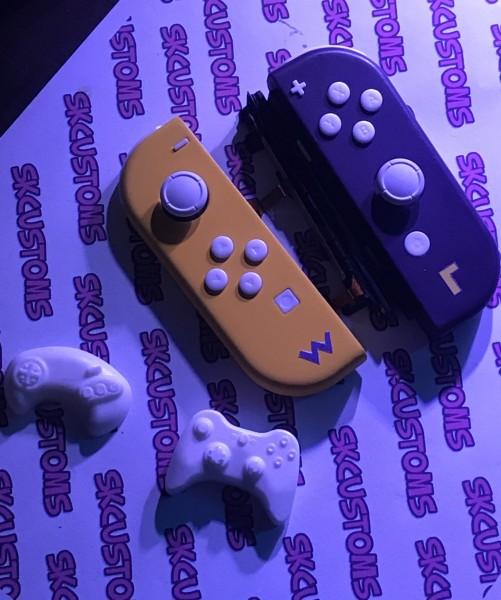
The white buttons that were cast are up next. We can’t give SK Customs all of the credit for the buttons that were cast. They’re not his product, but we can still talk about them since he vouched for them. Honestly, they feel great and I don’t know why I expected any less. I suppose in my mind resin was some type of rough feeling surface. Nope, it totally feels like a normal button. The color of the buttons really does accent the purple and yellow nice and evenly. I’m unsure of the flipside of the button if they had to be sanded or something. However, the travel of the buttons is spot on since they were cast using a mold of the OEM buttons. So they get a giant thumbs up from me! Shout out to @VeryNiceMitch
Now let’s talk about the stickers. SK customs admitted to me that originally they gave him troubles. When I looked them over, they are admittedly under 100% perfect. Don’t get me wrong though, I was never expecting perfection. In fact, they look superior compared to my expectations of them. I do wonder about their longevity or if they’ll come off one day. Either way, they’re a B+ in my book. I hope to see SK Customs experiment with them more and hone the craft of incorporating stickers. My main complaint about the W and L is more about the placement. You just don’t see them when your hands are on it. If I were to make any change it would be to just have them painted onto the center backs of the Joycons with a stencil. Or airbrush a W and upside-down L on the front of the respective thumbsticks.
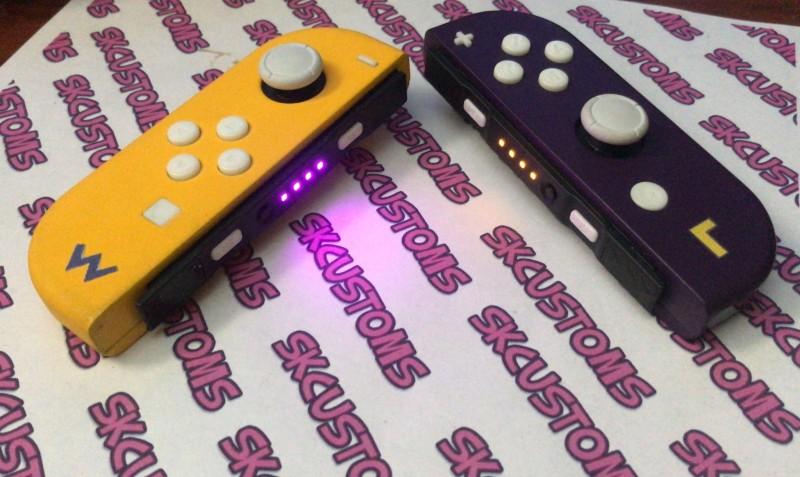

The LED replacements are the next point to talk about. This touch, like the screws, that most people will not really fuss over too much. A fair amount of us don’t play docked or in tabletop mode. We like to keep our Joycons firmly seated in the rail slots, hence the metal buckles. So for that reason, I actually forgot about my LED swap for a long while! It wasn’t until I docked my Switch and put the Joycons into the grip that I remembered. Since the front of the controller grip has light tubes to pass the rail colors to the front.
I was like, “Oh yeah! Forgot all about that!”. I took them out and admired the colors. The yellow LEDs are a bit too similar to the default color but different enough that it gets the point across. I did absolutely love the purple LEDs though. It’s so cute to see a bright shining purple. Otherwise, not much to say, they’re just lights, and replacing them may not have much purpose besides flare. But so is the painting of the shell, I suppose…
What a nice transition into the last topic of discussion. The matte paint.
Before continuing, I’d like to stress that these opinions are my own. They are not likely to be shared by others. I’m always sensitive to textures and have ADHD.
Continuing on now, the matte Joycons feel great if you’re using one on its own (Mario Party). But playing with both at the same time throws me off. It’s hard for me to not focus on the fact that the left Joycon feels different from the right. I’m uncertain of the cause of the different feelings (i.e. maybe more layers, maybe less sanding) but I notice it too much to confidently touch it all of the time.
It’s all my fault for requesting a matte finish. A smooth, glossy finish likely would’ve felt more symmetrical. The easy fix for me was to put a plastic case on the whole thing. That way I get the glamorous looks and I don’t feel the stuff that sets of my brain. This also likely will keep the stickers firmly seated, never to move. This also protects the beautiful colors that he got his hands on. The purple is definitely the correct color of purple and the yellow is so frickin’ yellow, I love them. They look just like our favorite anti-heros (and goofballs), Wario and Waluigi!
Final Thoughts:
This is simply a great service from SK customs. There is no denying it. I would recommend to anybody who can wait patiently and spending money to reach out to SK customs using their information below and see about a commission today. If you are impatient and/or think you can wheel and deal prices, you should not be reaching out to any customization services. When you reach out to SK customs I would inquire about what they are really experienced with and what they might already have in stock and go from there. In the video (at the bottom) you’ll see that he even included an extra Joycon shell to show one of his more sophisticated shimmering techniques. It looks so much better in person than it does in pictures or videos!
Notes from SK Customs:
- I run a 90-day warranty on any work performed or on the buttons! Within reason of course! And after those 3 months, I will offer additional discounts on any future repairs!
- Accept trade-ins for $50 off of orders!
- If someone were to supply all the parts for what they wanted to be done, I am always open to negotiations!
- I offer
- Colored LEDs swapped into the rails/player indicator lights from what I have in stock or I can order to meet needs!
- Several types of buttons. Either plastic or I have an amazing resin casting guy that does full resin face buttons, triggers, SL/SR, and release buttons! Price on those vary depending on how complex the color is and other factors.
- Replacement joysticks, with 4 different factory Nintendo colors!
- I say $25 to do the repair to swap thumbsticks and latches already supplied.
Purchase Links:
Reach out to SK Customs on Twitter to see if commissions are open at the time you’re reading this!
You can also peep the website to see prebuilt options for sale.