We’ve already talked in-depth about RetroSix’s replacement Game Gear shell, lens, buttons, membranes, CleanPower GG and all of the quality of life improvements that they make. If you’re not caught up on that yet, feel free to check that out here. But if you’re already on the up and up with that, we’re now going to discuss the pros and cons of installing RetroSix’s capacitors that they supply for the Sega Game Gear. Let’s get into it shall we?
Unboxing video of all of the Game Gear parts RetroSix sent us:
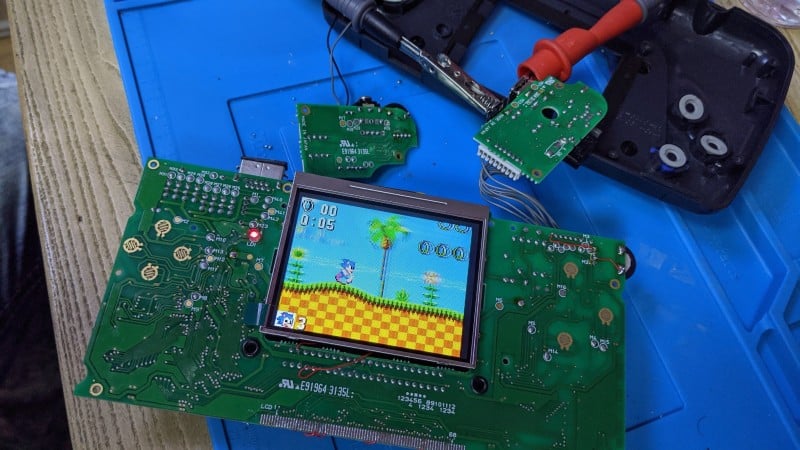
Swapping out capacitors video:
Capacitor Kit Description:
The Game Gear was notorious for bad capacitors, which means almost no Game Gears exist in the wild that work without repair. This kit comes with all the capacitors needed to fix your Game Gear. It is a much simpler install than all other kits. Only 3 different sized capacitors to install.
Capacitor Pros:
- Simple. The guide, once you find it anyway, is simple enough to follow if you’re experienced. It was quasi-scary when I was first looking at it, but it truly isn’t that bad in the long run. You could follow a video, but be aware that there is more to know than just if it’s a VA1, VA0, etc. I found that there are board variations within those models that you should be researching too. Once I did one, I understood what their diagrams and notes meant and I’m admittedly intermediate. I wouldn’t recommend recapping a board with any capacitor set if you’re not familiar/comfortable with a soldering iron. You can always pay to have it done.
- Organized. Everything came in separate baggies and each baggie was labeled accordingly. Each baggie had plenty of capacitors, I wasn’t short any at all. Best of all, I didn’t need the ones that they supply for the power board since I am utilizing the CleanPower GG, so I had a few extras. If you watched my video, you’ll see that I lost one of my ceramic capacitors and had to resort to a standard capacitor as the replacement. I lucked out, honestly. So in other words, RetroSix is organized and keeps track of the capacitors and I do not!
- Ceramic. This kit is a bit more advanced than other basic kits floating around on the internet. Not to say that the basic ones wouldn’t get the job done. I would never make that assertion. It’s more about the fact that the primary capacitors used in this kit are ceramic. That means that they come without the regular complications that the standard capacitors have. One such downside is that they have legs. Soldering legs onto a board can be daunting because they’re razor-thin and worse, they’re fragile. More than that, they have a specific polarity that you have to pay attention to. The ceramic capacitors simply get placed either direction onto the two points and soldered down, then you’re onto the next. Best of all, ceramic capacitors have nothing inside to leak and they just WORK.
- Price. At about $8-$10 (depending on your country), this kit is brilliantly priced. Usually, we don’t talk too much about the cost of things on here. We figure, if you have the money, that’s not the issue. You want to know the nitty-gritty pros and cons before you use your time buying it. But this time around I figured I would mention the price because other kits exist out there. You might think that other $10 kits are also organized and labeled…and you might be right. But they’re not ceramic, meaning you have to worry about the downsides of standard capacitors. Now, I looked online (in the USA) and as of the time of writing this, I could only find one seller who also has a kit with ceramic capacitors. Theirs costs $25 before shipping. I think I’ve made my point.
- New Life. So yeah, all in all, this kit is organized, inexpensive, long-lasting, and easy to install. If you were to already have a Game Gear that works, you could recap using this kit and be set for a tremendous amount of time. If you have a Game Gear that you thought was broken due to audio/visual issues, this would probably fix it. Or, if you see an inexpensive Game Gear being sold locally and you’re iffy on it because it has audio/visual issues, this $10 kit would probably fix it for you! A person online once said that Game Gears with audio/video issues can be fixed with a capacitor kit if you don’t see any external damage to them. Meaning, if the speakers or screen is busted in, a capacitor kit is not your solution. Otherwise, if everything looks fine on the outside, buy yourself this capacitor kit!
Capacitor Cons:
- Instructions. When you’re on the webpage for the capacitors on the RetroSix website, it states that instructions are included with your purchase. This was the first thing I looked for when it came time to install them. Those instructions were nowhere to be found. Funnily enough, I even went back and watched my unboxing video to see where I placed the instructions. Alas, none were in the video either. I was confused as to why they didn’t include an instruction sheet or book or something for me to use. I went to their site and there was no link on that page to instructions. Someone had to ask the question in the comments for them to share a link to the instructions. So maybe, if a customer had thought to check that section, they would see it there.
But if you’re like me, I had to look high and low until I ultimately found a “Support” section. In that section, everything is broken into a proper subsection. Finally, that’s where I found the capping instructions. My complaint is the lack of updates and clarity on their website. They should remove every instance of “Instructions included.” with their products that no longer include physical printed instructions. That text should be replaced with a link to the support page for that specific item’s instructions. I got you, though, dear reader. Click here to view the installation instructions.
Overview:
Aside from RetroSix having their wires crossed on the instructions, these capacitors are a home run. There’s not a single thing wrong with them and they helped get my Sega Game Gear back to a useable state. So if your Game Gear is stuck on a blank backlit screen with no sound, it’s probably high time you’d buy yourself a capacitor kit from RetroSix. Don’t forget, soldering skills are a must, but this is one of their services that RetroSix accepts send-ins for. If you’re uncertain about your capabilities and cannot find a local repair person that can do it for you, consider sending it over to the people at RetroSix (UK residents only). The links for buying the kit, the installation instructions, and the send-in service are below.
Purchase Link:
If you’re in the UK, click here to buy a capacitor kit.
If you’re in the US, click here to buy a capacitor kit.
UK resident? Click here to do their send-in service.