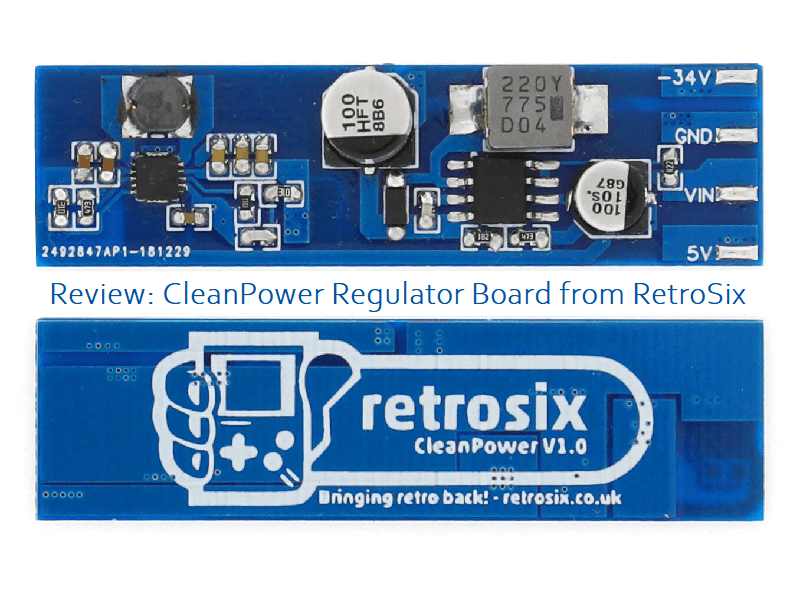
We talk a lot about handhelds here on Hackinformer. Recently I’ve personally been reviewing products for different Game Boy models. Today we’re covering the CleanPower Regulator Board from retrosix! This $10 add on is designed for the DMG Game Boy. What does it do? What is it for? How easy is the install? We’ll get to that right now, let’s do it!

Description:
‘Take your original Game Boy restoration to the next level with the custom built, ultra-efficient and clean power regulator designed in-house by RetroSix.
The CleanPower replaces the original power regulator PCB of the Game Boy with a modern smooth and health power supply.
Perfect if your old power board is dying or dead. Common symptoms include faded screen (lack of or no contrast), failure to load games, freezing or total non-power on conditions.
The original power regulator board is 30 year old technology; it is very inefficient, very unstable and does not do the Game Boy electronics any good.
During our journey of restoration perfection at RetroSix, we reverse engineered and analyzed lots of the Game Boy’s original components. The power regulator board was one of the worst parts about the original GameBoy, with various faults.’
Default Regulator Board Faults:
- ‘The 5V supply cannot handle the system load and constantly drops. This means the system is running from a heavily rippled and fluctuating power supply.
- The negative voltage line for the LCD is on its limits of current supply and wears away at the inductors over time, causing a lack of contrast and eventual dead of the inductor
- The entire regulator PCB is noisy, which injects a lot of unwanted ground noise to the board, causing many issues including audio quality loss
The CleanPower board by RetroSix addresses all of those issue, providing a clean, stable and efficient 5V and negative LCD voltage supply to the system to keep the lifespan of your console at it’s best.’
Unboxing Video:
Pros:
- Custom. A product like this truly needed to exist. RetroSix must’ve looked at the current state of the DMG scene and realized that there’s one part that keeps giving out. If your regulator board stopped working or was on its way out, you’d have to unfortunately, buy a used one. It would never be a brand new one and it would eventually die as well. Going through this could only mean that one day all of the original DMG regulator boards would be dead and zero DMG’s would be working. I’m aware other companies make regulator boards, but they’re promoted as “boosting” and “step up” boards. These are a bit more daunting and usually come with bivert mod kits.
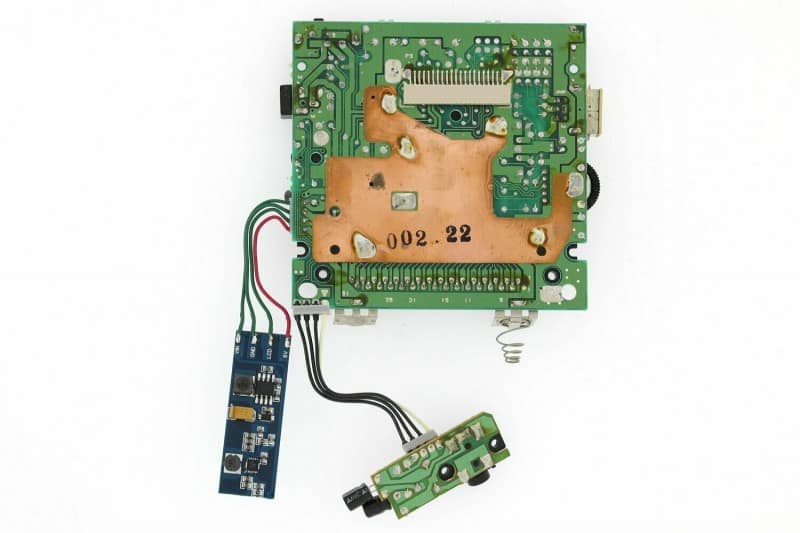
Why not create a custom replacement board that is easy to swap in instead? RetroSix clearly did some research and development, testing, and made sure they had a one of a kind product on their hands. You can only get this from them. - Simplicity. The first thing that you’ll notice here is that there is no solder required. The CleanPower regulator board comes with solder on the four points for you. Furthermore, you’ll be happy to know that it takes the four cords already in existence to solder to the board. You only have to worry about one end of the cords. The other ends stay soldered into the DMG mainboard. The whole process, if you’re familiar with things like this, should be at most fifteen minutes. But even myself who had to use pictures as reference, got it done in a half-hour tops. It really isn’t difficult if you have an idea of how to swap the regulator boards. If not, I’ll be posting our obligatory guide and video on how to install one of these.
- Size. With regards to the size, there isn’t much to talk about here. I just wanted to give some kudos to RetroSix. They get brownie points for manufacturing a smaller board in their solution. And while the board itself is smaller, but still fits nicely in the original spot. It may seem scary to someone who is soldering on it seeing how it’s smaller. But trust me, there’s room to mess up and it will not affect anything on the board if your hand slips while soldering. Everything on the board is solid and isn’t moving and you’re very unlikely to accidentally hurt a trace on it.
- Efficiency. I like some of what they mention on their page about their product and how efficient it is compared to the OEM regulator board. “The original power regulator board is 30 year old technology; it is very inefficient, very unstable and does not do the Game Boy electronics any good.” “The 5V supply cannot handle the system load and constantly drops. This means the system is running from a heavily rippled and fluctuating power supply.” I could go on, but you see here what the point is, the original board is stunted and that doesn’t help the health of the Game Boy.
Their solution definitely finds a clean, efficient way to regulate the power coming in from the FOUR BATTERIES. It does this without the flickering and such that the old board had done. I wish that I have a multimeter so I could give you all a further breakdown of this. But I have a much more consistent play session with my new backlit LCD mod with the new regulator. But even if you have zero mods, you’ll find that this efficiency leaves you with better contrast and longer battery life. - Cost. Seriously, it’s only $11 to either bring your old Gameboy back to life or to keep it from dying. The CleanPower Regulator Board is the difference from your loved one being on life support and living. To me it seems like a no brainer when you consider how easy it is to install and the pros that come along with it.
Cons:
- Instructions. I know that things like this that are custom-built are great things for us tinkerers, hobbyists, and modders. Nobody is disputing the helpfulness that these new-age creations bring. We do, however, need to have some kind of instructions come alongside it. The product page at least shows some stop-gap pictures and the finished product. Naturally, experienced folks can figure out how to get to the end result. But I do think we can encourage less experienced people that this is super easy if there was at least a short tutorial video on the product page. When I was less experienced, no instructions scared me away. I want people to enjoy the world of home repairs. It’s also more money for Retrosix, so it would be a win/win.
Purchase Link:
Click here to visit the purchase page. You can set your currency to any currency you need to use in the upper right hand corner of the page.