I know, I know, most of you don’t play DDR anymore if you ever did. Well, some of us old dudes did play it and we’re always stoked when there’s a new way to do so. Well recently, a kind soul by the name of p_sam ported Stepmania 5 to the Switch. So let’s take a look at what all that entails, shall we?
![]()
History:
Dance Dance Revolution came out way back when, you might’ve heard of it. When it was out on PS1, a superior PC port of it came out. It was notoriously easy to decrypt and before we knew it, we had an open-source version of DDR on our hands for PC by the way of Stepmania. Fast forward some years, we got a port of it on XBOX and then subsequently on PSP. The PC, XBOX, and PSP versions have all seen updates to introduce improvements over the years. Now, we’re here in 2019 and finally, we got ourselves a Switch version!
Instructions for Stepmania Installation:
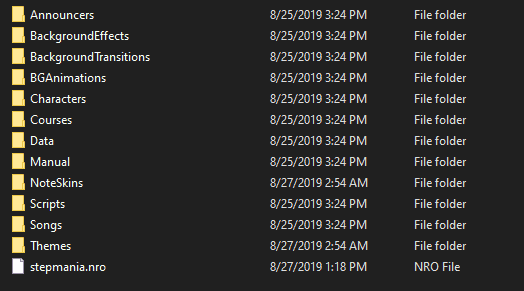
- Download this file from the github.
- Extract it somewhere on your PC.
- Now you should see the list of folders/files as shown in the picture below.
- Connect your Switch via FTP or insert your microSD card into your PC.
- Put the folders/files from the below on the root of your SD card.
- Eject and reinsert your SD card or disconnect from FTP.
- Stepmania has to load via hblmenu using hbl. Load it that way to start it up.
- If it loads successfully, follow the next set of steps below.
Instructions for Adding Songs/Vids/Backgrounds/Themes/Etc:
- Now that you know that it works, you can eject your microSD cards again and place it back into the computer.
- If you have a download of song packs/theme packs/announcer packs, they’re usually split up into the same folder types as you already have on your root.
- Drag and drop them to the root of your microSD card, overwrite any existing folders.
- Once that is done, pop the microSD back into your Switch.
- Put your Switch into CFW and load Stepmania via hblmenu.
- Depending on the amount of new content you just added to the homebrew, it may take a while to load. Just give it time if you added a lot.
- Once it’s loaded everything, you’re good to go!