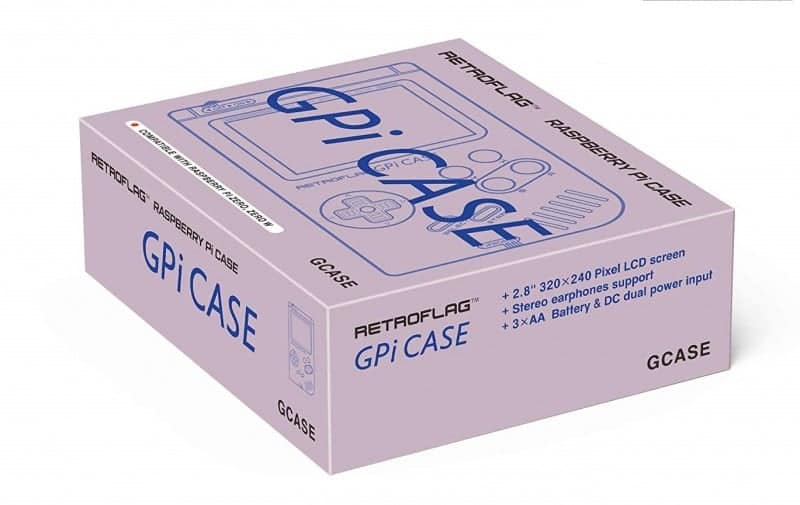
After a long hiatus, I’m back with a new review! Aside from this, I have a huge back catalog of products that have been accumulating since before my move to my new spot. But in the meantime, we have to talk about the GPi Case (Retroflag,~$80). This is an all-new product that they’ve released in a long line of Raspberry Pi cases. This one is their first portable case. At the end of the day, is getting your hands on one of these truly worth it? Let’s discuss!
Features:
- ‘Compatible with Raspberry Pi0 and Pi0-W. NOT Pi0-WH(with GPIO pins soldered)
- Feature: 2.8 inch IPS screen; 3.5mm audio port; LED power indicator.
- Support SAFE SHUTDOWN functions. (Scripts are necessary).
- Pogo Pins, Solderless and effortless to install.
- 12-Month Warranty.’
Specs:
- ‘Case dimensions-135*81*32mm
- Weight-183g
- Compatibility-Raspberry Pi ZERO and Raspberry Pi ZERO W
- Screen size-2.8″
- Battery-AA Battery *3
- Includes-GPi CASE and Instruction manual’
Unboxing Video:
Pros:
There are an incredible amount of great things to say about this magnificent device. I geeked out so intensely over this device. But I believe that I can put down the words in a clear, concise, and educated manner!
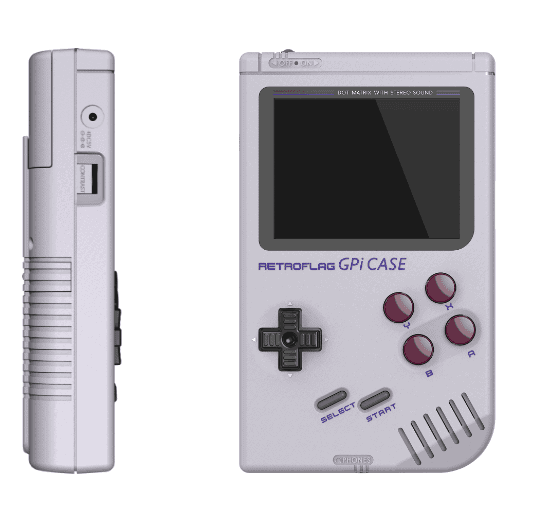
- Hardware: We can’t get anywhere without first talking about all of the buttons, dials, and ports this tiny guy comes featured with. On the front face of the device, you have the highest concentration of hardware. You have a 2.8 inch IPS screen, it’s resolution is 320X240. The brightness and viewing angles are incredible. You have to be at an extreme angle to catch a discolorization or a sliver of the lighting coming through the side. From there you have the D-Pad which looks and feels one to one with the original DMG D-Pad. I think the only difference is the size. It’s negligible, but it does appear a tidbit smaller.
Then you’ll find that you have the Start and Select buttons. Now they feel just the right kind of rubber to make them match the original Game Boy’s buttons. It’s such a specific feel that others have not gotten correct when doing their cheap knock-offs. Retroflag hit the nail on the head. And not just in feel either, these buttons have the correct amount of travel and don’t squish. The same goes with the ABXY buttons, they have the right plastic gloss feel and press correctly.
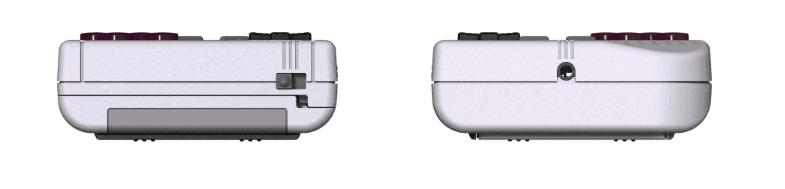
On the left side of the device, you’ll find 2 pieces of unique hardware. You have a port for powering the device if you have no batteries and just want to play it old school Game Boy style. There is also a dial underneath that labeled as “Contrast”. This is originally on the Game Boy, but here it is used as a brightness dial. If you continue onto the bottom of the device, you have a 3.5mm headphone jack. It’s positioned precisely where the DMG’s headphone jack is. It has a great hold on the cord and won’t just haphazardly come out.
The top of the device is interesting as it looks like it features a Gameboy cart and a power switch. While it does indeed have a power switch like the OG Game Boy, it does not actually have a game cartridge in the slot. The whole entire top back comes out. This is where the Raspberry Pi Zero goes. More on that later though. Now, on the right side of the device, you simply have the volume wheel and access to the microSD card via a small rubber flap.
Lastly, on the back, you have the battery door. Once you open it there is a slot for 3 AA batteries. I recommend using rechargeable batteries. And for those wondering battery life, I got just under 4 hours. Even with the brightness maximized and the volume all of the way up playing the most intensive game I could get the Raspberry Pi Zero to play. Lastly, there is an opening above the batteries which you can see the board inside of the GPi case. It’s not for no reason, you have access to a USB port that enables firmware upgrading and according to some on the internet, file transferring. I wasn’t able to achieve the file movement myself, but I didn’t really try for very long. I also didn’t see a need to do a firmware upgrade as everything on the GPi case seemed to operate as advertised. - Durability. So now that we’ve covered all of the buttons and ports, it’s time to talk about the actual caseing. Now, I’m not an expert on plastics and polymers, I can still attest to the greatness of this. First off, I closed my eyes and ran my left-hand fingers on the GPi and my right-hand fingers on the original DMG and they feel the same in terms of texture. Additionally, I was able to put the GPi case in my back pocket and sit on it all day with no ill effects. Now, I can’t speak on the longevity of it if you were to do that. But I can say that if you accidentally do that once or twice, you’re probably not going to damage the device. I also dropped the GPi case at one point and it took a tumble down my carpeted 15 step staircase. It did survive that as well. Again, I’m not advising that everyone go bowling with their GPi, but if something happened to it, it should survive.
- Portability. Obviously, this thing is designed to mimic the OG Game Boy which revolutionized how we viewed gaming at the time. But I wanted to go into specifics. Sure, it’s modeled after a DMG, but it isn’t a 1:1 full size replica. What you have is something probably closer to 15% smaller than a DMG. However, I would still estimate that it’s larger than a Game Boy Color. It definitely has a thickness to it. So if you’re intending on buying this and you wear skinny jeans, it probably will not fit in your pockets.
- Ease of Use. This device is incredibly easy to assemble if you just want basic functionality out of it. And by that I mean if you know how to set up a Retro Pie already, then you just do that and then pop the Raspberry Pi Zero into this, run the .bat file for configuring the screen, and add ROMs accordingly. Yes it does get a bit more complicated if you want Safe Shutdown and need to set up wireless functionality from a Raspberry Pi W. But by the time you may buy one of these, there will be even more tutorials and guides out there. The manual it comes with has a bit of broken English that I tried to endure. It took me just finding a quick video and then I had a fully functional GPi working within 30 minutes. The best part of this whole endeavor is that there is absolutely no soldering or modding is necessary.
- Emulation. Now, when it comes to emulation, you’re of course using a Raspberry Pi Zero. While most of the 8 and 16-bit emulation is great on here, you’re not going to get much better than that from the Zero. This doesn’t matter at all because the emulators that do work on this device look like they’re meant to be on this device. I think that PS1, Saturn, and Dreamcast games would look out of place and why would you want to play those with this anyhow? I put all of my legally obtained Atari, NES, SNES, SMS, Genesis, Game Gear, Lynx, NGP, NGPC, GBA, GB, and GB color ROMs on here and literally had hundreds of games on the go.
- Price. The price is great, especially for the value. It’s as low as $70 at some places and as high as $80 at others. But no matter what, the sheer amount of value and quality this thing exudes is so much more than the cost that I feel like I should be giving Retroflag more money. Especially if you further compare it to other handhelds on the market right now. It’s just not even a question.
Cons:
With every good comes a few downsides. This device, while I love it, is not without its shortcomings. Bear with me here as I go through these frowns. We’re only talking about this because I love it so much and care about it and hope it improves.
- Comfort. At the end of the day, you all need to remember that this is a device based on the original Game Boy. It’s square in shape and while it’s corners are soft and rounded, they’re still not ergonomic. However, back in the day, this never used to matter too much. But now on the GPi, we have L and R buttons on the back. Now, the L and R buttons are welcome, but that they are harder to press at the height that they’re at and thus incite cramping. Games that require constant pressing of them will suddenly become unfun (Mario Kart Super Circuit). Normal, occasional presses of them, while inconvenient, will still not render your game annoying. This could all be resolved with a landscape form factor, but then it wouldn’t match the aesthetic and vibe. And while I know they didn’t have to give us L and R at all to make it look like a Game Boy, I’d like to see this readdressed in a future revision.
- Mono speaker. This is what it is. They had to match the original form factor and get the hardware just right. However, some of your favorite console games that never experienced mono sound will sound disappointing. Yes, you can resolve this by simply plugging in headphones and playing it. That’s what we all did when we were growing up with the Game Boy. But I feel as though they could’ve included a small hidden opening on the side or on the back for a second smaller speaker. However, one speaker does keep the cost down. I’m torn on this topic, but I feel like it’s definitely a downer.
- Safe Shutdown. This is a feature that works in tandem with the power switch on top of the GPi, but that’s the extent of it. Whenever you want to shut down, you simply flip the Switch and the Raspberry Pi Zero runs a safe shutdown protocol. So why is this a con? Well if you’re on the road playing this with batteries and aren’t plugged into a wall, you run the risk of the system simply shutting down on its own. The battery will start blinking at you to get your attention to power it down. Since it knows the battery is running low, it should simply start doing a safe shutdown protocol at that time instead of suggesting to you to do it. They should patch the script to let you choose to have it automatically execute the safe shutdown at 1, 3, or 5%. Or give you the choice to have it off entirely so you at least know what you’re getting a choice.
- 6 Button Layout.While I do think that it’s great that I can emulate Genesis titles (for example), this handheld has room and should add a 3rd face button to each row. This means we can play more titles more accurately. Sega Genesis games would be like playing with a 6 button controller instead of a 4 button and having to use the shoulder buttons. I don’t care if it adds cost or makes it look less like a DMG. If they can add 2 face buttons, they can have 6. This felt like a missed opportunity to me.

Final Thoughts:
This thing is pure magic. It’s a fully featured handheld with only a few minor shortcomings. Most, if not all could be overlooked. There is nothing about this that is unloveable. From the hardware to the ease of setup to the portability to the nostalgia factor to the freaking wow factor to the conversation piece of it all. This thing is a total romp for anyone who is into portable and retro gaming. While I would love to see this same love given to a horizontal handheld, I will take what I can get and spread the word!
Where to Buy:
If you’re interested, you’ll be sad to know that as of the writing of this article, this product is sold out pretty much everywhere. In lieu of this, I have found an Etsy seller who sources them and sells them in the US for $80! If this is intriguing to you, click the here to preorder for their July delivery. As I find more links or as these come back into stock, I’ll update this article. You can always watch the Amazon listing for it to see when it comes back into stock.