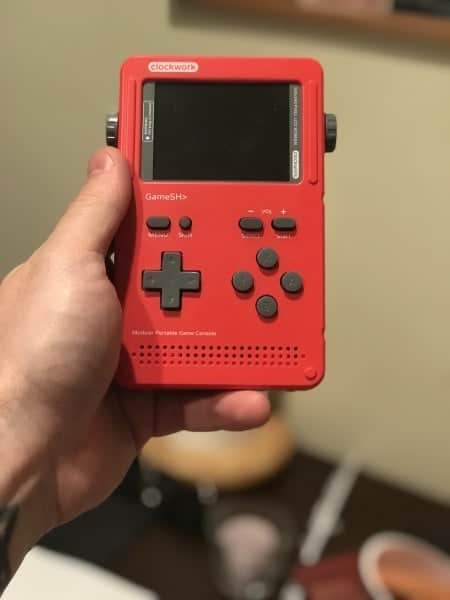
Some of you may remember when we talked about the Kickstarter for the GameShell. It’s a modular handheld that is also open source and thoroughly hackable. In fact, the hacking aspect is encouraged. It had a Kickstarter campaign of $50,000 and as of now they’re at 580% greater than their goal! This is something that I’ve been waiting for months to try out because just explaining it using their marketing terms doesn’t even truly begin to describe the experience!
Features:
- Free Independent Games
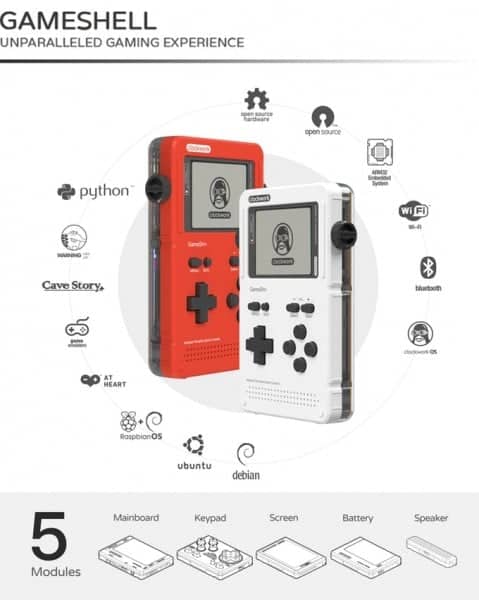
- GameShell uses the powerful LINUX operating system and every game published on it will be free, open-source and modifiable. We have included two classic games – Cave Story and DOOM1 in GameShell and there will be more free games included in future (Classic Hacx, Doom II, Chex Quest: Galatic Conflict, Strife, Heretic, Hexen).
- Emulator for Classic Console Games
- Like many of you, we loved Game Boy, NES and other consoles. We wanted to be able to revisit those classic favorites and refresh the experience in an easy and flexible way and GameShell is designed for that. You can add emulators for all of those classic consoles, install your favorite games, and play it anytime and anywhere.
- Create Your Own Games & Mods
- GameShell supports programming languages like preset C, Python, Lua, and LISP. You will be able to modify games and even create new ones as you wish.’
Commercial:
Unboxing Video:
Quality:
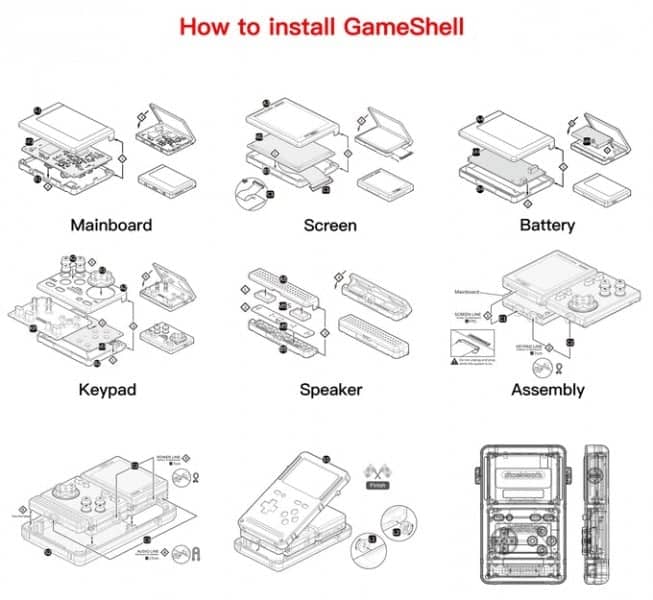
If you watch any of my videos down below in the ‘Ease of Construction’ section, you’ll see, that the quality here is divine. I think that the best way to do all of this is to talk about this product piece by piece. I think that breaking down the system and its parts the way that Clockwork has them makes the most sense. Now, there are actually a lot of pieces to this. And when you take it all out, you may be a bit overwhelmed. But, as we’ll talk about later, that part is relatively easy.
First off, we have the inside shells. These shells serve multiple purposes. Besides holding the sensitive components within them, they also have labeling. The labels inform you of the different ports and buttons as well. So besides just build quality, there is great print quality, and it’s quite thoughtful of them to help you out along the way. The shells themselves are made of a strong and sturdy plastic. The front half of the shell is a clear plastic and the back half of the shell is a more translucent plastic. When they’re closed completely, they not only protect the inside components from dust and scratching, but they also can withstand quite a bit of weight.
Aside from the shells, there are some cords that you’ll use later in the assembly. They’re measured to be the perfect length and you only get one of each. I do wish that they gave us some extras or at least had a pack of extras on their site. These will hold up well, but with the idea of these being opened and closed and messed with, it’s only a matter of time before something breaks.
The same can be said about the buttons. The face buttons, D-Pad, and side locks are the only ones in the set. They do not currently sell these products and that’s scary. I actually lost my X face button for a few hours because it bounced off. I’m not afraid of these products breaking as they too are made of sturdy plastic. The quality of these things is tremendously solid. What I’m ultimately afraid of is them going missing.
The screen and speakers are extremely high quality in terms of build quality. You’re not going to look at your retro handhelds the same way again. Because besides build quality, they’re also fantastic in the impeccably great department. The screen is absolutely crystal clear and even makes you feel like you’re not looking at a 2.7″ (320×240) surface. It appears larger than what it is since the frame rate is so high and it’s RGB, you really feel immersed. Could it be bigger? Sure, they have the bezel so large around it. Is it necessary to enlarge the screen though, no. It’s perfectly great the way that it is. And the speakers flow sound your way in a way that only lovely, crisp dual-channel stereo speakers can. I’m so glad that this device features stereo speakers, yet another reason to tuck this bad boy in your pocket.
Now we continue onto the GameShell’s battery. The battery itself is rated as a 1050 mAh battery. It looks to be a cell phone battery from way back when, but a surplus one as it appears brand new. This probably also means that maybe you can find compatible batteries with higher milliamp capacity and swap it in. If that’s not something that you want to do, you can always just keep a big battery bank handy. It really doesn’t take any time at all to charge this thing. You should also be aware that this doesn’t come with any micro USB cord for charging. The battery will probably last you just as long as a Nokia flip phone if you treat it properly (always let it drain completely, then always fully charge it).
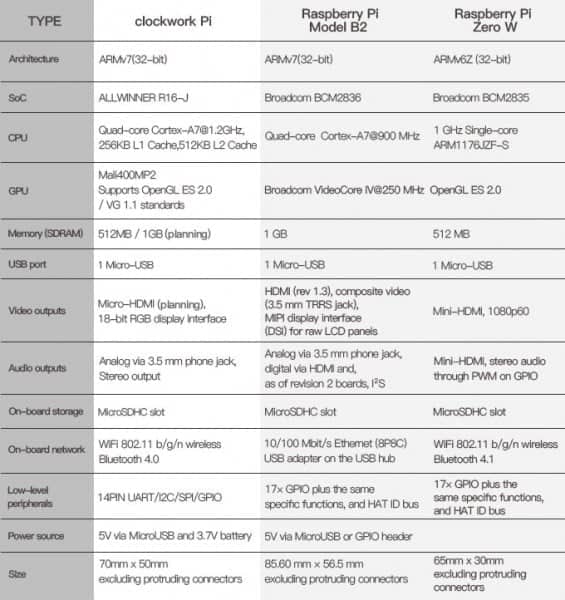
The last component in the GameShell is the brains of the operation, it’s the mainboard. It’s clearly some iteration inspired by other credit card sized computers. It’s sitting at 512MB of RAM and it’s ARM-based. It has all of the ports on the GameShell feature on its body meaning that all pieces plug directly into it as well as headphone jack and the micro USB cord for charging. The board itself also features a wifi chip as well as Bluetooth, stereo audio, PMU chips and an LCD video output. I realize I just said the same thing twice, but one sounded fancier and a more knowledgeable audience out there might appreciate it. It’s low and flat, unlike Raspberry Pi’s. It is more like a fatter Raspberry Pi Zero, though I feel that it could increase its RAM.

Ease of Construction:
As you’re about to see in the six videos below, it is not overly complicated to compile the plastic you receive into a working device. I have little to no knowledge about things of this nature. And while I was definitely apprehensive at first, I still worked through it all. You’ll see that even I have little to no problems after I realize that each step on the instructions follows a pattern. The videos below are of someone who is more experience with software than hardware. So you may be a little frustrated at first, like watching a someone try to read a paper map.
But! Unlike the map reader, I realize very quickly that it is actually quite easy. The ease of construction is so high and I clearly let go of my inhibitions. From the second video on you see that I start having a lot of fun with it and the videos are much shorter because it’s so very easy to assemble. So feel free to watch the videos below to see how easy the whole process truly is and see that even if you’re like me, that you shouldn’t worry!
Click the links below to watch my series on assembling the GameShell:
Ease of Loading Software:
This section is sort of a loaded one. It really comes down to if you’re wanting to create games for it and load them. Maybe you’re just looking to get homebrew that other people have made. Or perhaps you’re looking to just add some emulator cores to RetroArch. There are even ways to make your own modified version of the Clockwork Pi. There is truly a lot that you can do with the GameShell. You have a great resource in their forums, which I have linked to at the bottom of the page.
So the break down is this; if you want to make your own games, you will go down the same avenues you go down for Raspberry Pi developing. There will be a difference in the long run, but for all intents and purposes, you have a similar base. Let’s word it this way, if you have already made a homebrew game for Raspberry Pi, with slight tweaking it would work on the GameShell. All in all, you already know this device and how to load software onto it, even if you don’t own it yet.
If you’re wanting to get homebrew loaded up on here created by someone else (SOMEONE PLEASE MAKE A STEPMANIA PORT), it should be simple. The easiest way to do it is to use the built-in SCP (similar to FTP) feature that the GameShell has. So basically, make sure you have an SCP client, pop in your device’s IP address with a login and password of “cpi”. Then you will have to run some quick line execution commands. Pico8 is the big port right now, if you want to read the example for installing Pico8 from the people directly, click here. It’s definitely going to give you some insight. I would say that it’s something that is going to take practice if you haven’t done it before. It’s definitely not as easy as the next paragraph.
Looking to add cores to RetroArch? Well take solice in knowing that it’s basically the same as any other device or product you have running RetroArch. On the microSD card, inside of the config folder there is a RetroArch folder and inside of that there is a Cores folder. So you’ll use your SCP client again to open up that folder and place your core in there. There are a handful of cores right now as it is. Including, if you can believe it, a PSX core!
Just to touch on having your own modified Clockwork Pi, I haven’t seen anything about that just yet. I know that the GameShell would run it if someone made one. People have been using different Linux distros as well on it. But most of the documentation for the GameShell is using the default Clockwork Pi distro. So if you’re wanting to have answers about everything else, I wouldn’t dabble in creating your own OS for it unless you know what you’re doing and you know that nobody is really going to be able to help you! However, just like a Raspberry Pi, you can always just pop a different OS on there and nothing is ever truly bricked even if you create something that just doesn’t work.
Overall Thoughts:
The overall build at the very end cannot be said as a thoroughly ironed out product. The biggest takeaway for me is the buttons. The D-Pad and face buttons are strangely off. The whole thing went together easily and the outer shell goes on correctly with no issues. However, then when it comes to playing the device I found that my X and Y buttons get stuck down a lot. I’ve taken the shell apart, confirmed that the buttons are positioned correctly too.
After disassembling, checking it out and reassembling, I find that it is fine for about 5 minutes of play time and then it begins to happen again. It seems that no matter what I do, stuck buttons are an issue. If I push down on the shell in the very center of the device, they get stuck worse. If I squeeze it from the outside edges to make it bow a little, it doesn’t improve anything. I can’t find a rhyme or reason for this happening.
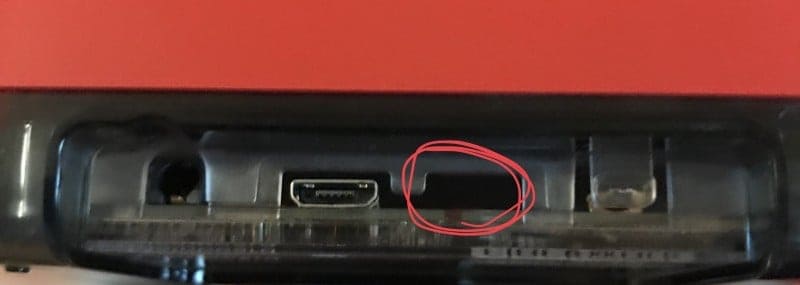
Other than that, I feel as though the Frankenstein’s Monster-esque studs on the outside are pretty ugly. I feel as though there could’ve been a cleaner way to have a device that could open and close. Maybe a small plastic hinge on one edge that swings open, it’s no worse than the studs and you don’t run the risk of losing anything either. The only other complaint with regards to the GameShell is this glaring oversight where they clearly intend(ed) on putting a mini HDMI output and haven’t yet. I don’t mean that I care about video output to an HDTV (because I do), I’m more concerned about the obvious and eventual dust that will make its way in there. Now I have to solve the problem if I want to avoid completely taking it apart to keep the dust out.
But all in all, the GameSehll got kick-started because it’s clearly a primarily well thought out device. It’s ultimately what gamers, tinkerers, modders, hackers, enthusiasts, and even newbies want. The GameShell is something that you can use out of the box if you’re someone who just wants to have something out of the ordinary. Or if you want, you can make it a truly unique and create games for it, deck it out with Legos and stickers (and it comes with a lot of them) and lighting mods. The only limit is your imagination…and maybe the 512MB of RAM.
There is a full blown forum set up to coincide with the hardware. People share their tweaks, their software, their ideas. Join them here!
If you’d like to buy one, click here to find out if they’re finally in the shipping stage!
If you like the author’s work, follow him on Twitter @V1RACY and don’t forget to enter the weekly giveaways!
And as always, stay tuned here on Hackinformer.com for so much more and follow us on Twitter @Hackinformer