WARNING ANY AND OR ALL DAMAGE TO YOUR PSVITA IS YOUR RESPONSIBILITY NOT MINE!!
Hey guys, it’s me again. I had some free time on my hands so I decided to try out a speaker mod for the psvita. Credit goes to this youtube
I simply saw what he did and tweaked it a bit. This is my version of the psvita speaker mod. The tools you’ll be needing are as follows:
psp speakers
-a soldering iron
-solder
-an electric drill
-a 3/32″ drill bit
-super glue
-30 gauge solid core wire
-Wire strippers
-Pliers
-Wire cutters
Step 1: Getting the back out-once you have disassembled your vita and disconnected the battery and the rear connections you should be meet with this.
As you can see the 3g has a bit more space in the back panel than the wifi version. This was done to make space for the 3G sim carder and module. I however have removed both because they are utterly useless.
Step 2: Connecting the speakers to the wires. This step is quite easy, you’ll need your soldering iron, solder, wire cutters, 30 gauge wire and psp speaker. What you want to do is now is get your 30 gauge wire cut and stripped, as always you wanna measure the distance between the psvita speaker and the area you are going to place the speaker in. This way you will know exactly how much wire to cut. After you’ve done that you wanna get your soldering iron and dab a small bit of solder on there, place your wire on top of the psp speaker as I’ve shown and solder it. Repeat this step for the other speaker. As you can see i cut my wires fairly long and trim them up if i need to later on.
Step 3: Removing the casting and drilling the holes- if you’re working with the 3g model you are in luck because 50% of the work has been done for you. As you can see in the pictures below the 3g’s left side has been empited while the wifi left side has a lot of grooves to deal with. If you have the wifi version it is time to get your pliers and start twisting and pulling the plastic grooves off. You wanna concentrate on the area i highlighted.
The right side of the wifi version is identical to the left, you will have to be pulling apart a small section to allow the other psp speaker to sit comfortably.
The 3g’s right side is removable which is so cool! Regardless of what version you have the pliers will have to be used to pull and twist the plastic grooves out. Take your time with this step.
Once this is taken care of that, you want to get out your drill and attach the drill bit. You’ll want to drill the area where you’ll be placing the speakers and remove the extra material that will form around the hole. Repeat this step for the opposite side.
Step 4: Applying the super glue to the speakers- What you wanna do here is apply the super glue completely around the black ring of the psp speaker like so:
Once you’ve done this you want to quickly place each psp speaker in their respective spots and wait for the glue to dry completely.
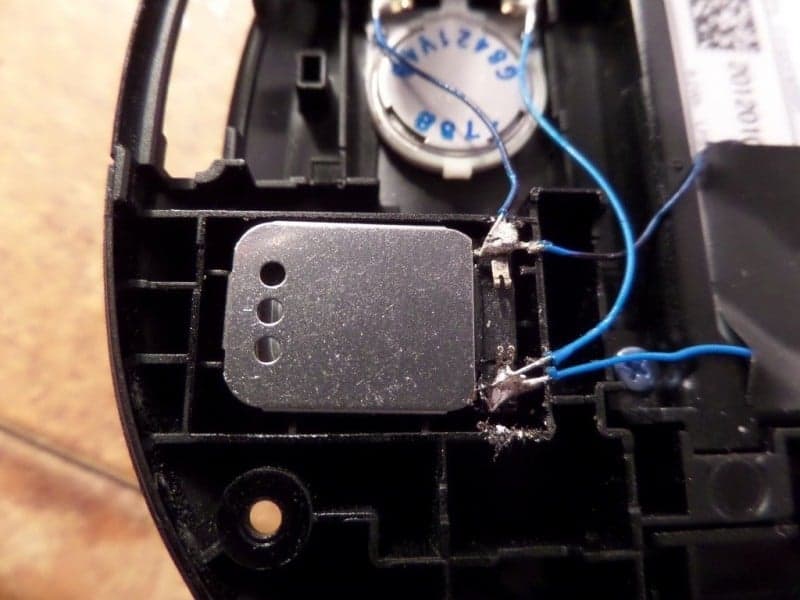
Step 5: Soldering to the psvita speakers- Now that the speakers are held in place, you simply have to solder the wires to the psvita speakers as pictured below. Remember not to put blobs of solder on these prongs because they NEED to make contact with the daughterboards in order for the sound to be active. Just use small dabs until you get it right:
That’s all there is too it, put your vita back together and enjoy your new sound system :D! Thanks for checking this out, I’ll see ya next time.
You can follow me on twitter @Bl4ckmonkey1


