After being gone for quite a while, I’m back with a new review! This go around, we will look at the keyboard that Rocket City Keyboards built for me. It’s going to be an unconventional review due to the fact that I’m going to be reviewing a keyboard, but also the customization process that Rocket City Keyboards uses. I’ll have shots of all kinds of custom keyboards they’ve made too, along with a video of the one they built for me. Anyway, let’s get into it, shall we?
Description:
Features:
These are going to vary depending on the keyboard you get, but I’m going to list the features of the keyboard base that I ended up getting.
- 1800 Compact Layout
- Dye-sub Technique & Cherry Profile
- Advanced Gasket Design
- Versatile Tri-Mode Connectivity
- Amazing RGB Backlight Effects & South-facing LEDs
- Triple Connectivity Modes
- Full Key Hot Swappable Sockets
Unboxing:
Pros:
Design-First off, let’s start with the designing process that Rocket City Retro went through with me. They first introduced themselves as Jackson and broadly asked me what kind of keyboard I was interested in. I used pictures and videos that they had uploaded to get it narrowed down to my style. Beige with neutral tones, not a total throw back, but nothing gaudy either. I also mentioned how it was important to me and my day to day typing to have a 9-key number pad built in. Furthermore, I used the reference point of one of his pictures that had large letters, but I didn’t care for the transparent nature of the keys. Jackson was even able to make something from scratch for those wondering if you have to choose something from stock he may already have. And on top of that, the turnaround time was quick!
Feel-Discussing the sound and “thump” of the keys is far more difficult of a task to share with you. I can tell you that he really, really narrowed down what I was looking for. He said, “What do you want it to sound like? Deeper? higher pitched? Do you want there to be a bump when you type (tactile switch) or do you want to be able to game with extreme speed (linear switch)? I suggest looking up YouTube videos of switch sound tests.” These were all options that I had no idea even existed, so I quickly found a short YouTube video that let me hear the differences. After I told him my switch of choice, he further asked “Do you want a heavy press with a big bump or a light press with a smaller bump?”. This, again, has never crossed my mind, so I told him which one made the most sense to me. Now, you’ve likely already watched my initial impressions in the video, but if not, just know that I was absolutely flabbergasted at how it sounds and feels exactly what I was aiming for! I don’t think I ever would’ve gotten that on my first try and would’ve wasted time, effort, and maybe even money.
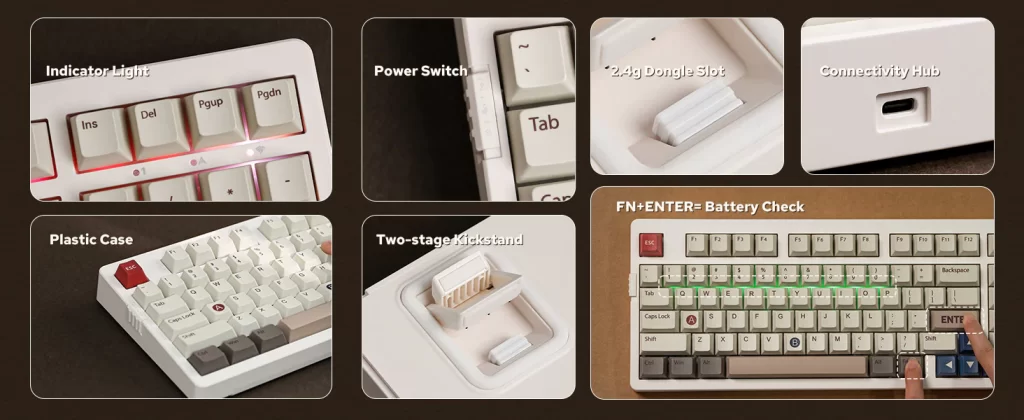
Build-Now you’ll notice that in the video, the biggest reaction I had was at the weight of the keyboard. I’m not entirely certain what the internals look like, I’m not going to disassemble it. But I will say it’s so much heavier than keyboards of my past! I’m so used to lightweight, maybe even hollow, plasticy keyboards. Now don’t get me wrong, this keyboard is clearly constructed of plastic. The difference being that it’s not a cheap, brittle or even flimsy plastic. It’s very solid and has a nice texture to the surface. And ultimately, the plastic body is the clearly weighted down by something in the internals. I’m not sure if there’s a metal skeleton within it or if they put weights in, but I’m certain it’s the heaviest keyboard I’ve owned. Because of that, it feels premium and durable to me. The other part of the build that I find interested is the LED display modes. This is something that I typically keep turned off so that I don’t get distracted. But one way that the manufacturer of the keyboard uses the LEDs to great effect is by using them as a big battery indicator. See the picture down below the “Modes” section a little further down in this article.
Mod-Keen eyed viewers of my unboxing will know that I was pulling some fuzz out of the corner of the keyboard. It had gotten bonked open in transit and I found that it had some fluff coming out. I pulled out the strands and snapped the keyboard back shut. But it was definitely confusing to me because I don’t know of any hardware manufacturer who adds cotton to the internals of their product. But, I certainly didn’t dwell on it too much, I thought it was some fuzz from the shipping process. However, Jackson did see my unboxing video and he did take the time to explain to me what the cotton was all about.
He said clearly and honestly, “So the tuft you were pulling out is some leftover cotton from me modding the board. So what I did was something called a tape mod where I go into the board and put tape in the back of the PCB to give it a poppier sound. Then, to deaden the noise, I stuffed as much cotton as I could into the remaining space. It seems that the keyboard was opened in transit and you got to kind of see behind the magician’s curtain there.” It sounds strange, but he’s doing it for part of the cost and not charging anything extra for doing so!
For those wondering about the mod itself, it seems that it’s something that is popular recently. I looked into it a bit after he told me about it. I won’t get distracted and go into how it works, but if you already have a keyboard and want to try it out yourself, I found a whole article about it for you. But bottom line, if it’s what is adding to the sounds of the keyboard to make it sound cooler, I’m all about it!
Battery Life-Man, I was waiting for this battery to die so that I could make this review, but honestly, it’s a moot point. This keyboard is used off and on across 8 hours every day. It’s been about 2 weeks of testing and I really am tired of waiting on making this review. The whole purpose is to make sure everyone who reads this article has time before Christmas to put in a custom keyboard order. So having said that, the point I’m driving at here is that the battery is still relatively full and it’s been used for 2 weeks straight. The thing that you have to remember is that in order to maximize the battery life, you should make sure that you turn it to a different mode than the wireless mode that you’re using it in. Be aware that I don’t have a way to test if Bluetooth uses more battery than the 2.4Ghz mode as I don’t have a Bluetooth receiver on my PC.
Modes-And what a perfect segue to the next section, MODES! This specific keyboard has three modes on board, there is wired via USB-C to the PC. Or you also have the option to do 2.4Ghz with the included USB dongle adapter. Finally, you can do Bluetooth connectivity if you have a compatible receiving device like a PC and likely even a newer iPad. To swap between the three of them, there is a slider that moves up and down, located by the left Tab button. The middle setting is off or wired USB-C, but it uses no power, so you can consider it “Off” in that setting. The top option and bottom option are the two wireless options, so that you don’t accidentally switch them or get them confused. Additionally, you can use the keyboard over USB-C while it’s charging. I likely won’t keep doing wireless going forward, just because I don’t like to worry about whether devices are charged or not. Finally, for those wondering, there is no noticeable latency when playing the games I tested. The ultimate test was Stepmania, where the keyboard must be perfectly synced.
Turn Around Time-With regards to the time it took to do all of this, I was honestly astounded. I thought we were looking at 1-2 weeks to do this all. The process for me working with him to narrow down what I wanted took less than an hour on its own. He was quick with the questions and had options that he could show examples of right off the bat. For making a new keyboard from scratch, which is what he had to do for me, he had it done the same week. This is due to the fact that he sources supplies from Amazon, which is always fast. And then, sending it a standard speed from Alabama to here in Kansas City, it didn’t take very long at all either. I was very impressed how he was able to juggle every element and be professional and courteous. That’s why I like reviewing products from small businesses such as Rocket City Keyboards, you just don’t get these amenities from big businesses.
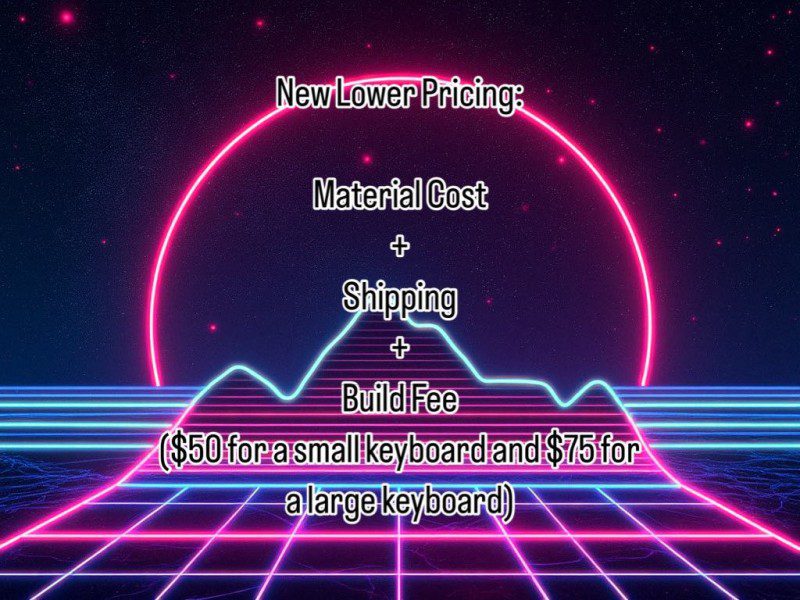
Cost-Below is the price breakdown for you to look over. If it’s all a bit too confusing, I got Jackson to share with me that the lowest cost for a fully customized and designed keyboard is $175. Now, God knows that being the starting price for a keyboard sounds like a lot. However, I think it makes legitimate sense when you stop and actually consider your bottom dollar. If you think about the fact that you may save money now but lose money in the long run, you’ll appreciate the prices.
Imagine you do it yourself and end up doing it wrong. And now you are stuck with a keyboard that upsets you for years to come. All in all, it makes sense to have someone build it out for you to the spec that you desire and get it done right the first time. Especially if it’s as fast and accurate as I’m describing to you. The same is true if the purpose of the keyboard is a gift for a friend or loved one.
Cons:
Shipping-This was packaged and shipped to me similarly to the same way that Amazon packs and ships. The difference being that if there is damage in transit, that Amazon doesn’t care, they’ll just replace the item as long as you send back the damaged one. I would like to see Rocket City Keyboards take the time to find a oblong shipping box to put the keyboard box into and ship it that way. Double boxing is the ideal way to ship things that have the ability to be cracked, chipped, or snapped like hard plastics do.
The reason that this even came into my mind was the fact that, as you see in the video, the corner of the keyboard had clearly taken a hit in transit. This caused the corner of the keyboard to come open and expose the internals. I got lucky that it snapped back together, but you may not be so lucky. Yes, when shipping has damages, you can file a claim, but if it’s packed incorrectly, the couriers will pay nothing and that hurts small businesses. So I hope they take this as a learning experience so they can grow even larger as a company!
Final Thoughts:
Honestly, I may get another keyboard from them for my partner. She’s envious of it after helping me record my typing segments of the video. All in all, I was surprised with how simple RCK made the whole process. They didn’t treat me like I was stupid, but they gave me explanations with each question so that I understood what they were ultimately asking. The need to get the keyboard perfectly correct before sending it out is key. If you’re looking for a keyboard and don’t know where to start, they don’t charge you anything just to have a conversation about what it is you’re looking for and they often have examples on hand that they can show you to help your decision making process easier. So click the link down below and message them now (Facebook required)!


