We’ve all seen our fair share of ways to make old school, retro games look good in a modern age. From OSSC to Framemeister to even just playing them on the Super NT or newer clone system. In this day and age, we have an obvious love of the old and need to play it on the new. Well today, we’re going to talk about 2 products that could help you with your newer TV’s and even with your older TV’s if you so desire. We’re looking at the Retrotink Ultimate and the Retrotink 2!
About the Creator, Mike Chi:
‘I’m an old school electrical engineer and gamer. My real job is running a startup designing mobile, wearable brain imaging (EEG) headsets. Our products are used in university and private research laboratories around the world with the goal of eventually enabling medical applications of our technology.
However, audio, video equipment, and gaming will always be a hobby of mine. I learned electronics as a kid hacking radios and TV circuits. After a 15 year hiatus from gaming, I’m really happy to see that there are still people out there that appreciate older technology.’
Retrotink Ultimate Specs:

Base Model/Specifications:
- Integrated 24-bit video DAC for superior quality over discrete resistors
- Low-noise voltage regulator
- Microprocessor controlled sync generation – perfect horizontal slices during vertical sync means no AFC PLL errors
- DB-15 VGA connector:
- RGB
- Supports 240p, 480p and custom timings
- Selectable sync mode: TTL HV or 1V CSYNC
- 75 ohm termination
Optional Component Video:
- Everything in the base model
- RGB to YPbPr transcoder
- 3x RCA connector:
- Sync on luma
- Supports 240p, 480p and custom timings
- 75 ohm termination
Optional NTSC:
- Everything in the base model
- RGB to CVBS and Y/C encoder
- CVBS on RCA
- Y/C on DIN-4
You can do both Component and NTSC:
- All of the above
- All outputs can be used at the same time (in 240p mode)
Retrotink 2X Specs:
- Specifications:
- Video inputs: component, S-video and composite
- Video formats: 240p/480i, 288i/576i, NTSC and PAL color
- Video sync recovery and regeneration for non-standard sources (e.g., SNES)
- Output: miniHDMI at 480p/576p (line-doubled mode) or input resolution (pass-thru mode)
- Audio: 24-bit stereo
- Power: microUSB
- Ultra-low latency: less than 5 scanlines (83 microseconds)
- Optional smoothing filter
- Plexi-glass enclosure
Build Quality:
I’m going to kick this section off by talking about the Retrotink Ultimate since it came first and is currently (at the time of this writing) is actively available. The Retrotink Ultimate is more of a dedicated video outputting device for Raspberry Pi. It’s for those of us who have our Raspberry Pi set up for RetroPie. The idea here is that the device can output the signal to be more RGB and less of the modern digital look that you get from standard HDMI out of the Raspberry Pi. This, on a CRT, will give you the glamorous look of vintage gaming through modern means. So it’s sort of the opposite of what the Retrotink 2X is out to do. The Retrotink 2X is a way to have retro style screen representation while playing your retro consoles on newer TV’s.
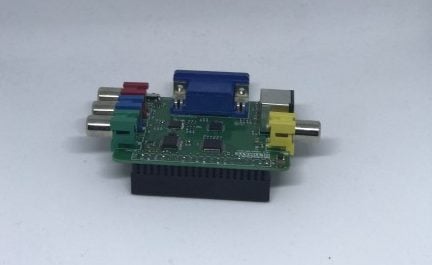
Going around the device, you’ll see that there are several ports and a switch. The outputs that are on the board are component, composite, and VGA. You’ll see on the underside of the device where it has the female PATA connector. This is so that you can fit it nicely onto the Raspberry Pi. Be gentle if you’re placing this onto your Pi as there are also solder points on the bottom. These could potentially break or touch something that you don’t want it to on the Pi. It goes without saying that the Pi should be completely powered down whilst merging the two devices. It’s also worth noting that the Retrotink Ultimate makes your Raspberry Pi taller and thicker. This will require that you either leave your Raspberry Pi naked or you have to create your own case for it.
Aside from all of that, the only part that is left is the small switch on the side of the board where you’ll find the VGA out. The two options that are associated with the switch are “HV” and “CSync”. These are both terms that usually come hand in hand when people are talking about RGB setups, so it’s no surprise that you’ll find them present. The HV on the switch stands for Horizontal and Vertical. The other is Composite Sync. I won’t go into the differences here. I’m mainly bringing up this switch as it’s on the board and adds to the brilliantly beautiful build quality. Click this picture to follow directions to set up your Pi to work with Retrotink Ultimate
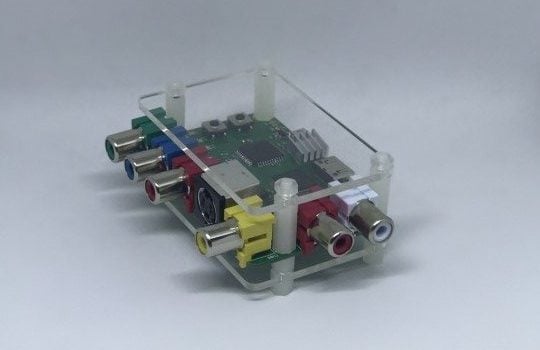
Now let’s discuss the build quality of the Retrotink 2X. The heatsink on the Retrotink 2X that I was sent doesn’t want to stay flush with the board. But this unit is also a prototype one sent out for review. I wouldn’t read too much into it, but I wouldn’t be doing my job if I didn’t mention it at all. The rest of the ports, plugs, and such are all firmly seated in place. And I have to say, this thing is a beautiful piece of kit. The Retrotink 2X has inputs for composite, component, and S-Video and then outputs to HDMI with a resolution of 480p.
There is an acrylic case on the unit itself. You could theoretically create your own after you receive the item if you want it to be different. 3D printing always helps us in the gaming community more than we thought it would. The small nuts on the plastic bolts holding the cast together do slip around a little bit. You could always take them off (one at a time) and put a dab of super glue in the threads and then hastily stick it back on. This would keep them from moving, but then again, it will barely be an issue if you never touch the Retrotink 2X.
There are a couple of more downsides here, but before I get into them, just know that I’m aware that this is still a prototype board. There are two tack switches on the far opposite end of the Retrotink 2X. They’re not hard to reach, but they’re not convenient if you have larger fingers. Unfortunately, you have to cycle through them pretty often. The only exclusion to that is if you buy the Retrotink 2X just for one device and then you find your favorite settings. One button is for parsing through the different inputs. The other button is for cycling through the different video options.
The other downside is that the device is only purchasable without cords. You have no option on the site to add in a mini-HDMI cord and a micro-USB power supply. The latter is generally something that most people have, but the former always seems to be hard to find in local stores. Lastly, the board says revision 3.0 on it, so I’m not certain if there will be any more improvements along the way or if this is the final version of the device.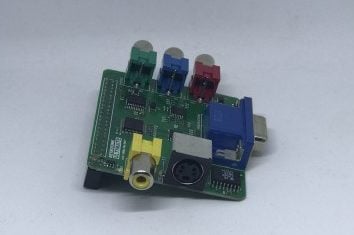
Pricing:

Please note that we aren’t comparing the two devices in terms of cost. They both set out to do different things. As I said before the Retrotink Ultimate is for the Raspberry Pi (2/3/Zero). The Retrotink 2x’s title comes from the fact that it can double the lines on the screen as it is primarily a line doubler. Even more so, it sets out to do so with a low latency.
Now with that clarified, let’s go over the pricing options that exist for the Retrotink Ultimate first. The Retrotink Ultimate is built on top of previous generations of Retrotink. None of those exist any longer, he only has the Ultimate on his site. So here is the basic breakdown for the Ultimate, these do not come with video cords or micro USB power supply:
Base Model:
- $60 + shipping
Base Model Plus Component Video:
- $75 + shipping
Base Model Plus NTSC:
- $85 + shipping
Base Model Plus Component and NTSC:
- $95 + shipping
The price for the Retrotink 2X is less expensive than some other upscalers or OSSC for example. Just remember that you will have to buy your own miniHDMI cord as well as a microUSB power supply. That will definitely increase the cost of the device overall. But it still won’t bring it up to the cost of those other devices. Additionally, you have to remember that the device isn’t supposed to compete with those other devices. It has less features, but it focuses on what it does and does it well.
Retrotink 2X:
At the time of writing this article, the Retrotink site is out of its initial run of 50 units. The first run of them started at a little bit higher of a cost than what he plans to do in the future. The initial price was $110 plus shipping and handling. In the future, when the next run occurs it will hopefully be done through distributors. This will mean higher quantities and, as I mentioned, lower costs! We’ll update this article accordingly when more are available with the future price point.
Lastly, there is no option to buy in bulk. There are people out there with multiple TV’s and/or multiple devices to hook up into these 2X units. The same goes with having multiple Raspberry Pi’s that you would need multiple Retrotink Ultimates for. I believe that there should be a reward for those people who want to buy multiple units.
Retrotink Ultimate-Demonstration Video (compliments of creator Mike Chi):
I think that this Retrotink Ultimate is the bee’s knees. It’s a one of a kind device for sure. It isn’t so bad for the pricing if you just stick with the base model. That will maybe be more justifiable on your wallet. However, I can say confidently that you will not regret it if you pick up the $95 setup. Now, I am aware that a Raspberry Pi and all of its other accessories probably don’t even total up to that. But if you’re serious about getting an RGB gaming, this is the cheaper way to go overall.
You have to remember that the alternative is to buy all of the video game systems first. Then get the games that you want. Last, of all, you’d have to pay to RGB mod all of those systems. You’re looking at thousands of dollars and that’s true cost, not an exaggeration. If RGB and other great outputs aren’t your thing, then again, I really suggest the base model at the very least.
Retrotink 2 Gameplay Demonstration Video (my capture card bit the dust, had to record the screen with a camera):
It does indeed provide line doubling with low latency. It did the analog to digital conversion that the HDTV would normally have to do and makes it play practically on par with a CRT television. But does it warrant spending that much more than the $30-$60 upscalers you see on eBay? Well, as you see in the video, the line doubling does smooth things out for sure. I tried to make the video short so that you could watch it again and again, trying to pick out the differences.
In the video, you’ll notice that I did not label the difference between the passthrough mode and the upscaled modes. You’d be hard-pressed to be able to tell the difference between the modes since they aren’t noted. The further you are away from it, the more likely you are to really not notice a difference. I think that having an upscaler is important with an HDTV. But unless these do indeed come down in price as promised, it may be hard to recommend them unless you have multiple inputs you want to do at once. Below is a video (again from Mike Chi due to my temporary technical difficulties) that may help you out more.
To purchase the Retrotink Ultimate, click here (scroll down a little on his page). You can use the same link to see if the Retrotink 2 pre-orders are active again.
If you want to read over everything before purchasing, click here.
If you like the author’s work, follow him on Twitter @V1RACY and don’t forget to enter the weekly giveaways!
And as always, stay tuned here on Hackinformer.com for so much more and follow us on Twitter @Hackinformer