We are all more than aware by now that the hakchi software from Cluster_M was a godsend to both the NES Classic and the SNES Classic. For those who aren’t aware, I have a quick history lesson. You can add more ROMs to your systems! So, the NES Classic easily fit the entire collection of NES games on it. The SNES Classic fit maybe all of your personal library or all of the fan favorites. However, if you wanted more, you most likely weren’t going to get it all as the SNES Classic has onboard memory topping out in 512MB. Obviously, some of that needs to be save space as well. But now, now we have USB-Host built into hakchi CE (from TeamShinkansen) to help us expand our storage using none other than USB storage! Scroll down, I’ll explain it to you.

First, a Really Quick Disclaimer:
It’s worth noting that all of the software and the processes are still new. All should work for you if you follow instructions correctly. However, Hackinformer is in no way responsible for a bricked console or any other issues that could potentially occur if you decide to follow this tutorial.
Okay, Here is What You’ll Need to Get Started:
1.You’ll have to have an OTG USB adapter. The smaller the better (you’re dealing with a tight space).
2.You will also need the newest version of hakchi CE, go ahead and extract it and have it ready.
3.IF and only if you already have some sort of hakchi installed on the SNES Classic already, you’ll need to uninstall it. Do the following, you won’t lose saves.
(In haxchi 2 go to Kernel > Flash original kernel and hit Yes, then follow on-screen instructions. Then, Kernel > Uninstall and hit Yes. Now, go copy the “config” and “games_snes” folder from your hakchi2 folder into the hakchi CE folder assuming you want those same games.)

Official Instructions:
- First, you can open the new hakchi CE folder, run hakchi.exe. It will prompt you to choose your specific NES/SNES model.
- Now head over to Kernel > Dump kernel then you’ll press Yes.
- Following the on-screen instructions, you will now connect the device to your PC.
- Go to Kernel > Flash custom kernel and choose Yes.
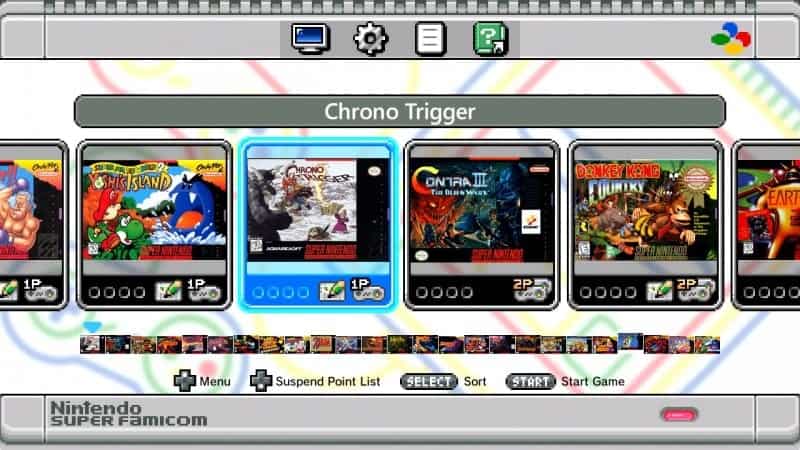
- You can actually test that it worked. Simply hook it up to your TV and power it on, you’ll have the hakchi splash show up first (picture 1) and then it will show the 21 normal games.
- If that worked out, move onto step 7. If not, start over from step 1.
- Now it’s time to connect your USB drive of choice to the PC. Plug it in, right click, go to Format, then do a Quick Format with NTFS chosen.
- Now that it’s formatted, make a folder on it simply titled “hakchi” without quotes of course.
- Inside of that hakchi folder, make a folder titled “games”. You can optionally add box art. Follow the same steps we discussed in this hakchi 2 guide.
- Back in hakchi CE, press the Add more games button and add the ROMs that you want.
- Once that’s complete, simply press Export Games.
- It will let you select the “games” folder that you made back on step 9.
- Press OK and it will export all of the games to that USB drive.
- Now, the moment of truth. Plug your OTG USB adapter to the micro-USB port onto the back of the SNES or NES Classic you flashed. Now connect the power cable to the micro-USB port on the side of the OTG USB adapter. Then, simply plug your USB that has the games on it into the USB port on the back of the OTG USB adapter.
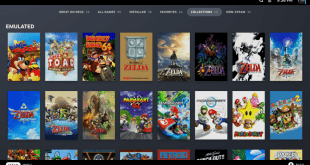
- Power on your NES/SNES Classic and you should see all of the games from the USB! (picture 2)
Stay tuned here on Hackinformer.com and follow us on Twitter @Hackinformer
If you like the author and his work follow him on Twitter as well @V1RACY